
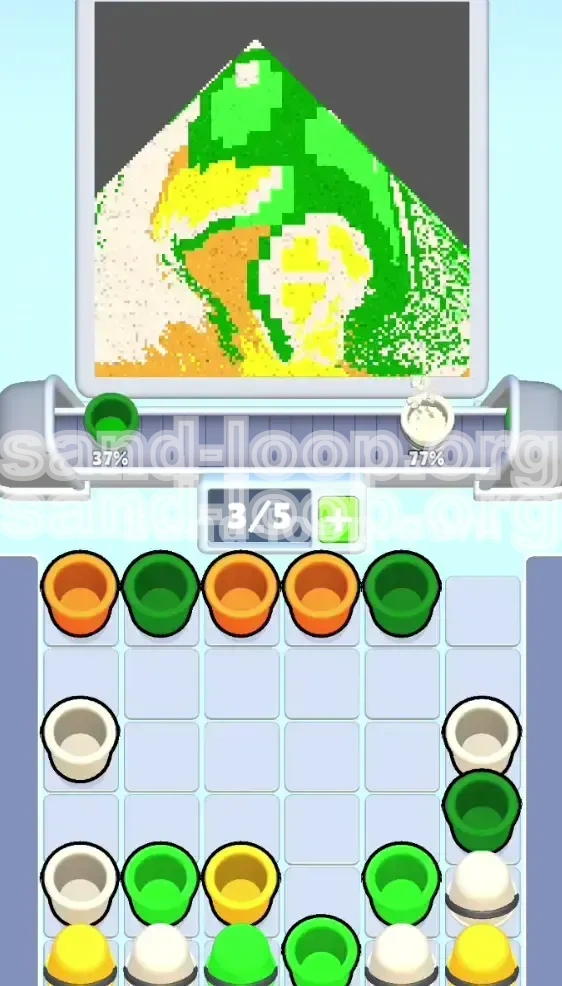
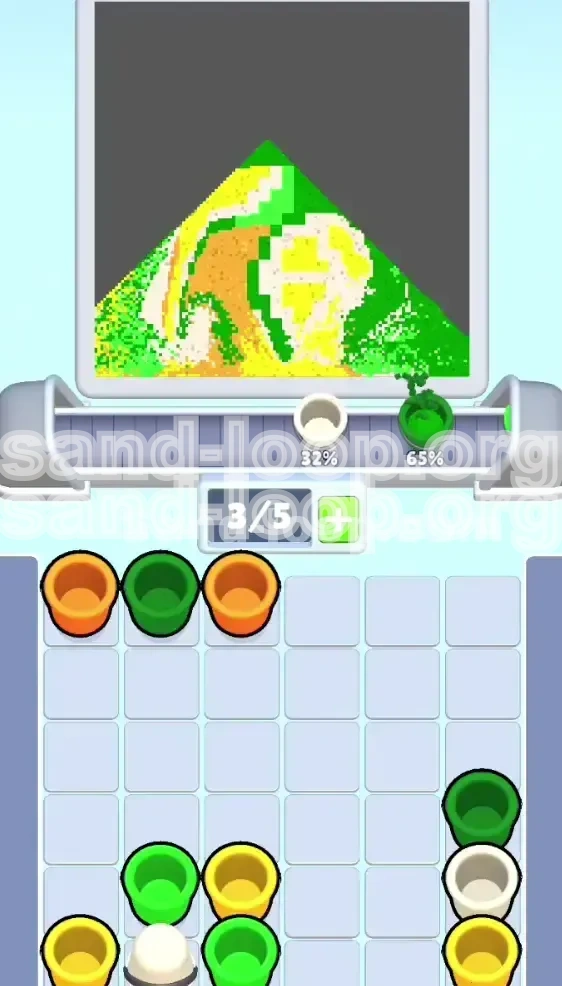
Level 193
HARDHow to solve Sand Loop level 193? Get instant solution for Sand Loop 193 with our step by step solution & video walkthrough. Sand Loop 193 tips and guide.
Play Sand Loop Now
Experience the puzzle challenge firsthand
Game Screenshots


Sand Loop Level Guides
Sand Loop Level 193 Walkthrough: The Citrus Strategy Guide
Level Overview and Core Concept
Level 193 in Sand Loop is visually deceptive. While the pixel art depicts a cheerful arrangement of lemons and limes, the underlying logic is one of the most challenging "excavation" puzzles in the game. This level is not about speed; it is about strict inventory management and vertical color sorting. The defining feature is the "Buried Palette" mechanic, where the colors you need most (White and Yellow) are trapped at the bottom of the tray by an excess of background colors (Orange and Dark Green).
The Strategic Bottleneck
The primary obstacle in this stage is the strict 5-slot conveyor belt limit. Because the Orange background cups occupy roughly 60% of the top layer, you are forced to process them first. This creates a timing bottleneck: you must clear the "garbage" colors efficiently without clogging your belt, ensuring you have space available when the rare, high-priority colors (White/Yellow) are finally excavated from the lower rows.
Win Condition Requirements
To achieve a three-star rating and clear this level, you must avoid "deadlocking" your tray. A deadlock occurs when your conveyor belt is full (5/5 slots), and the only available moves are cups blocked by other cups. Success relies on maintaining at least one open slot on the belt at all times during the mid-game excavation phase.
Difficulty Analysis
This level ranks as a 7/10 in difficulty. It requires patience. The first 10 moves are scripted, but moves 15-25 determine success or failure. The pixel density of the White "pith" lines is low (less than 5% of the canvas), meaning missing even one White cup due to a full belt can force a restart.
The Mental Model
Approach this level as a miner, not a painter. You are digging down through the earth (Orange/Green) to find the gems (White/Yellow). If you focus on the painting too early, you will fill your belt with the wrong colors. Keep your eyes on the cup availability, not the canvas completion percentage.
Mission Objectives and Color Priority
Primary Objective: The White Pith Protocol
Your most critical objective is to secure and deploy the White cups. In this level, White represents the pith (the inner skin) of the citrus fruit. These lines are thin and unforgiving. There are only 3 White cups in the entire deck, buried deep in Columns 1, 2, and 6. If you accidentally pour a White cup into an Orange zone, or if you fail to pour it because your belt is full, you likely cannot recover.
Secondary Objective: The Lemon Pulp (Yellow)
Yellow is the "fuel" for the bottom half of the image. While more abundant than White, Yellow cups are buried under layers of Dark Green. You must prioritize freeing these cups immediately after the initial Orange purge. Do not leave Yellow cups sitting on the tray while you work on Green details.
Tertiary Objective: Background Excavation (Orange)
Orange is the "blocker" color. It constitutes approximately 50% of the total cup count. Your goal with Orange is simply to get rid of it. Pour Orange cups as soon as they appear to clear the top rows of the tray. Do not try to "save" them for neat background filling; they are obstacles preventing you from reaching the critical colors below.
Quaternary Objective: Structural Definition (Dark & Bright Green)
The Dark Green (rinds) and Bright Green (lime pulp) are support colors. They fill about 30% of the canvas. Use these colors to reset your rhythm when your belt is empty, but never prioritize them over White or Yellow.
The Capacity Management Goal
Maintain a "3+1" rhythm. Keep 3 cups actively processing on the belt, and leave 1 slot open as a buffer for emergency excavations. The 5th slot should only be filled when you are 100% certain the next cup in the sequence matches the available space.
Phase 1: The Excavation (Opening Moves)
Steps 1-5: The Top-Layer Purge
As the level begins, scan the top row of the tray. You will see a pattern of Orange and Dark Green cups. Do not analyze the canvas yet. Immediately tap all accessible Orange cups in the top row. This usually includes Column 1, 3, 4, and 6. Your goal here is mechanical removal—dropping the stack down to reveal the middle layer.
Steps 6-10: The Rind Outlining
Once the top Oranges are gone, you will see Dark Green cups exposed. Tap 2-3 Dark Green cups to start defining the outer edges of the fruits. However, stop immediately if you see a White or Yellow cup peeking out from underneath a Green stack. Do not pour the Green if it blocks access to a higher priority color.
Managing the First Belt Jam
By move 10, your conveyor belt will likely have 3 Orange cups and 1 Green cup sitting on it. This is dangerous. Do not tap more cups until the first Orange cup has finished pouring. You must wait for the "slot release" audio cue before tapping the next layer. Patience here prevents the soft-lock.
Identifying the "Buried" Whites
Look closely at Columns 1 and 2. As the Orange stack decreases, you will spot the White cups usually sitting 3 layers down. This is your target. Shift your entire focus to these columns. Stop pouring Oranges from other columns if you have enough space to start digging for the Whites.
The Precise Unblocking Sequence
If a White cup is blocked by a Dark Green cup, and that Green is blocked by an Orange, you must clear that specific vertical stack first. Ignore the rest of the board. Clear column 1 entirely until the White cup is the top card. This "vertical focus" is the key to solving the Buried Palette problem.
Phase 2: The Critical Processing (Mid-Game)
The White Cup Window
This is the most volatile phase of the level. You have successfully unearthed the White cups. Now you must pour them. The canvas has very few White pixels, so these pours are quick. Watch the scanner closely. As soon as the White cup is done, remove it from the belt. Do not let it linger.
Why White Must Come First
The White lines in the fruit act as borders. If you pour Yellow (lemon pulp) before the White borders, the Yellow will bleed into the White areas. Since Yellow is abundant and White is scarce, always pour the White cup the moment it enters the active slot. Never let a White cup wait on the belt while you pour a Yellow.
The Yellow/Blue (Lime) Alternation
With the White lines established, you are now dealing with Yellow and Bright Green. These colors occupy the center of the fruits. Alternate your taps: One Yellow, One Bright Green. This prevents the scanner from confusing similar color tones and keeps the belt balanced. If you pour three Yellows in a row, you risk overfilling the specific fruit segment.
Monitoring Tray Capacity
In this phase, the tray is a mix of empty columns and deep stacks. Keep your belt at 3/5 capacity maximum. You need 2 empty slots to handle the "fallout" from clearing the remaining Green cups. If you hit 5/5 capacity here, you are forced to wait, and waiting wastes valuable seconds needed to align the final pours.
Dealing with Stray Greens
You will find leftover Dark Green cups that are needed for final touches on the rinds. Do not pour these until the main Yellow/Bright Green bodies are filled. Treat these Greens as "clean up" tools. Pouring them too early is inefficient because they cover small pixel areas and require high precision.
Phase 3: The Cleanup and Finale
Securing the Final Pixels
At this stage, the canvas is 80% complete. You likely have a few stray Yellow cups and a couple of Bright Green cups remaining. The background Orange is long gone. Now you can relax the capacity management slightly. Focus purely on accuracy.
The Final Stack Clear
Look for columns that have 2-3 cups left. These are usually the leftovers you saved earlier. Tap them rapidly now. The danger of deadlock is passed because you have processed the complex layers. The belt moves freely now.
Verifying Completion
Don't just tap and hope. Look at the image. Are there any gaps in the Lemon slice? Are the lime segments fully colored? If a specific color isn't filling, check the tray—you might have missed a buried cup under a "finished" stack. It happens in Level 193 that a single Green cup hides under a processed Yellow stack.
Endgame Efficiency
If you are aiming for a high score, the final 10 seconds are about speed. Tap the remaining cups as fast as the scanner allows. The "Risk" phase is over. Now you just want to clear the tray to trigger the "Level Complete" bonus timer.
Post-Level Analysis
If you failed, it was likely in Phase 2. You probably let the conveyor belt fill up with Orange while waiting for a White cup to be unblocked. In your next attempt, focus on clearing the vertical columns of the White cups *before* filling your belt with background colors.
Advanced Tactics and Common Pitfalls
The "Background First" Trap
Many players lose because they try to finish the Orange background completely before moving to the fruit. This is a mistake. In Level 193, you should only clear enough Orange to unblock the Whites and Yellows. Leave 10-15% of the background Orange for the very end. Prioritizing the background too early clogs your belt with low-priority cups.
Conveyor Belt Traffic Control
Avoid the "Tap Spamming" habit. Do not tap 5 cups in a row rapidly just because they are accessible. If you tap 5 Oranges in a row, your belt is full for 15 seconds. If a White cup unblocks during that time, you have no slot for it, and you stall. Always tap 2, wait, tap 2.
Handling Color Ambiguity
The lighting in this level makes Dark Green and Bright Green look similar in the tray. Double-check before you tap. Pouring a Dark Green (rind) into a Bright Green (pulp) zone creates a messy pixel that is hard to correct later. If you aren't sure, wait for the cup to reach the front of the belt to see the color label clearly.
The "Buried Cup" Soft-Lock
Sometimes, you will pour a color, and the stack won't drop. This means a cup below is "glued" because its color on the canvas is already full. You must manually find another cup of that color to unblock it. If you are stuck, scan the tray for a cup that matches the color at the bottom of a stack.
Speed Run Tips for Pros
If you can master the "One-Handed Rhythm," you can cut 30% off your time. Keep your thumb hovering over the "skip" button (if available) or the next tap target. Predict the stack drop: if you pour a Yellow and know a White is directly underneath it in the tray, tap that White the *millisecond* the Yellow cup leaves the tray. Zero latency is the key to S-Ranking this stage.
Restart Criteria
When should you give up and restart? If you have poured 3 White cups and the white lines on the fruit are still not filled, you have missed a cup somewhere in the stacks. It is faster to restart than to hunt for one missed pixel in a sea of Orange. Also, restart immediately if you jam the belt with 5 cups before move 15.