
Level 208
HARDHow to solve Sand Loop level 208? Get instant solution for Sand Loop 208 with our step by step solution & video walkthrough. Sand Loop 208 tips and guide.
Play Sand Loop Now
Experience the puzzle challenge firsthand
Game Screenshots
Sand Loop Level Guides
Sand Loop Level 208: The Pink Cottage Master Strategy
Understanding the "Bottleneck" Mechanic
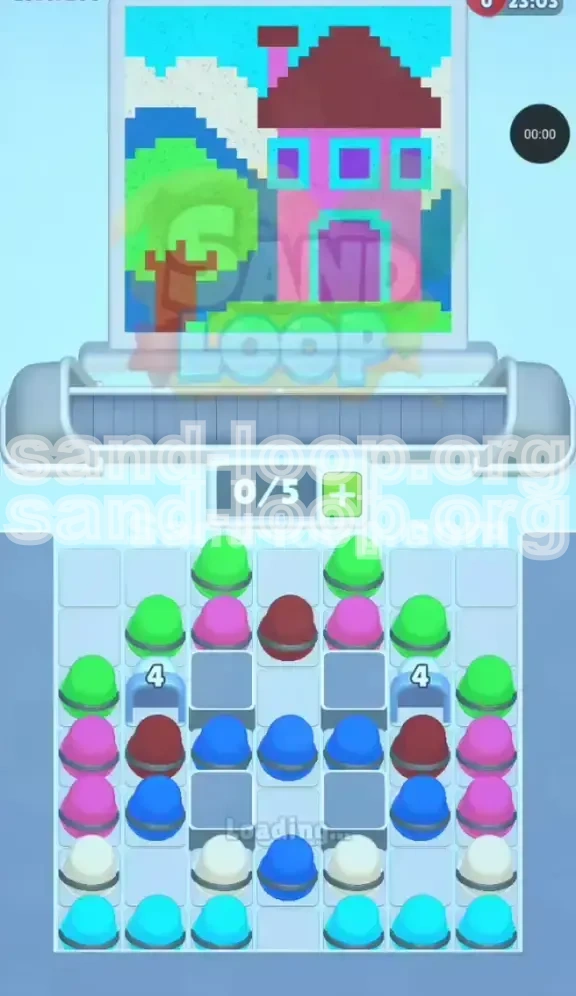
Level 208 is widely considered a "gear check" for inventory management players. Unlike earlier levels where you could rely on random tapping, this stage introduces a strict logistical puzzle. The primary feature is the **Ice Blockade** located in the center of the tray (marked with a "4"). These blocks function as locks that prevent the lower 40% of your cups from sliding into the active dispensing zone.
Visually, the level is deceptive. The "Pink Cottage" image looks peaceful, but the pixel density is skewed heavily toward Pastel Pink and Sky Blue. The challenge isn't just finding the right color; it is sequencing your moves so that you don't fill your 5-slot conveyor belt with unusable paint while the key colors remain frozen behind the ice walls.
Core Challenges & Resource Scarcity
The difficulty in Level 208 stems from three specific constraints:
- Limited Slot Capacity: You only have 5 slots on your conveyor belt. If you fill these with the wrong colors, you cannot tap new cups, causing a deadlock.
- The "4-Tap" Lock: You cannot access the bottom rows (where the White and Dark Blue cups are stored) until you have physically moved or cleared 4 cups adjacent to the Ice Blocks.
- Color Similarity: The Cyan (window frames) and Sky Blue (background) have very low contrast in the pixel grid. Accidentally loading a Dark Blue cup when the nozzle needs Cyan is the most common cause of failure.
Strategic Overview
To achieve a 3-star rating, you must prioritize breaking the ice blocks over painting the initial sections of the house. Many players fail because they try to finish the roof or the tree first. The correct approach is to treat the Ice Blocks as the primary boss. You must "play the edges," clearing the left and right wings of the pyramid to chip away at the ice's integrity. Only once the center shatters should you focus on detailed painting.
Essential Pre-Game Analysis
Decoding the Color Hierarchy
Before you tap a single cup, analyze the distribution of paint in the supply tray. The colors are not distributed evenly.
- Pastel Pink (High Volume - 45%): Used for the walls. These are abundant and located in the top-middle row. They are your "filler" color—easy to access and safe to dump on the belt if you have space.
- Bright Green (Medium Volume - 15%): Used for the tree. These are located at the very peak of the pyramid. They are your "starter" currency.
- Dark Brown/Maroon (Low Volume - 10%): Used for the roof. This is a scarce resource. There is usually one large Maroon cup trapped near the center top, and smaller ones hidden on the flanks.
- White & Blues (High Volume - 30%): These are locked behind the Ice Blocks at the bottom. Do not worry about them until the mid-game.
The Ice Block Math
The Ice Blocks are labeled with the number "4". This indicates a specific trigger mechanism: Adjacency Clearing.
These blocks are situated in the second row, effectively pinching the supply flow. To lower the count from 4 to 0, you must clear the cups physically touching the ice blocks. You cannot break the ice by tapping the ice itself. You must tap the Pink and Green cups surrounding it.
Warning: If you tap the center-most Maroon cup too early, it might slide into a position that blocks the Pink cups needed to break the ice. Always prioritize the cups touching the ice over the cups touching the nozzle target.
Nozzle Movement Prediction
The automated nozzle moves in a predictable pattern: Left-to-Right Sweep.
- Tree Area (Left): The nozzle starts here.
- Roof Area (Top Center): Moves here second.
- House Body (Center): Third.
- Windows/Doors: Fourth.
- Sky/Background: Last.
Use this knowledge. If the nozzle is on the Roof (Maroon), do not load Green cups. If the nozzle is on the Tree (Green), do not load White cups. Syncing your belt loading with the nozzle position is the secret to speed.
Step-by-Step Walkthrough
Phase 1: The Green Canopy & Opening Gambit
As soon as the level loads, your first 5 seconds are critical. The supply tray presents a pyramid of Green cups at the top.
Action: Rapidly tap the top 3 Bright Green cups. Send them to the conveyor immediately.
Execution: The nozzle will likely be hovering over the tree area (left side). Unload the Green paint as soon as the nozzle passes over the tree pixels. Do not wait. You need to clear these Green cups to expose the layer of Pink cups sitting directly beneath them, which are essential for the next phase.
Pro Tip: Do not tap the single Maroon cup at the very top center yet. It is a trap. If you load it now, it occupies a slot while the nozzle is still painting the tree, wasting valuable time.
Phase 2: Breaking the Shoulder Ice
Once the initial Green cups are cleared, you will see a row of Pastel Pink cups and the Ice Blocks (marked 4) on the left and right "shoulders" of the tray.
Action: Focus entirely on the Pink cups that are physically adjacent to the Ice Blocks.
The Mechanic: Every time you clear a cup touching the ice, the counter drops.
- Move 1: Tap the Pink cup on the left of the Left Ice Block. Counter drops to 3.
- Move 2: Tap the Pink cup on the right of the Left Ice Block (or below it). Counter drops to 2.
Simultaneously, the nozzle will move to the Roof area. You may need to use the available Maroon cups now. If the roof isn't ready to be painted, do not load the Maroon cups; instead, tap more Pink cups to keep the belt moving and the ice breaking.
Phase 3: The Mid-Game Unlock
When the Ice Blocks shatter (counter hits 0), a massive shift happens. The bottom rows of the tray—containing the bulk of the White, Cyan, and Dark Blue cups—will slide up and become accessible.
Action: Pause for a split second to assess your belt capacity.
The Risk: Many players panic here and spam-tap the new colors. Do not do this.
Instead, look at the nozzle. If the nozzle is painting the house walls (Pink), only tap Pink. If the nozzle is moving to the windows, prepare your Cyan and Blue cups. The shattering of the ice is your cue to switch from "Break Mode" to "Paint Mode."
Phase 4: The Cyan vs. Blue Distinction
This is the section where 90% of retries occur. The windows require Cyan (a light, turquoise blue) for the frames. The background sky requires Dark Blue. The tray is now a messy mix of these two.
Identification Rule: Look at the cup's icon. The Cyan paint usually looks like a light bulb or has a brighter gradient. The Dark Blue is deep navy.
Execution: Wait for the nozzle to enter the window frame area. Tap the Cyan cups specifically. If you accidentally load a Dark Blue cup, you must "dump" it (use it on the sky if any is visible) or wait until the nozzle reaches the sky, which clogs your belt. Keep 1 slot open as an emergency buffer for mis-tapped cups.
Phase 5: The White Finish
By now, the house is pink, the roof is brown, and the windows are cyan. The nozzle is swinging through the background areas (clouds and mountains).
Action: You can finally tap the large White cups located at the very bottom of the tray (which were previously buried).
Speed Run: Since the background is the last area to be painted, you can now safely fill your remaining 4-5 slots with White and Dark Blue. Spam-tap is acceptable here, provided the nozzle is actively painting the background and not lingering on small details.
Color Order & Processing Guide
Priority Sequence for Tapping
To avoid gridlock, follow this strict hierarchy when deciding which cup to tap next. Do not deviate from this order unless the nozzle forces you to.
- Green (Tier 1): Top priority only at the start. Ignored completely after the tree is done.
- Pastel Pink (Tier 2): High priority. Used to break ice and paint walls. Safe to keep on the belt.
- Maroon/Brown (Tier 3): Medium priority. Only tap when the nozzle is directly over the roof. Do not stockpile these.
- Cyan (Tier 4): Precision priority. Tap only for window frames.
- White/Dark Blue (Tier 5): Low priority until the end. Tap these only after the ice is broken and the house structure is complete.
Recognizing the "Trap" Colors
Be aware of specific cup placements that are designed to trick you:
- The Decoy Blue: You will see Dark Blue cups exposed early on the sides. Resist the urge to tap them. They are for the sky, which comes last. Tapping them now fills your belt with unusable paint while the roof needs Maroon.
- The Corner Green: Sometimes a Green cup gets trapped in the corner of the pyramid after the main tree is done. If the nozzle has moved past the tree, that Green cup is dead weight. Leave it there; don't waste a slot on it.
Slot Management Strategy
Think of your 5 slots as a currency.
- 0-2 Slots Filled: Safe Zone. You can tap whatever you need.
- 3 Slots Filled: Caution Zone. Only tap if you are 100% sure the nozzle needs that color immediately.
- 4-5 Slots Filled: Danger Zone. Stop tapping entirely. Watch the nozzle. Do not tap a new cup until one has poured and emptied a slot.
Pro Tips, Mistakes & Stuck Solutions
Common Mistakes to Avoid
Review these errors to ensure you don't waste a "Perfect" run:
- Mistake 1: Ignoring the Ice. Trying to dig vertically into the center of the tray first. The Ice Blocks will stop your progress, and you will run out of moves while the bottom half of the screen remains unpainted.
- Mistake 2: Color Confusion. Using Dark Blue on the window frames. The pixel art logic is strict; Dark Blue on a Cyan frame will not register as a "fill," effectively wasting that cup.
- Mistake 3: Pre-loading. Tapping the next color before the nozzle has finished pouring the previous one. This often leads to loading the wrong color because the nozzle moved while you were tapping.
What to Do When Stuck
If you reach a point where the nozzle is moving but you have no usable paint on the belt:
- Assess the Nozzle: Where is it going next? If it's going to the roof, look for Maroon. If it's going to the sky, look for Blue.
- The "Sacrifice" Move: If your belt is full of junk (e.g., Pink cups but the nozzle is on the Blue sky), you have to dump them. Look for any small pixel of that color on the screen (even a background detail) to dump the paint and free up the slot. If no detail exists, you may be forced to wait for the nozzle to cycle back, which wastes time.
- Reset Strategy: If you deadlock (belt full, no moves possible) within the first 10 seconds, restart immediately. You won't make up the lost time.
Speed Run Shortcuts
For players aiming to top the leaderboards:
- Chord Tapping: Once the Ice Blocks are gone, you can use two fingers to tap the White and Blue cups simultaneously. This is the only time "spam tapping" is viable.
- Nozzle Riding: Don't wait for the nozzle to be perfectly positioned. Tap the cup a split second *before* the nozzle arrives at the target area. This ensures the paint is ready to pour immediately, minimizing downtime.
- Ignore the Tree Base: The very bottom of the tree trunk is sometimes Dark Brown. If you are short on Brown, skip the trunk base and finish the roof. The game often gives you leniency on small background details like roots.