
Level 209
HARDHow to solve Sand Loop level 209? Get instant solution for Sand Loop 209 with our step by step solution & video walkthrough. Sand Loop 209 tips and guide.
Play Sand Loop Now
Experience the puzzle challenge firsthand
Game Screenshots
Sand Loop Level Guides
Level Overview: The Campfire Icebreaker
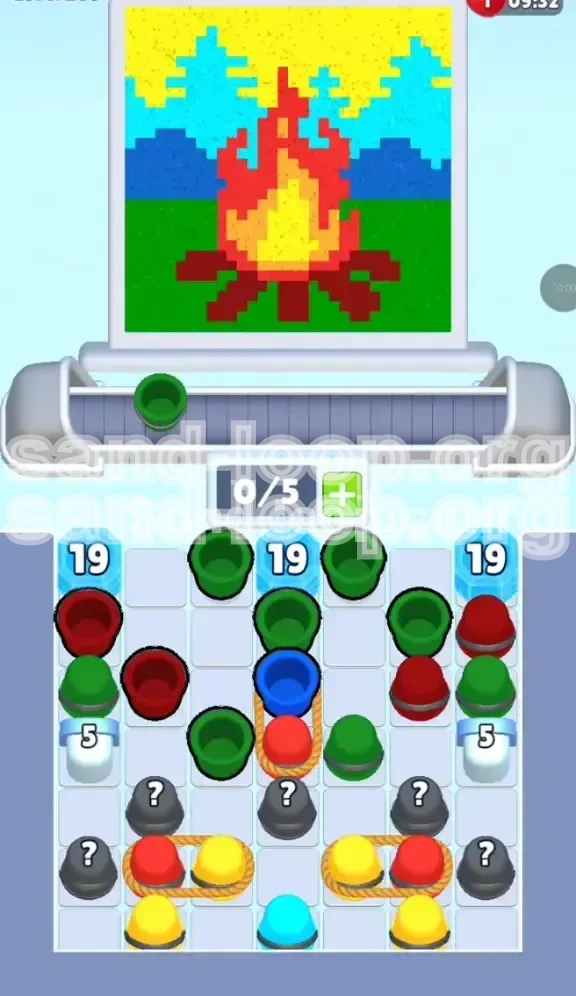
Welcome to Level 209, a stage that masquerades as a relaxing painting task but quickly evolves into a logistical puzzle. In this level, you are tasked with filling a Campfire scene, but the cozy atmosphere is misleading. The core challenge here is managing severe supply chain constraints caused by massive ice blockades and a limited slot capacity. You are not just painting; you are excavating resources from under frozen debris.
The defining feature of this level is the trio of "19-count" Ice Blocks located in the top rows. These act as hard barriers that block your primary color sources. Unlike standard levels where you can pick and choose colors freely, here you must fight to unlock even the most basic supplies. Furthermore, the conveyor belt is restricted to a tight 0/5 capacity, meaning every slot counts. One wrong move can clog your system, halting progress and eating up your valuable time limit.
The Frozen Logistics
Understand that this is an "Ice Breaking" stage first and a color-matching stage second. The 19-hit requirement for the top ice blocks is not just a number; it is a timer. Every second you spend waiting for a specific color is a second wasted against these blocks. You need to cycle cups rapidly, prioritizing volume over precision in the opening phase to shatter these barriers and access the Red and Green supplies hidden beneath.
The Rope Trap
Be wary of the bottom section of the board. Your most critical colors—specifically the Red and Yellow needed for the fire and sky—are tied together in roped pairs. You cannot simply tap one; you must commit to pulling two cups at once. In a level with only 5 available slots, pulling a roped pair without planning is the fastest way to deadlock your board. You must have exactly 2 open slots before engaging these pairs.
The Conveyor Crunch
Your slot capacity is critically low (5 slots). This means you have zero room for error. You cannot hold onto "maybe later" cups. Every cup on the belt must either be used immediately or discarded to make room for the next one. The game forces you to adopt a "just-in-time" inventory strategy. If you hoard cups, you will block the dispenser, stop the flow of new resources, and fail the level.
Color Palette Analysis
The visual target is distinct, but the supply is unbalanced. You will have an abundance of Green for the grass, but a severe shortage of Red and Yellow early on. The "Mystery Grey" cups add a layer of RNG (Random Number Generation) chaos. While tempting as wildcards, they can unpredictably clog your belt if they transform into a color you don't currently need. Treat them as a last resort, not a primary strategy.
The Time Factor
Efficiency is not just about speed; it is about movement economy. The ice blocks at the top require a high volume of "hits" to break. Using standard 1-unit cups is inefficient. You must prioritize clearing the path to the 5-count White Buckets located on the flanks. These act as "shotgun" blasts for the ice, dealing 5 points of damage per pass. Unlocking these is the difference between a smooth clear and a timeout failure.
Clear Objectives: Your Mission Goals
To conquer Level 209, you need a structured approach rather than frantic tapping. Your mission is divided into three distinct phases: Excavation, Unlocking, and Painting. Failing to respect these phases—usually by trying to paint the image before clearing the ice—is the most common reason players fail.
Primary Objective: Shatter the Ice
Your first and only goal for the first 30% of the level is reducing the "19" counters on the top ice blocks to zero. Do not worry about perfect color placement during this phase. Your focus is volume. Get cups on the belt. Get them under the dispensers. Even "wrong" color chips count toward breaking the ice. You must clear the top row to free the flow of Red and Green cups trapped beneath.
Secondary Objective: Free the Roped Pairs
Once the ice is gone, your focus shifts to the bottom rows. You must clear the debris (Green and Blue) sitting on top of the roped Red/Yellow pairs. These pairs represent the fuel for your final push. You cannot finish the fire or the sky without them. Prioritize clearing the columns directly above these ropes to drop them into the tapping zone.
Tertiary Objective: Manage Dispenser Timing
The color dispenser cycles through a specific order: Green -> Cyan -> Yellow -> Red. You must sync your cup pulls with this cycle. Pulling a Red cup when the dispenser is set to Blue is a waste of a slot. Your objective is to minimize "wait time" where cups sit on the belt doing nothing. Ideally, a cup should hit the belt, pass immediately under the correct color, and be poured.
Final Objective: Clean Up Edges
The sky (Cyan) and the Logs (Dark Brown) are usually the leftovers. Once the main blocks of Grass (Green) and Fire (Red/Yellow) are placed, use the remaining space in your slots to polish off these smaller sections. The Mystery Cups are useful here if you have a spare slot, as they often fill these tricky niche colors.
Step-by-Step Instructions: The Walkthrough
Follow this exact sequence to maximize your efficiency. This guide assumes you are starting with a full board and empty slots. Adjust your tapping speed based on the current dispenser color shown at the top of the screen.
Phase 1: The Green Rush (Start-Up)
As soon as the level begins, ignore the ice for a moment and look at the center columns. You will see a cluster of Green cups.
- Action: Immediately tap the accessible Green cups in the center.
- Reasoning: Green is the color of the dispenser at the start (usually). This fills the bottom grass section instantly.
- Benefit: Clearing these Green cups drops the next layer of cups into position, including the critical Red cups located under the ice blocks.
Phase 2: Targeting the White Buckets
Look at the far left and right edges of the board. You will see columns with "5-count" White Buckets buried under the initial ice layer.
- Action: Focus your taps on the columns containing these White Buckets.
- Reasoning: A White Bucket counts as 5 hits on the ice block above it.
- Benefit: Sending one White Bucket through the dispenser reduces the "19" counter by 5 points. Sending three standard cups only reduces it by 3. The Buckets are your heavy artillery for this stage.
Phase 3: Cycling Through the Freeze
Once the immediate Green and White cups are cleared, you will be left with a board full of frozen or mismatched colors. The dispenser will likely be cycling to Cyan or Yellow.
- Action: Do not stop tapping. Even if the color is wrong, keep the belt moving.
- Reasoning: Stopping creates a "dead air" gap where no ice is damaged.
- Benefit: Continuous movement ensures that as soon as the dispenser cycles back to your needed color, you have a cup ready to go. "Wrong" colors are just placeholders to keep the momentum going.
Phase 4: The Rope Unlock
After the top ice shatters (usually around the 40% mark), you will see the Roped Pairs (Red/Yellow) at the bottom.
- Action: Stop tapping everything else. Clear your belt so you have 2 empty slots.
- Reasoning: Tapping a roped pair with 1 slot will jam the belt (2 cups enter, only 1 space exists).
- Benefit: With 2 empty slots, you can pull the pair, sending one to the dispenser and holding the other in reserve, preventing a deadlock.
Color Order: The Processing Sequence
Understanding the priority of colors is vital because you cannot process them all at once. Attempting to do Yellow work while the dispenser is on Red will waste precious seconds. Follow this hierarchy to ensure you are always working on the "current" color.
Priority 1: Green (The Grass Base)
Green is your opener. It is abundant, accessible, and feeds the conveyor. You process Green first not just for the picture, but to clear the board space. The Green cups are effectively "free hits" on the ice because they are so easy to access. Do not leave Green cups sitting on the board; tap them immediately to fuel your ice-breaking efforts.
Priority 2: Cyan (The Mountains)
Cyan is your "filler" color. Once Green is exhausted, the dispenser moves to Cyan. The mountain section is large but doesn't require the precision of the fire. Use this phase to continue chipping away at any remaining ice blocks in the upper corners. Cyan cups are usually plentiful enough to keep the belt moving without needing complex strategy.
Priority 3: Yellow (The Inner Flame)
This is the danger zone. Yellow is scarce initially because it is tied to Red. You must wait for the dispenser to hit Yellow before you tap the Roped Pairs. If you tap the pair early, you will be stuck with a Yellow cup in your hand while the dispenser is on Red or Cyan, wasting a slot. Only process Yellow when the dispenser is actively glowing Yellow.
Priority 4: Red (The Outer Flame)
Red is the bottleneck. It is the primary color for the fire but is locked behind the ice and the ropes. You process Red last (or paired with Yellow) because it is the hardest to retrieve. By the time you focus on Red, the ice should be gone, and the board should be clear enough to handle the Roped Pairs without jamming.
Priority 5: Mystery Grey (The Wildcard)
Mystery Grey is the lowest priority. You never "plan" for Grey. You only tap it when you have an empty slot and no other useful moves available. It is a Hail Mary pass to clear the board when you are waiting for the dispenser to cycle. Expect it to turn into a color you don't need (like Blue when you need Red).
Key Tips: Mastering the Mechanics
These tips are designed to help you manage the unique constraints of Level 209. Mastery of these mechanics separates a failed attempt from a 3-star victory.
The "2-Slot" Rule for Ropes
This is the golden rule for this level. Never, ever tap a roped pair unless you have at least 2 empty slots on your conveyor belt. A roped pair consists of 2 cups. If you only have 1 slot open, the first cup enters the slot, and the second cup has nowhere to go. This halts the entire game flow. Always count your slots before you tap the bottom row.
The Dispenser Sync
Watch the dispenser icon at the top of the screen. It shows the color of the sand currently being dispensed. If it is showing Red, do not pull a Green cup. Wait 2 seconds. Let the dispenser cycle. The game rewards patience. Pulling a "wrong" color forces you to either discard it (waste of a tap) or hold it (waste of a slot). Sync your taps to the rhythm of the dispenser.
Ice Block Prioritization
Not all ice blocks are equal. The center ice block usually covers the most critical supply lines (often Red or Green). The side ice blocks cover the flanks. Prioritize breaking the center ice block first. It opens up the middle of the board, allowing you to access cups on both the left and right sides more easily. A clear center is the key to board control.
White Bucket Efficiency
Do not waste White Buckets on small debris or "perfect" painting. A White Bucket adds 5 units of color. If you only need 1 unit to finish a blade of grass, using a White Bucket overfills it and wastes the potential 4 extra hits. Save White Buckets exclusively for the Ice Blocks or the large empty sky sections where you need volume, not precision.
Mystery Cup Caution
Mystery Cups are tempting because they promise a solution, but they are risky. If you tap three Mystery Cups in a row, they might all turn into the same color, flooding your belt with Red when you need Green. Limit yourself to tapping one Mystery Cup at a time. See what it becomes, process it, and *then* consider tapping another. Never chain-tap Mystery Cups.
Common Mistakes to Avoid
Players often fail Level 209 because of impatience or misunderstanding the game rules. Avoiding these specific pitfalls will drastically increase your win rate.
Ignoring the Ice Timer
The biggest mistake is trying to "paint" the picture perfectly while the ice blocks are still up. You will run out of time. The ice blocks are the true enemy here. If you spend 10 seconds looking for the perfect Blue cup for the sky, you have wasted 10 seconds that could have been spent hitting the ice. Focus on breaking the ice first; the painting can wait.
Premature Rope Pulling
Seeing the Red and Yellow cups at the bottom is exciting, but pulling them too early is fatal. If you pull them while the top of the board is still clogged with ice or random debris, you will add 2 cups to a belt that is already struggling to move. This causes a "traffic jam" where no cups can cycle, and the game stalls. Wait until the board is flowing smoothly before pulling the ropes.
Slot Hoarding
Do not keep "just in case" cups on your belt. Holding onto a Red cup "just in case" the dispenser turns Red is a bad strategy. It takes up a slot that could be used to cycle a Green cup *now*. You must flow with the current, not the future. Keep your slots as empty as possible to maintain fluid movement.
Overfilling Small Sections
Using a 5-count White Bucket on a section that only needs 1 or 2 pixels is a massive waste of efficiency. While it doesn't seem like much, over time, these wasted units add up. You will eventually run out of high-volume buckets and be forced to chip away at the final ice blocks with single hits, which is agonizingly slow. Conserve your big buckets for big problems.
Panic Tapping
When the belt gets full, players often panic and start tapping randomly. This usually makes it worse. If you are stuck, take a second to look at the dispenser. Is there a cup on the belt that matches the dispenser *right now*? Pour it. If not, tap a cup off the board to create space. Random tapping rarely solves the blockage; calculated tapping does.
Stuck Solutions: Troubleshooting
Even with a plan, things can go wrong. The board state can become chaotic. If you find yourself stuck with no moves and a full belt, use these specific recovery strategies.
The "Deadlock" Recovery
Symptom: Your belt is full (5/5 cups). The dispenser is Blue. You have 0 Blue cups. You cannot tap new cups because the belt is full.
Solution: You must sacrifice. Identify the cup on your belt that is the "least useful" (e.g., a color you have already finished painting, or a Mystery Cup). Tap it to remove it from the board entirely. This frees up a slot. Then, tap a new cup from the stack to try and find the matching color. It is better to lose one cup than to be frozen for 20 seconds.
The Roped Pair Jam
Symptom: You tapped a roped pair with 1 slot. The belt is jammed. New cups are falling but bouncing off.
Solution: You need to clear space fast. Pour any cup on the belt that is currently ready to go (matching the dispenser). If none are ready, you have no choice but to discard a cup manually to unblock the intake. It hurts your score, but it's the only way to restart the flow.
The Ice Wall Stalemate
Symptom: The ice block is at 1/19, but you have no cups left on the board that can reach it. The remaining cups are blocked by other debris.
Solution: Stop focusing on the ice. Look at the rest of the board. Clear the *other* colors (Green/Blue) to open up the columns. Gravity will drop the remaining Ice-Breaking cups (Red or White) into the accessible zone. You have to clear the bottom to free the top.
Color Starvation
Symptom: You need Red to finish the fire, but there are no Red cups available on the board, and the dispenser is cycling through Green/Blue.
Solution: Check the Mystery Cups. If there are Mystery Cups available, tap one. It has a high chance of turning into the "Starved" color (Red) that the game knows you need. If no Mystery Cups exist, you must wait out the cycle. Pour wrong colors just to clear space, hoping the next tap reveals the needed color.
Speed Run Tips: For the Fastest Time
If you are chasing a high score or a personal best time, you need to optimize every micro-second. These tips are for advanced players who are comfortable with the mechanics.
Pre-Tapping Strategy
While the level is loading (or the "Go" animation is playing), look at the board. Identify where the Green cups are. As soon as you have control, tap them instantly. Do not wait for the dispenser animation to finish. Anticipating the start saves 1-2 seconds, which can be the difference between a win and a loss on a tight timer.
Chain Reaction Planning
Try to set up "chain" taps. If you tap a Green cup, it fills the grass. As it falls, it might trigger a rope drop or reveal a White Bucket. Watch the falling animations. If you see a cup falling into a position that will clear a rope, be ready to tap that rope the *millisecond* it settles. Speed running is about rhythm, not just raw speed.
Ignore Perfection
A 100% filled picture is not required for 3 stars; speed is. If a tiny pixel of grass is empty, leave it. If the fire has a 2% gap, move on. Do not hunt for the last 1% perfection if it means stopping the conveyor belt to find a specific cup. Keep the belt moving. A fast 90% completion beats a slow 100% completion every time.
Memorize the Dispenser Order
The dispenser in Level 209 usually follows a fixed pattern: Green -> Cyan -> Yellow -> Red. Memorize this. If you know Red is coming next, you can pre-position your Red cups on the belt. You don't have to wait for the color to switch; you can have the cup ready *before* the switch happens. This eliminates the "reaction time" delay.
The Reset Button
If you mess up the first 10 seconds (e.g., you jam the belt immediately), don't struggle through a bad run. It is often faster to force-close the game (if on mobile) or hit restart immediately. A bad start in an Ice Breaker level usually cannot be recovered from because you lose too much time breaking the initial ice. A perfect restart is better than a flawed recovery.