
Level 25
HARDHow to solve Sand Loop level 25? Get instant solution for Sand Loop 25 with our step by step solution & video walkthrough. Sand Loop 25 tips and guide.
Play Sand Loop Now
Experience the puzzle challenge firsthand
Game Screenshots
Sand Loop Level Guides
Level Overview: The Autumn Pines Challenge
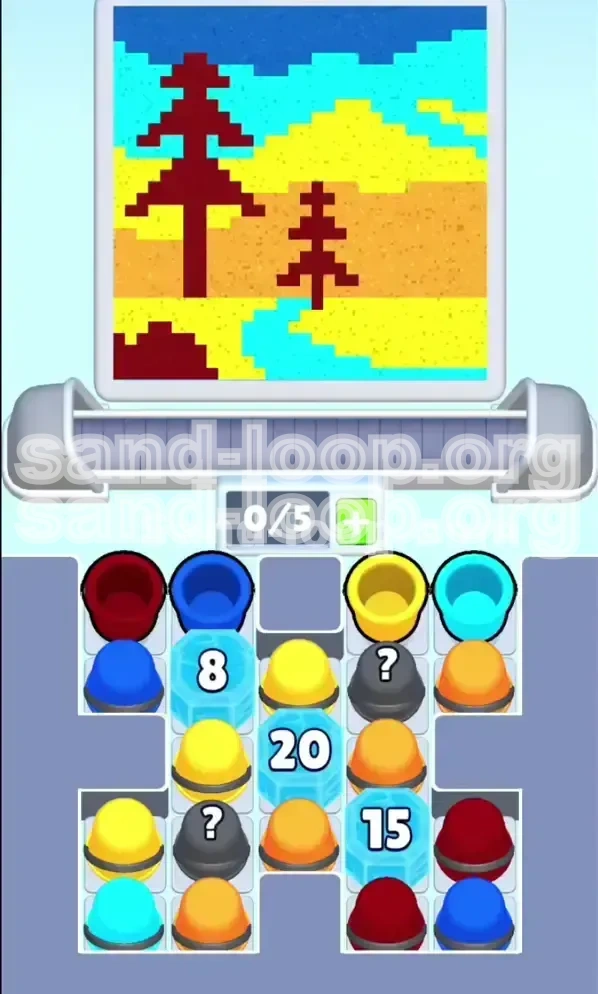
Welcome to the definitive guide for Level 25 of Sand Loop, officially known as the "Autumn Pines" challenge. This stage represents a significant difficulty spike compared to previous levels, introducing players to the mechanics of "Blocker Break" scenarios through a complex, pixel-art landscape. The visual composition is deceptively peaceful, featuring two distinct Maroon pine trees standing tall against rolling Yellow and Orange hills, a Cyan river cutting through the foreground, and a deep Blue sky overhead.
However, beneath this aesthetic lies a rigid logistical puzzle. Unlike standard levels where sand flows freely and rhythmically, Level 25 is locked down by high-HP Ice Blocks. These obstacles act as dams, physically preventing access to the bottom half of your material supply until they are systematically destroyed. The central challenge is not just color matching; it is resource management under extreme spatial constraints. You are forced to fight for every inch of conveyor belt space while simultaneously managing the health of three separate ice barriers.
The defining feature of this level is the massive "20 HP" Ice Block situated dead center. It acts as a choke point, severing the connection between your active dispensing trays and the reserve supply. If you allow your conveyor belt to clog with inefficient colors before this central block is cleared, you will face a "soft lock" scenario where no valid moves remain. Success in this level requires a shift in mindset from reactive tapping to proactive strategic planning.
The Core Mechanics of Blocker Break Stages
Understanding the "Blocker Break" mechanic is essential for victory. In this mode, specific cups are encased in Ice Blocks with visible HP counters. You cannot directly target the ice. Instead, you must eliminate adjacent cups of matching colors to deal damage to the block. Every time a valid match is made next to a block, its HP decreases. This changes your primary objective from simply "painting the canvas" to "breaking the grid." You must view the puzzle as a battle of attrition against the ice HP numbers.
Analyzing the Grid Layout
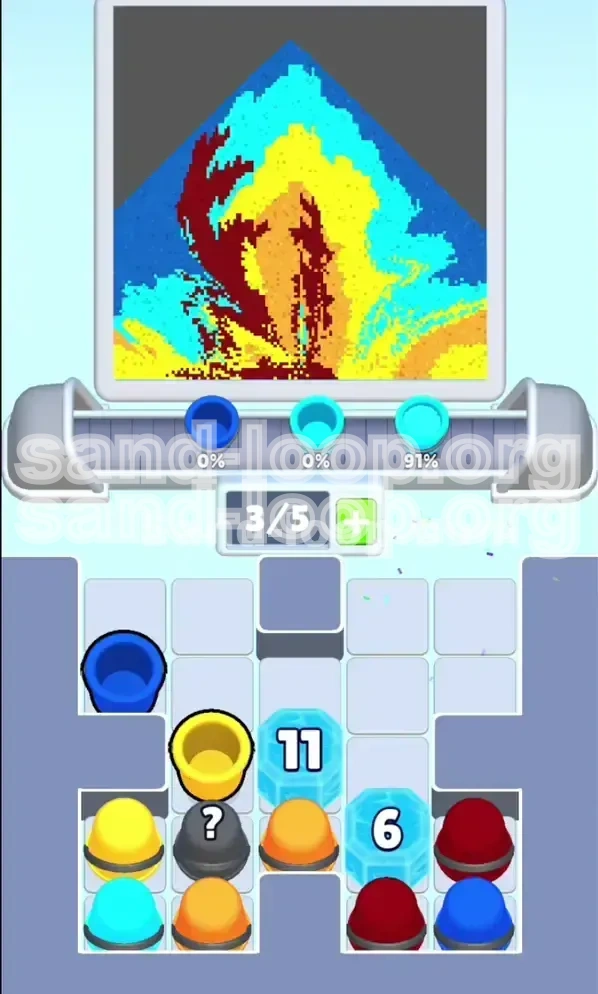
The board is divided into three distinct vertical zones, each governed by an Ice Block. The Left Zone is protected by an 8 HP block, the Center Zone is dominated by the 20 HP block, and the Right Zone is guarded by a 15 HP block. The layout is asymmetrical. The left side offers the easiest path to progression, while the center is designed to stall you. Recognizing this asymmetry is the first step toward formulating a winning strategy.
The 5-Slot Limitation
Your conveyor belt has a strict capacity of five slots. In Level 25, space is your most valuable currency. Every slot occupied by a color you cannot immediately use is a wasted opportunity. The ice blocks prevent new cups from falling into the active tray, meaning you cannot rely on gravity to refresh your options. You must constantly cycle the belt to keep the flow moving. If your belt reaches full capacity (5/5) with unusable cups, you are effectively stuck and will likely fail the level.
Visualizing the "Autumn Pines" Art
The target image dictates your color requirements. The "Autumn Pines" scene is color-heavy in the mid-tones. Approximately 45% of the canvas requires Yellow and Orange for the expansive hills. Another 30% is dedicated to the Blue sky and Cyan water. The remaining 25% is the Maroon color needed for the trees. This distribution is critical because it tells you that Yellow is your "workhorse" color—it will be your primary tool for breaking the center ice block due to its high volume requirement.
Why This Level is Harder Than It Looks
Many players fail because they try to paint the picture traditionally—focusing on the sky or trees first. In Level 25, this approach leads to disaster. The ice blocks force you to paint out of order. You might have to complete the lower hills before you can even touch the pine trees. The difficulty lies in suppressing your natural instinct to follow a top-down painting order and instead following the path of least resistance dictated by the ice HP.
Clear Objectives: Your Path to Victory
To conquer Level 25, you need a clear set of goals that prioritize breaking the ice over pure aesthetic progression. Your primary directive is to clear the board to unlock the full supply of sand. Below are the specific phases you must navigate to achieve a 3-star finish.
Primary Objective: Shatter the Ice Triad
Your main focus must be the reduction of all Ice Block HP to zero. The 8 HP block on the left is the priority target, followed by the 20 HP block in the center. The 15 HP block on the right is a secondary objective that acts as a cleanup phase. You should gauge your success not by how much of the picture is painted, but by how quickly the ice numbers are dropping. If you go more than 10 seconds without damaging an ice block, you are likely off-strategy.
Secondary Objective: Maintain Belt Flow
You must prevent the conveyor belt from stalling. This means constantly tapping valid cups to keep the slots rotating. A stalled belt is a death sentence in this level. You need to maintain a rhythm of Tap-Flow-Tap-Flow. Even if a cup doesn't go exactly where you want it, if it clears a slot and breaks a piece of ice, it is often a better move than waiting for a perfect placement that might clog your belt.
Tertiary Objective: Strategic Color Hoarding
While you generally want to clear space, certain colors (specifically Maroon for the trees) are rare and located in the bottom tiers. You must identify these cups early and ensure they are not accidentally discarded. Your goal is to position high-value colors in the "Next" queue so they are ready to deploy the moment the relevant ice blocks break. Do not waste Maroon cups on the hills; save them strictly for the tree sections.
Efficiency Metric: The HP Per Tap Ratio
Aim to maximize damage per action. Clearing a cup that touches two ice blocks simultaneously is the optimal move (dealing 2 points of damage for 1 tap). You should constantly scan the board for these "double tap" opportunities, particularly where the Left and Center blocks meet. Efficiency is what separates a clear with 1 star from a clear with 3 stars.
The Cleanup Phase
Once all three ice blocks are destroyed, the objective shifts to standard painting. At this point, the board opens up completely, and you can focus on filling the difficult details of the tree branches and the river banks. The final 10% of the level is about precision and ensuring no stray pixels remain unpainted.
Step-by-Step Instructions: The Tactical Walkthrough
This is the actionable core of the guide. Follow these steps in order to navigate the "Autumn Pines" challenge systematically. We will break the level down into three distinct phases based on the ice block locations.
Phase 1: The Left Flank Assault (Breaking the '8' Block)
The start of the level is a race against the clock to free up your conveyor space. The Left Block (8 HP) is the weak link in the level's defense.
- Step 1: As soon as the level loads, identify the Blue and Yellow cups in the top row. These are your immediate tools.
- Step 2: Tap the Blue cup located in the second row, left side. This is adjacent to the '8' block. Sending this to the belt deals 1 damage and starts the sky.
- Step 3: Immediately look for Yellow cups in the top-left sector. The game usually spawns these early to facilitate the hill background.
- Step 4: Aggressively tap all cups adjacent to the Left Ice Block. Do not worry about the right side of the screen yet.
- Step 5: Monitor your conveyor belt. If you have a "Mystery Block" (Gray cup) appear, do not tap it yet unless you have 2 empty slots. We want to use it as a filler later, not a starter.
- Step 6: Within the first 30 seconds, the '8' block should shatter. You will hear a distinct cracking sound. This opens the left channel.
Phase 2: The Center Grind (Breaking the '20' Block)
This is the longest phase of the level. The '20' block requires sustained pressure. The key here is volume and synergy.
- Step 1: With the left side open, shift your focus to the center column. You will see a large cluster of Yellow cups trapped above the '20' block.
- Step 2: Enter "Yellow Spam Mode." Tap every Yellow cup you see. Since the background hills are mostly Yellow, this serves two purposes: it paints the majority of the canvas and it chips away at the massive center block.
- Step 3: Introduce Orange cups. The hills transition from Yellow to Orange. Weaving Orange taps in with your Yellow taps keeps the color palette consistent and continues the assault on the ice.
- Step 4: Watch the "Next" preview. If a Maroon cup is coming up, try to time your taps so you don't clog the belt with it. We don't need Maroon until the end.
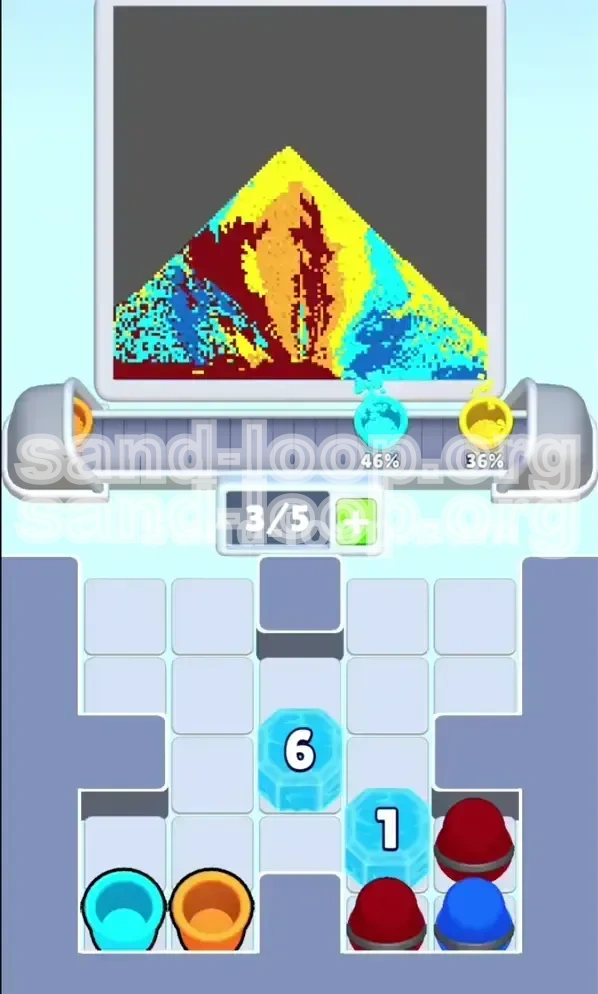
- Step 5: If the center block is around 10 HP and you are running out of immediate moves, look for "double contact" points on the bottom edge of the ice where it might touch a cleared Blue or Yellow zone.
- Step 6: Once the '20' block breaks, the board will flood with new options. Take a deep breath; the hard part is over.
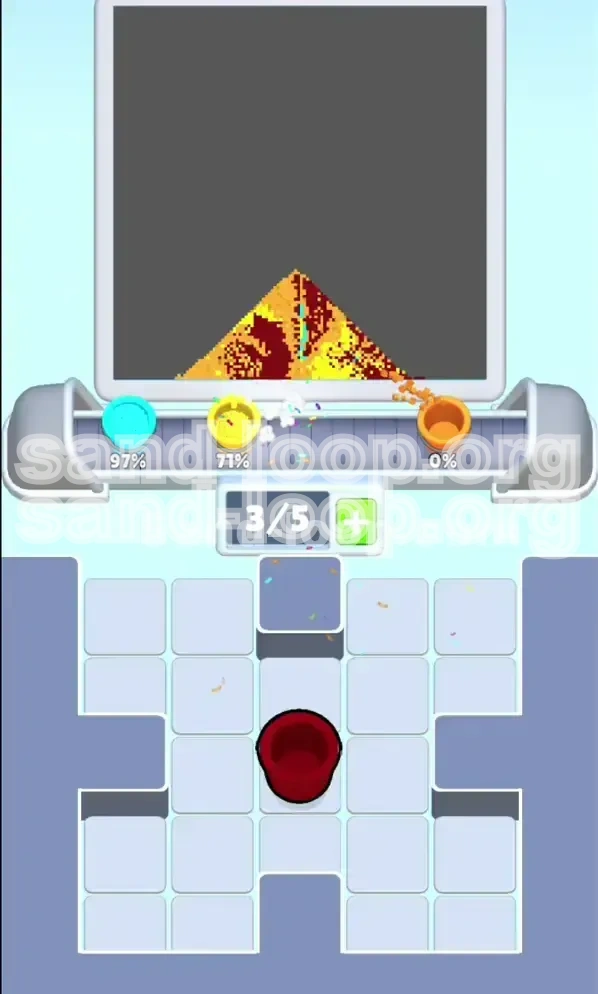
Phase 3: The Right Flank and Cleanup (Breaking the '15' Block)
The Right Block (15 HP) guards the detail work. It usually falls as a consequence of your center clearing, but it needs focus at the end.
- Step 1: Now that the center is open, the right side blocks are exposed.
- Step 2: Deploy the Cyan cups. These have likely been stacking up or were hidden behind the center block. Use them to paint the river and attack the right side of the '15' block.
- Step 3: Retrieve the Maroon cups. Now is the time to paint the pine trees. Since the trees are vertical, tap the Maroon cups when the "paint head" is at the top of the tree or bottom to ensure coverage.
- Step 4: Check the "HP" of the remaining ice (if any). Use whatever color is most abundant in that specific row to finish it off.
- Step 5: Scan for unpinned pixels. The "Mystery Blocks" you saved earlier can be useful here to fill in tiny gaps of color you might have missed.
Managing the Mystery Blocks (The RNG Factor)
Gray question mark blocks add a layer of randomness. They can be a boon or a bust.
- Identification: These blocks appear randomly in the queue. They do not reveal their color until they hit the conveyor belt.
- The Rule: Only tap a Mystery Block if your belt has 2 or fewer items. If you tap it on a full belt, you risk getting a color you don't need (e.g., a Maroon cup when you only need Yellow), which will instantly jam your flow.
- The Strategy: Treat them as "wildcards." If you are stuck and need *any* color to break a piece of ice, tap the mystery block. It has a high chance of turning into a common color like Yellow or Blue, which will likely help.
Color Order: Processing the Palette
The specific order in which you process colors is the difference between a smooth run and a failed attempt. Do not paint this picture like a coloring book (top to bottom). Paint it based on ice accessibility.
Priority 1: The Yellows and Oranges (The Background)
Start with Yellow and Orange. These colors constitute the "Autumn Pines" hills. Because they cover roughly 45% of the board, they are the most abundant resource. Using them first clears the maximum amount of space and deals the most damage to the center ice block. Treat Yellow as your default "tap" whenever you are unsure. It is rarely a wrong move to send a Yellow cup to the belt in this level.
Priority 2: The Blues (The Sky)
Blue is your secondary priority. It is essential for breaking the Left Block (8 HP) early on. Once the left side is open, Blue cups are useful for clearing the top of the screen and keeping the belt moving. However, be careful not to over-commit to Blue once the left block is down, as the sky is a smaller area than the hills.
Priority 3: The Cyan (The River)
Cyan is a mid-tier priority. It is crucial for the Right Block (15 HP) but often inaccessible until the center clears. Do not go out of your way to hunt for Cyan in the early game. Let the Cyan cups come to you naturally as you clear the Yellow and Orange clusters.
Priority 4: The Maroons (The Trees)
Maroon is the "trap" color. The trees are visually striking, making you want to paint them immediately. Resist this urge. The trees are thin and vertical, making them inefficient for clearing ice blocks. Furthermore, Maroon cups are often buried at the bottom of the stack. If you try to paint the trees too early, you will fill your belt with Maroon cups that you can't place, causing a jam. Save Maroon for the very end when the board is open and you can easily place them without penalty.
Order of Operations Summary
- Early Game: Heavy focus on Blue (for left ice) and Yellow (for center ice).
- Mid Game: Transition to Yellow and Orange (grinding the center).
- Late Game: Introduce Cyan (right side) and finish with Maroon (trees).
Key Tips and Common Mistakes
Even with a strategy, small errors can compound. Here is how to play like a pro and avoid the pitfalls that trap most players on Level 25.
Key Tip: The "Tap Budget" Concept
Every level has a limited number of taps you can physically perform per second. Your "Tap Budget" is how many of those taps can be wasted on non-essential moves. In Level 25, your budget is zero. Every single tap must either break ice or clear a slot for a cup that breaks ice. Avoid tapping cups just to "see what happens." Only tap when you know it contributes to the ice HP reduction.
Key Tip: Visualizing the "Next" Queue
Don't just look at the current cup; look at the *next* three cups. If you see a Maroon cup coming in 3 turns, but your belt is full of Yellow, you need to accelerate your Yellow tapping to make room. If you see a Mystery Block coming, slow down and ensure you have empty slots ready. Always be thinking 3 steps ahead.
Common Mistake: Tunnel Vision on the Center
Many players stare at the big "20" number and panic. They try to force cups into the center even when no valid moves exist there. Don't do this. If the center is blocked, shift your eyes to the left or right blocks. Clearing the side blocks often unlocks the cups needed to finish the center. The board is interconnected; work the periphery to crush the core.
Common Mistake: Ignoring the Conveyor Jam
The "Conveyor Jam" is when you have 5 cups on the belt and none of them match the available slots. This is usually caused by hoarding a specific color (like Maroon) too early. If you feel the belt getting sluggish, stop trying to paint specific areas and just start tapping whatever colors allow you to empty the belt slots, even if it means slightly misplacing a color. Flow is more important than precision.
Common Mistake: Premature Tree Painting
As mentioned, the trees are tempting. But painting the top branches of the pine trees early is a waste of taps. The "paint head" moves horizontally. If you paint the top branch, the paint might not reach the bottom trunk, leaving you with a half-finished tree and a clogged belt. Wait until the trunk is accessible from the bottom to finish the trees in one smooth pour.
Stuck Solutions and Speed Run Tips
So, what happens when things go wrong? Or what if you are aiming for a top leaderboard time? This section covers the advanced techniques.
Solution: The "Soft Lock" Recovery
If you are stuck with a full belt and no moves:
- Identify the Culprit: Find the cup on the belt that is least useful. Usually, this is a color you have already finished (like extra Blue at the end).
- The "Discard" Tactic: Even if you can't place the cup perfectly, tap it into a "close enough" slot just to get it off the belt. It is better to have a slightly messy painting than a failed level.
- Reset the Rhythm: Once you clear one slot, the chain reaction usually frees up the rest. Take a breath and slow down your tapping speed.
Solution: Mystery Block turned into Trash
If a Mystery Block turns into a color you absolutely don't need (e.g., turns into Blue when you are full on Blue), do not panic. Just acknowledge it as "dead weight." Your goal now is to tap every other valid cup as fast as possible to cycle the belt until that trash cup falls off the end of the line. Do not try to force it into a slot.
Speed Run Tip: The "Double Tap" Optimization
To achieve the fastest time, you must exploit the geometry of the ice blocks. Look for cups that sit at the intersection of two ice blocks. A single cup placed here can damage *both* the 8 HP block and the 20 HP block simultaneously. Prioritizing these "intersection cups" can shave seconds off your time by effectively doubling your damage output.
Speed Run Tip: Pre-Loading the Belt
As you finish breaking the left block, don't wait for the animation to finish before looking at the center. Start tapping Yellow cups for the center block *before* the left block debris has even settled. This keeps your input lag low and maintains a high "Actions Per Minute" (APM) rate. The game allows for input buffering, so queue up your next tap while the current one is animating.
Speed Run Tip: Ignoring Perfection
A 3-star run requires efficiency, not 100% pixel perfection. If the trees are 95% painted but the belt is moving fast, move on. Don't spend 30 seconds hunting for that one last pixel of Maroon. The auto-fill mechanic in Sand Loop often forgives tiny imperfections at the end of a timed run. Focus on breaking the ice; the painting usually takes care of itself.