
Level 26
EXPERTHow to solve Sand Loop level 26? Get instant solution for Sand Loop 26 with our step by step solution & video walkthrough. Sand Loop 26 tips and guide.
Play Sand Loop Now
Experience the puzzle challenge firsthand
Game Screenshots
Sand Loop Level Guides
Level Overview: The Geometric Divide
The Dual-Layered Challenge
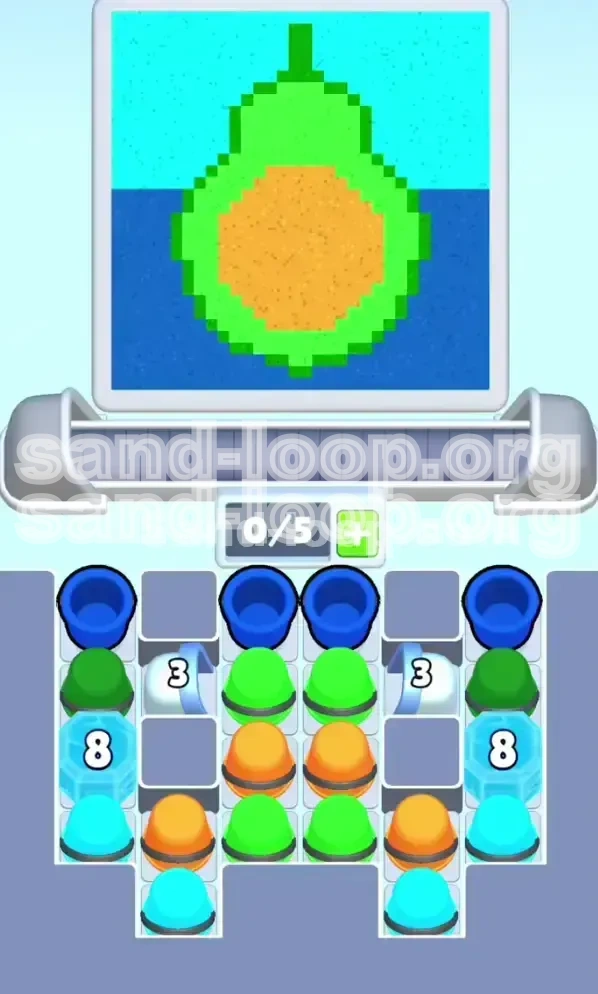
Sand Loop Level 26 is fundamentally an exercise in managing contrasting volume requirements. Unlike previous levels where colors might be evenly distributed, this level forces you to juggle massive background fills against tiny, precise foreground details. The screen is split visually: the top requires a heavy wash of Cyan, while the bottom demands deep Navy Blue. Occupying the center are the precision elements—a Lime Green ring and a Golden Yellow core. The friction in this level comes from trying to keep the belt moving for the bulk colors without accidentally drowning the small yellow center.
Visualizing the Target
Imagine your canvas as a bullseye sitting on top of a mountain lake. The "water" (Navy) covers the bottom 40%, and the "sky" (Cyan) takes up the top 40%. That leaves a mere 20% in the absolute center for your green and yellow elements. Because the conveyor belt moves at a constant speed, the temptation is to treat every cup with equal urgency. You must resist this. The Cyan and Navy are "marathon" colors that need slow, steady accumulation, while the Yellow is a "sprint" color that is finished in seconds.
The Inventory Constraints
Your starting tray is deceptive. It looks plentiful, but it is structurally unsound. You will notice that Blue cups are often stacked precariously on top of Green supplies, and Cyan—the color you need most for the top background—is frequently buried at the bottom of the tray or blocked by stray Orange cups. This physical arrangement in the tray is the first "boss" of the level. If you don't clear the physical blockages in the tray early, you will find yourself with a moving conveyor belt but no usable cups to load.
Why Speed Kills Here
In many puzzle games, fast tapping is rewarded. In Sand Loop 26, speed is a trap. The processing delay between loading a cup and it actually pouring paint is roughly 3 to 4 seconds. If you tap five cups in 5 seconds, you have committed to actions that cannot be undone for another 20 seconds. This level demands a "rhythmic patience." You are the conductor of an orchestra, not a drummer in a punk band. You must pace your loading to match the pouring rhythm.
The Mental Bottleneck
The hardest part of Level 26 is not the mechanics, but the panic management. When you see your Cyan meter at 15% and your Navy at 20%, the instinct is to load nothing but Blue and Cyan. However, doing this ignores the Yellow meter, which needs to hit 100% *before* you finish the backgrounds. If you ignore the yellow core until the 90% mark of the level, you will inevitably overshoot it because the bulk paints are still wet on the canvas.
Victory Conditions
To secure the 3-star rating, you must fill all four meters to 100% simultaneously without ever allowing the conveyor belt to deadlock (filling all 5 slots without a pouring gap). Efficiency is measured by how few "wasted moves" you make—moves where you load a cup that doesn't contribute significantly to the current lowest meter. A perfect run feels like a smooth wave, rather than a series of jerky stops and starts.
Step-by-Step Walkthrough Guide
Phase 1: The Trigger Sequence (Moves 1-10)
The beginning of the level is the only time you have total freedom. The belt is empty (0/5), and the canvas is blank. Do not fill the belt immediately. Instead, focus on "priming" the tray.
- Step 1: Load one Blue cup. This starts the Navy meter and clears space in the tray.
- Step 2: Load one Green cup. This establishes the center ring early.
- Step 3: Load one Orange cup. This is your most aggressive early move for the yellow center. Do not load a second orange yet.
- Step 4: Pause and wait for 3-4 seconds. Watch the first cup pour.
- Step 5: Assess the tray. You will likely see Cyan cups becoming exposed on the sides.
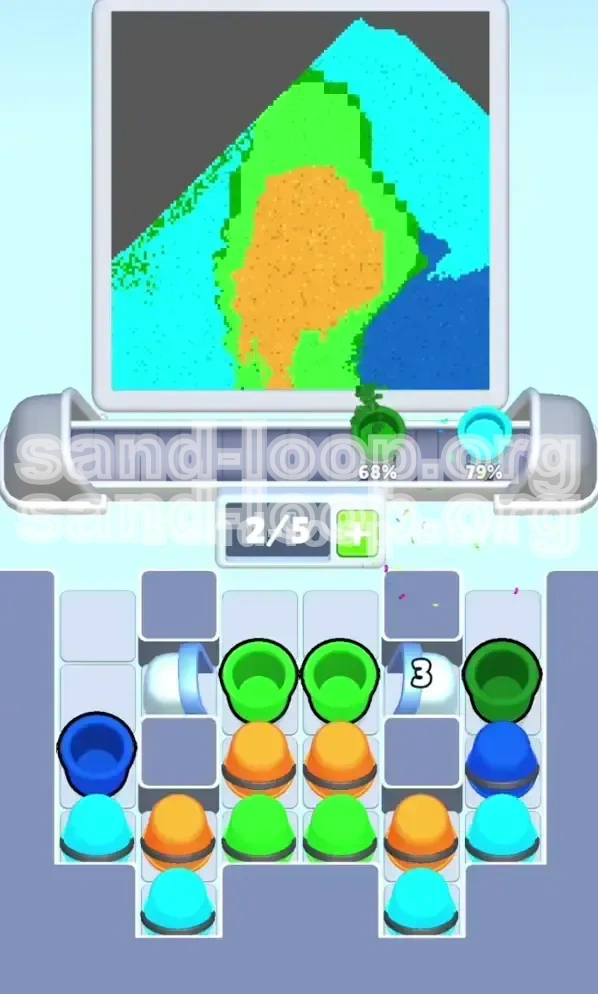
Phase 2: The Bulk Rhythm (Moves 11-30)
Now that your precision colors (Yellow/Green) are started, you enter the "grind" phase. Your goal here is to increase the Cyan and Navy meters without clogging the belt.
- The 2-for-1 Pattern: Adopt a loading pattern of Blue, Cyan, Blue, Cyan. Keep this rhythm steady.
- Monitor the Yellow Meter: It should be sitting around 20-25% after the first pour. Do not touch another Orange cup until you have processed at least 4 or 5 Blue/Cyan cups.
- Unblocking: If you see a Green cup blocking a Cyan stack, load the Green cup to free the Cyan. It is better to slightly overfill Green (which is a large area) than to be starved of Cyan.
- Slot Management: Keep your belt count between 2/5 and 3/5. Never let it hit 4/5 during this phase unless you are 100% sure of the order.
- The Checkpoint: By move 30, your Navy and Cyan should be roughly equal (around 40-50%), and your Green should be near 60%.
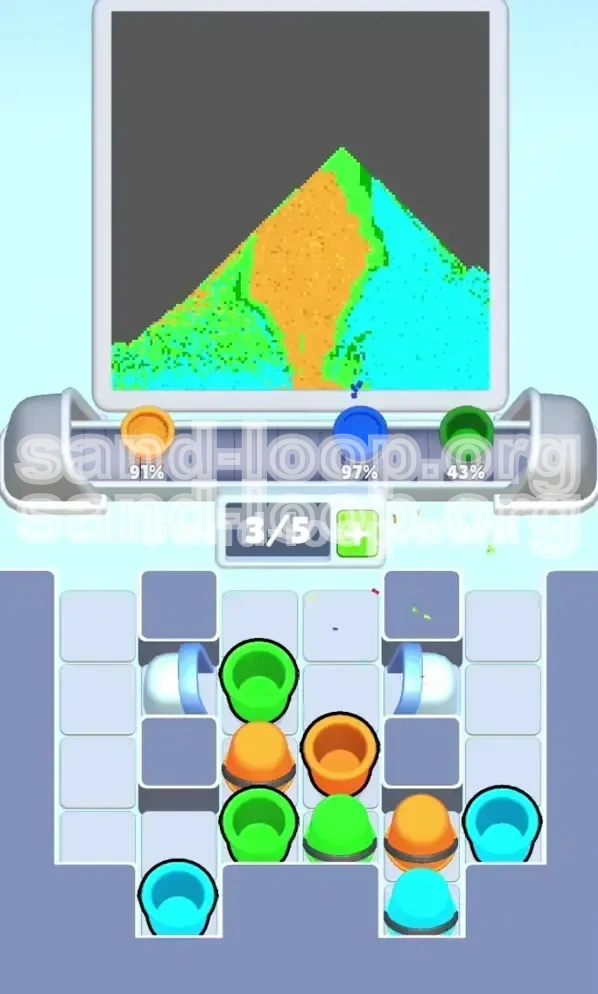
Phase 3: The Precision Injection (Moves 31-50)
This is the danger zone. Your backgrounds are looking good, but the center needs attention. The Yellow meter is likely lagging behind.
- The Yellow Push: Locate your Orange cups. You need to load exactly one Orange cup now.
- The Buffer: Immediately after the Orange cup, load a Blue cup. This prevents the Orange from pouring immediately after the previous cup, giving the paint time to set.
- Watch the Lag: Remember the cup you loaded 3 moves ago is pouring *now*. If you loaded an Orange cup 3 moves ago, watch the Yellow meter. If it hits 80%, stop.
- Green Finish: If your Green meter is around 85%, you can afford to load one or two more Greens to polish the ring.
- Cyan is King: Even during this phase, keep loading Cyan. It is the largest background area and requires the most volume to catch up to the others.
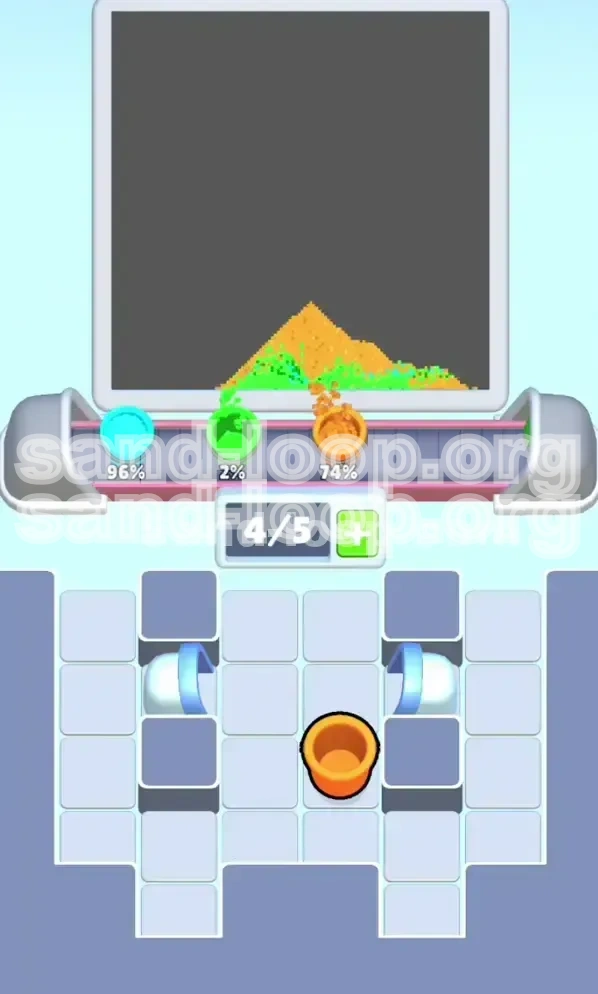
Phase 4: The Endgame Approach (Moves 51+)
You are in the final stretch. All meters are between 85% and 95%. This is where most players fail by overshooting.
- Stop Orange: If your Yellow meter is above 90%, do not load any more Orange. It is too risky.
- Final Clean-up: Switch to a strict Cyan, Blue rotation. These two colors are the most forgiving.
- The "Creep" Method: Load a cup, then wait for the pour to finish before loading the next. This slow, manual control ensures you don't accidentally queue a 6th cup that ruins the run.
- Visual Check: Look for the "shimmer" on the canvas. When a section is almost full, it will visually pulsate. Use this visual cue instead of just relying on the numbers.
- Final Victory: Load the last color needed to cross the 100% threshold. Usually, this will be a Cyan cup for the top background.
Color Order and Processing Logic
The Hierarchy of Priority
Not all colors are created equal in Level 26. You must treat them differently based on their size and position.
- Cyan (Top Background): Highest volume, lowest priority per cup. You need hundreds of units of this, so missing one cup doesn't matter. It should be your "filler" color between other actions.
- Navy (Bottom Background): High volume. Similar to Cyan, but often more accessible in the tray. Use this to keep the belt moving when you need thinking time.
- Lime Green (Center Ring): Medium volume. This needs to be maintained steadily. If you ignore it for too long, the ring looks uneven. It acts as a bridge between the background and the center.
- Golden Yellow (Core): Tiny volume, highest priority. This is the "Boss" of the level. One mistake here costs you the game. It requires constant monitoring but minimal action.
The "Sandwich" Technique
The best way to handle the Yellow color is to sandwich it. Never load two Orange cups in a row. Never load an Orange cup when the belt is full (5/5). The optimal sequence is: Bulk Color (Blue/Cyan) -> Orange -> Bulk Color. This ensures that when the Orange cup pours, it lands on a semi-prepared canvas and is immediately followed by a bulk color that "washes out" any edges, preventing the yellow from spreading too far.
Understanding Paint Overlap
In Sand Loop, paint can mix or overlap. Level 26 relies on distinct geometric zones. If you pour Blue over a finished Yellow section, you don't necessarily ruin the Yellow (if the meter is full), but you waste time. However, if you pour Yellow over a wet Blue section, it might muddy the color. The game engine prioritizes the top-most layer. Always finish the background (Blue/Cyan) around the center, not over it.
Percentage Breakdown Strategy
Here is a rough percentage guide to aim for during the mid-game (around move 30):
- Cyan: 45-50% (Needs the most work)
- Navy: 45-50% (Needs the most work)
- Green: 60-70% (Ahead of schedule)
- Yellow: 30-40% (Intentionally lagging)
If you follow this curve, you will naturally hit 100% on all colors within a few moves of each other at the end.
The Tray Analysis
Before you load a cup, scan the entire tray. If you see a stack of 3 Cyan cups buried under 2 Orange cups, it is often worth the moves to load the Oranges first (temporarily storing them on the belt if you have space) just to unlock the Cyan supply. Running out of Cyan while your belt is half-empty is a guaranteed failure state.
Key Tips and Critical Warnings
The "One Empty Slot" Golden Rule
This is the single most important tip for Level 26. Never let your conveyor belt reach 5/5 slots. Always keep at least one slot empty (ideally 2). Why? Because if the belt is full, you cannot react to a sudden shortage of a color. If you are at 5/5 and realize you need a specific Green cup that is currently buried, you are stuck watching the belt cycle until a slot opens. Keeping a slot open gives you the flexibility to grab a "Blocker" cup (a cup you load just to clear tray space) without jamming the flow.
Recognizing the "Overshoot" Point
The meters have a visual "cap." When a color is at 98%, the game will often visually round it to 100% or flash the meter. However, the logic continues until it hits exactly 100.0%. If you pour a large Blue cup when you are at 99%, the excess paint is wasted, but more importantly, the time spent pouring that cup is time you could have used for a different color. Learn to recognize the "sweet spot" where one more small cup will finish the job, rather than relying on a large cup.
Timing vs. Positioning
Don't worry about the exact *position* of the paint on the canvas. The game is forgiving about placement as long as the color is correct. Worry about the *timing* of the pour. If you pour a Cyan cup while the belt is jammed, it might pour too thickly or miss the target zone entirely. Rhythm beats precision in this level.
The "Deadly" Delay
There is a roughly 0.5-second delay between when a cup pours and when the meter updates. Do not panic-load a second cup of the same color because you think the first one didn't register. Wait for the UI to flash before making your next decision. Panic loading is the #1 cause of the 105% overshoot.
Using "Filler" Cups
Sometimes, you have no choice but to load a cup you don't really need (e.g., a Green cup when Green is 90% full) just to unblock a color you do need (e.g., the Cyan underneath it). This is called a "Filler" move. It is acceptable only if you have the slot space for it. If you load a filler cup when you are tight on space, you are effectively wasting a slot that could have been used for a critical color.
Resetting Your Mental State
If you mess up and overshoot Yellow to 110% on the first try, do not try to salvage the run. The math will never work out perfectly. Restart immediately. Level 26 is short enough that a restart takes 10 seconds. Fighting a losing battle for 5 minutes just to lose at 98% Cyan is frustrating. Know when to cut your losses.
Solutions for Common Stuck Scenarios
Scenario A: The "Cyan Drought"
The Problem: You are at 60% progress, but you cannot find any Cyan cups in the tray. They seem to have disappeared.
The Diagnosis: You likely burned through the initial top layer of Cyan too quickly, and now the remaining Cyan is buried under layers of Green and Orange.
The Fix: Stop looking for Cyan. Shift your focus to Green and Orange. Load the Green cups that are blocking the lower stacks. Load the Orange cups that are sitting on the "lid" of the tray. By clearing these "Blocker" colors, the Cyan cups will naturally rise to the top. You will temporarily spike your Green and Orange meters, but as long as they don't hit 100%, you can balance them out later once the Cyan supply is restored.
Scenario B: The "Yellow Wall"
The Problem: Your Yellow meter is stuck at 90%, but every time you load an Orange cup, it overshoots to 110%.
The Diagnosis: The remaining "Yellow" required is less than the volume of a single Orange cup. The game's meter granularity is too fine for the tools you have.
The Fix: You need to use "bleed" from other colors or simply wait. Stop loading Orange entirely. Instead, focus entirely on Cyan and Blue. As you finish the background, sometimes the mechanics of the level will "top up" the last few percentages of the foreground. If that doesn't work, you may have to restart and be more conservative with Yellow earlier in the level (aiming for 85% instead of 90% before the final push).
Scenario C: The "Belt Jam"
The Problem: The belt stops moving. It says 5/5, but no cups are pouring.
The Diagnosis: You have encountered a logic loop or simply overfilled the queue without letting the pouring mechanic catch up.
The Fix: You cannot "un-jam" it instantly. You must wait. Do not tap any more cups. Watch the cups currently on the belt. Wait for the one at the front to pour and disappear. Once you are at 4/5, you can resume. To prevent this, always count "1... 2... 3..." out loud between loading cups if you are playing fast.
Scenario D: The "Perfect Storm" Shortage
The Problem: You are at 95% on Blue, 95% on Cyan, and 95% on Green. You need 1% of each to finish, but you only have Orange cups available in the tray.
The Diagnosis: This is a sequencing failure. You polished the main colors too early without leaving "wiggle room."
The Fix: This is very hard to recover from. Your only hope is to load the Orange cups (overshooting Yellow) and hope that the sheer volume of paint on the canvas triggers a "Complete" state for the level despite the meter imbalance. However, this rarely works. The real solution is prevention: in future runs, ensure that at least two colors are below 90% before you run the tray dry of their specific cup types.
Speed Run and Shortcuts
Speed Run Strategy: The "Batch Load"
If you are chasing a time score, you cannot wait for cups to pour one by one. You must use the "Batch Load" technique. This relies on the fact that the belt holds 5 cups.
- The Setup: Wait until the belt is completely empty (0/5).
- The Batch: Rapidly load 3 cups in quick succession: Cyan, Blue, Green.
- The Pause: Wait for the first cup to pour.
- The Repeat: Load 2 more: Cyan, Blue.
This keeps the belt at a high capacity (3-5/5) without risking a jam, because you are alternating the load types. It maximizes the amount of paint on the canvas per minute.
Shortcut: Ignoring the Tray Order
Standard play requires you to pick the "best" cup available. Speed running requires you to pick the "fastest" cup available. If a Blue cup is right at the top of the tray, take it—even if you really need Cyan. The time saved by not hunting for the perfect cup often outweighs the slight inefficiency of the color balance. You can correct the balance later with a single big pour.
The "Swipe" Technique
On mobile devices, the swiping motion to load cups is faster than tapping. If you can master the "Swipe-Down" gesture to pull a cup directly onto the belt, you can shave seconds off your time. This allows you to keep your eyes on the canvas meters rather than looking at the specific cup icons.
Level Start Skip
The very first seconds of the level are non-critical. The paint won't start filling meaningfully until the third or fourth cup. You can load your first 5 cups almost blindly: Blue, Green, Cyan, Blue, Green. This "Opening Gambit" works for 90% of Sand Loop levels and puts you instantly at 15-20% progress without any thought.
Memorizing the "Safe Zone"
For repeat speed runs, memorize the specific meter reading where you can stop caring about a color. For Level 26, once your Navy (Blue) hits 85%, you can effectively ignore it for the rest of the run. The residual paint from other pours will almost certainly push it over the line. Declaring a color "finished" in your brain reduces your cognitive load, allowing you to process the remaining colors faster.