
Level 229
HARDHow to solve Sand Loop level 229? Get instant solution for Sand Loop 229 with our step by step solution & video walkthrough. Sand Loop 229 tips and guide.
Play Sand Loop Now
Experience the puzzle challenge firsthand
Game Screenshots
Sand Loop Level Guides
Level Overview: The Pagoda Ice Trap
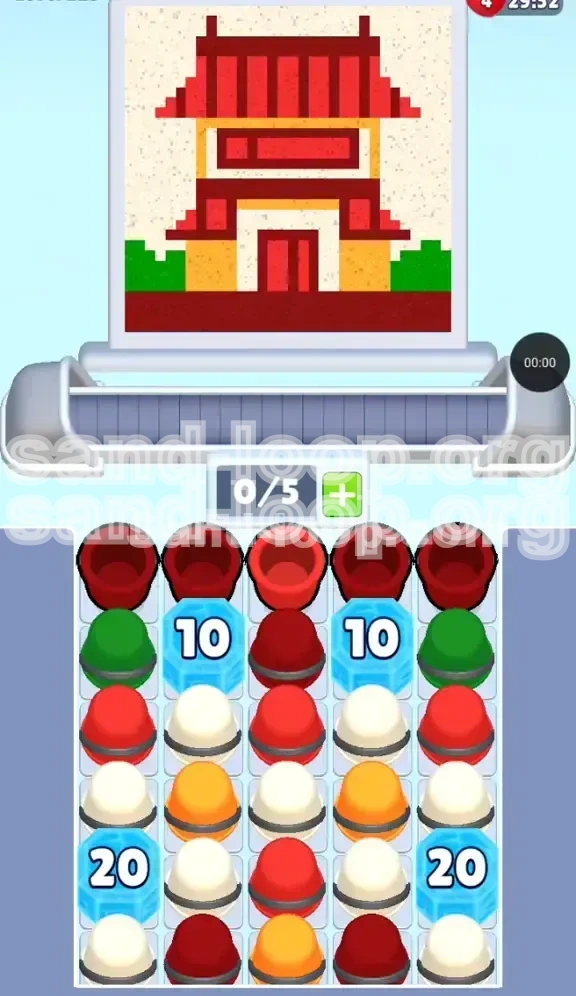
Sand Loop Level 229, officially titled "The Red Pagoda," is a masterclass in resource management and capacity control. While the pixel art—a traditional Asian temple against a backdrop of sky and bushes—appears serene, the gameplay is anything but. This level is categorized as a high-difficulty logic puzzle rather than a test of pure speed.
The defining characteristic of this stage is the severe restriction on resources at the start. You are boxed in by Countdown Ice Blocks that specifically target the columns containing your background and wall colors. Unlike standard stages where you can pick and choose colors freely, here the game forces a strict dependency tree: you cannot access the light colors until you have manually melted the ice using the dark colors. This creates a high-pressure scenario where space on your conveyor belt is your most valuable asset. One wrong move—pulling a cup you cannot use immediately—can clog your machine and force a restart.
The Visual Challenge
The target image is a multi-layered composition. The foreground features Forest Green bushes, the mid-ground contains a large Mustard Yellow temple structure with Deep Maroon roofs, and the background is a Cream/White sky. The complexity arises because the game forces you to paint the foreground and roof details before you have physical access to the paint required for the background walls.
The Slot Economy Crisis
Your conveyor belt has a maximum capacity of 5 slots. In Level 229, you will frequently find yourself with 4 or 5 active colors available, but only 1 or 2 valid targets to paint. This discrepancy is the primary cause of failure. You must resist the urge to tap dispensers just because they are available; you must only tap when there is a clear path to the canvas.
The Ice Block Mechanics
There are four Countdown Ice Blocks in this level. Two blocks marked "10" freeze your Yellow and White supplies. Two blocks marked "20" are buried deeper, blocking late-game reserves. The counters only decrease when a cup is successfully poured onto the canvas. "Successful" means the paint hits the pixel art; if a cup loops around because the target area is already full or blocked, it does not count toward breaking the ice.
Why Strategy Beats Speed
Although a timer exists, frantically tapping dispensers will result in a "Jam" state 100% of the time. The "10" blocks require 10 successful pours to break. If you fill your belt with unusable cups, you create a deadlock where you cannot pour to lower the counter, and you cannot pick up new cups because the belt is full. Patience and precision are the keys to unlocking the Pagoda.
Clear Objectives and Strategy
To conquer the Red Pagoda, you need a structured approach rather than reactive tapping. The level is divided into three distinct phases defined by the availability of your color palette.
Phase 1: The Ice Breaking Initiation
Your primary goal in the first 30% of the level is purely logistical. You must generate 10 "points" of pour volume to shatter the "10" Ice Blocks. During this phase, you are forbidden from painting certain elements even if they look tempting, because you lack the necessary paint and you lack the belt space to manage mistakes.
Phase 2: The Structural Fill
Once the "10" blocks shatter, the game changes dynamically. You unlock Mustard Yellow and Cream. The objective immediately shifts to clearing the backlog of cups that have likely accumulated on your belt. You must prioritize the Yellow walls immediately to prevent the nozzle from painting the background (Cream) while the walls remain unpainted.
Phase 3: The Background and Foundation
The final phase involves managing the "20" blocks and the sky. As you finish the structure, the deep ice blocks will break, adding more cups to your belt. The challenge here is ensuring the sky is painted evenly without "spilling" Cream paint onto the Red roof or Green bushes, which wastes precious belt space during the final cleanup.
Step-by-Step Walkthrough Guide
This section provides a linear script to follow. If you deviate from this order, you risk clogging your conveyor.
Step 1: The Dark Red Opening
As soon as the level starts, ignore the Green and Yellow colors. Locate the Deep Maroon (Dark Red) dispensers in Columns 1 and 5.
- Immediate Action: Tap Column 1 and Column 5 simultaneously.
- Target: These cups will automatically flow to the large roof area.
- Note: Do not worry about the Bright Red yet. Focus on emptying the heavy Dark Red load first to free up your belt capacity.
Step 2: The Bright Red Accent
With the Dark Red flowing, look at the center column (Column 3).
- Action: Tap the Bright Red dispenser in Column 3.
- Target: This color is designated for the door frame and the horizontal roof accents.
- Why Now: Tapping this now ensures it enters the queue behind the Dark Reds. If you wait, you might not have the slots to pull it later when the nozzle is in the correct position.
Step 3: Managing the Green Trap
After the initial Reds are cleared, you will see Forest Green cups exposed in Columns 1 and 5.
- The Trap: The Green bushes are located at the very bottom corners of the canvas.
- The Risk: If you tap Green now, the cups will enter the belt. However, the nozzle is likely still painting the roof at the top of the screen. The Green cups will cycle around, taking up slots, and will not pour until the nozzle reaches the bottom.
- Strategy: Only tap the Green cups if you have at least 2 empty slots on your conveyor. If your belt is full, wait for the nozzle to start moving downward before loading Green.
Step 4: Breaking the "10" Barrier
Keep pouring Red and Green until you hear the shatter sound. This indicates the "10" blocks are gone.
- Immediate Shift: Stop tapping Columns 1 and 5 entirely for a moment.
- New Access: You now have access to Mustard Yellow (Walls) and Cream (Sky).
- Pivot: Your belt is likely full of cups that just became usable or are now obsolete. Focus entirely on managing the flow of these existing cups before pulling new ones.
Step 5: The Mustard Yellow Wall Push
With the ice broken, the nozzle will eventually move to the center of the screen.
- Prioritize Yellow: The Yellow walls are the "anchor" of the image. You must pour them before the background sky is finished.
- Mechanic: If the nozzle is currently over the Yellow section, aggressively tap the Yellow dispensers to ensure you don't run out mid-pour. Running out causes the nozzle to hover, wasting time and allowing the belt to back up.
Step 6: The Final "20" Block Cleanup
As the walls and roof finish, the "20" blocks in the corners will break.
- Final Supply: These usually contain the remaining Cream for the sky or extra Maroon for the base foundation.
- Execution: By this point, most of the art is done. Simply ensure the remaining cups on your belt find their targets. Do not pull new cups unless the belt is nearly empty.
Color Order and Processing Logic
Understanding the hierarchy of colors is crucial for optimizing your conveyor space. The order is dictated by the position of the art layers from top to bottom.
Priority 1: Deep Maroon (Roof)
This is the highest priority color not because it is the most important, but because it is the most accessible. It occupies the top-most position on the canvas, meaning the nozzle reaches it first. Processing this first clears your initial cup backlog and lowers the ice counters.
Priority 2: Bright Red (Details)
Processed immediately after Deep Maroon. Since it shares the same general vertical space as the roof, it can be queued directly behind the Dark Red cups without causing a traffic jam on the belt.
Priority 3: Forest Green (Bushes)
This is a "Low Priority" early-game color. Because it is at the bottom of the screen, Green cups loaded early will sit on your belt for the longest time. Only load Green when you have "dead space" on your belt that needs filling while waiting for other colors to process.
Priority 4: Mustard Yellow (Walls)
This becomes "High Priority" only after the "10" blocks break. The walls are located in the center of the screen. Once accessible, you must switch focus to Yellow immediately. If you paint the Cream background first, you will have to carefully paint the Yellow walls later, which increases the risk of bleeding colors.
Priority 5: Cream/White (Sky)
This is the "Filler" color. It should be processed last. It is the background layer. If you attempt to process Cream while you still have Reds and Greens on the belt, you risk the nozzle painting the sky white while the roof is still unfinished, creating a messy, incomplete look that is hard to fix.
Key Tips for Success
The "Slot Reservation" Technique
Always try to keep at least 1 slot open on your conveyor belt. If you have 5/5 slots full, you lose the ability to react to new colors unlocking. Keeping 4/5 slots full gives you the flexibility to grab a crucial cup the moment a block shatters.
Watch the Nozzle, Not the Belt
Novice players stare at the dispensers. Expert players stare at the nozzle. Only tap a color when the nozzle is approaching the area where that color needs to be painted. Tapping too early is the primary cause of belt jams.
Recognizing the "Shatter" Moment
The game provides visual cues when ice blocks are about to break. If you are at 8/10 pours, stop pulling random colors. Clear your belt as much as possible to make room for the flood of new colors that will appear the instant the block hits 0.
Understanding "Pour Points"
Large areas like the Roof and Sky require multiple cups to fill. Small areas like the Door Frame only need one. Do not pull three Bright Red cups for a feature that only requires one. This clogs your belt with unusable inventory.
The Reset Protocol
If you realize you have made a mistake and your belt is full of cups that cannot be poured (e.g., you have Green cups but the Green area is already full), do not hesitate to restart the level. Trying to "wait it out" in Level 229 rarely works; the math of the slot economy is usually unforgivable.
Common Mistakes to Avoid
Pre-Loading Green Cups
This is the #1 error. Players see the Green bushes at the start and tap them immediately. The cups sit on the belt, taking up 20-40% of your capacity. Then, when the "10" blocks break and you need to pull Yellow, you have no room. You get stuck waiting for the Green to pour, which wastes valuable time.
Ignoring the "2/5" Warning
When you see the belt is nearing capacity, do not try to "force" a cup onto it. The game will prevent you from tapping, but the hesitation breaks your rhythm. Managing the rhythm is more important than tapping quickly.
Painting the Background Too Early
Just because Cream is available after the "10" block breaks doesn't mean you should paint it immediately. If the nozzle is still at the roof, painting the sky is inefficient. Wait for the nozzle to naturally move to the top or bottom, or until the walls are done.
Misjudging Similar Colors
The Deep Maroon and Bright Red are very similar in low light. If you confuse them and pour Bright Red on the roof structure meant for Deep Maroon, the pixel art won't register it as complete, and you'll waste a cup trying to "fix" it.
Stuck Solutions and Troubleshooting
If you find yourself in a state where progress has halted, use these diagnostic checks.
Scenario: "I can't break the Ice Block!"
Diagnosis: You have 0/10 points on the counter, or you are stuck at 8/10.
Solution: Check your conveyor belt. Is it full of cups that aren't pouring? You likely have a color on the belt that corresponds to an area of the art that is already full or currently unreachable by the nozzle. You must wait for the nozzle to cycle to that area to pour the cup, which will lower the counter. There is no shortcut; you must wait for the cycle.
Scenario: "The Belt is Full and Jammed!"
Diagnosis: You have 5/5 cups, and none are moving to the front.
Solution: This usually means the lead cup cannot be poured because the target area is blocked or full. Look at the leading cup. If it's Green, wait for the nozzle to go to the bottom. If it's a color for an area that is already fully painted, you have made a mistake in your previous fills and may need to restart.
Scenario: "I ran out of a color mid-pour!"
Diagnosis: The nozzle is painting a large area (like the sky) and the cup runs dry, but the next cup on the belt is a different color.
Solution: This is a timing issue. You should have tapped the dispenser of the active color *while* the nozzle was painting, to ensure a seamless chain. In the future, listen to the sound of the paint pouring; when it slows down, tap the next matching cup.
Speed Run Tips and Shortcuts
For players looking to achieve a 3-Star rating or top the leaderboard, efficiency is paramount.
The "Double Tap" Opener
You can shave 2-3 seconds off your time by using two fingers. As the level loads, immediately place fingers on Column 1 and Column 5. Tap simultaneously the exact millisecond the "Start" fade-in finishes. This queues the Dark Red cups instantly.
Chain Painting the Roof
The roof requires about 4-5 cups of Deep Maroon. Instead of waiting for one to finish and then tapping the next, tap the next dispenser while the previous cup is still pouring (about 80% full). This keeps the nozzle moving constantly without the "searching" animation pause.
Ignoring the Small Details
During the initial phase, completely ignore the door frame (Bright Red) and the small bushes (Green). Focus purely on mass-volume colors (Dark Red) to break the ice. You can come back for the details once the ice is broken and your belt is cleared.
The "Yellow Rush" Strategy
Once the "10" block breaks, do not wait for the belt to clear naturally. If you see Yellow, tap it immediately. The Yellow walls are the bottleneck of the second half. Getting them done early frees up the belt to handle the final "20" block cleanup effortlessly.