
Level 238
HARDHow to solve Sand Loop level 238? Get instant solution for Sand Loop 238 with our step by step solution & video walkthrough. Sand Loop 238 tips and guide.
Play Sand Loop Now
Experience the puzzle challenge firsthand
Game Screenshots
Sand Loop Level Guides
Level 238 Comprehensive Walkthrough: The Winter Cottage Strategy
Welcome to the definitive guide for Level 238, infamously known as the "Winter Cottage." This stage is a significant difficulty spike in Sand Loop, designed to test your resource management rather than just your painting speed. On the surface, it looks like a charming pixel art scene featuring a cozy cabin under a snowy sky. However, beneath this aesthetic lies a ruthless logistical puzzle.
The primary difficulty here is not the pixel art itself, but the board layout. You are dealing with a "Choked Board" scenario where a massive 65 HP ice column in the center blocks access to 60% of your paint supply. If you approach this by trying to paint the pretty picture first, you will fail. The win condition for this level is breaking the center ice; the painting is merely a byproduct of that process.
In this guide, we will break down exactly how to manage your 0/5 slot limit, which colors to prioritize, and how to avoid the common deadlock that plagues most players on this stage.
1. Level Overview and Analysis
The "Choke Point" Mechanic
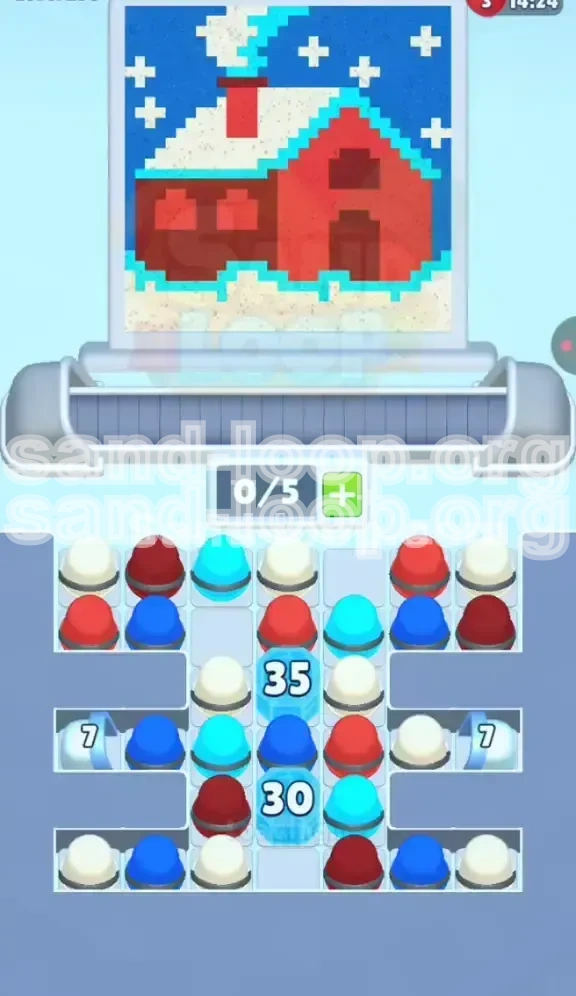
Unlike standard levels where paint flows freely, Level 238 restricts your economy. The center of the supply tray is dominated by two stacked Ice Blocks: a 35 HP Cyan block and a 30 HP Blue block. These blocks act as a dam. Until you destroy them, the cups behind them (which are essential for the background sky) are inaccessible. You are forced to play with a depleted hand of cards for the first 50% of the match.
Visual Breakdown: The Winter Cottage
Your target image is complex but can be divided into four distinct zones. Understanding the volume of paint required for each helps you prioritize:
- The Sky (Background): Occupies roughly 40% of the canvas. Requires Blue paint. Save this for last.
- The Snow (Foreground): Occupies 25% of the canvas. Requires White paint. This is your "dump" color for when you have spare slots.
- The House (Mid-ground): Occupies 25% of the canvas. A mix of Bright Red, Dark Maroon, and Cyan trim. This is high-precision work.
- The Smoke (Accent): The final 10%. White and Cyan pixels that curve against the blue sky. High risk of "bleeding" errors.
The Slot Management Crisis
You have a maximum of 5 cups on your conveyor belt (0/5). This is extremely tight. Because the board is choked, you will often find yourself in a situation where you have 4 cups on the belt, but none of them match the current color of the dispenser. This is the "Deadlock Zone." We will discuss how to clear these jams in the walkthrough section.
Color Palette and Distribution
The supply tray is deceptive. It looks like there is plenty of paint, but the distribution is skewed:
- White: Abundant. You will be swimming in White cups. Use them to keep the belt moving.
- Red/Maroon: Moderate. These are your workhorses for the mid-game.
- Cyan: Scarcity. Most Cyan cups are locked behind the Ice Block or located in the hard-to-reach top rows. Priority #1.
- Blue: Rare. Almost entirely locked behind the Ice Blocks. Priority #2.
Win Condition vs. Kill Condition
To beat Level 238, you must shift your mindset. The "Kill Condition" is the destruction of the center Ice Column. The "Win Condition" (painting the canvas) is secondary. If you focus 100% of your early moves on hitting the Ice Block with Cyan, even if it means ignoring unpainted pixels on the house, you will win. If you try to paint the house first, you will run out of moves.
2. Strategic Objectives
Primary Objective: Ice Breaker
Your single most important goal is to deal 65 points of damage to the center column. This means you must aggressively hunt for Cyan and Blue cups. Every time a Cyan cup enters the dispenser, ask yourself: "Can I use this to hit the 35 HP block?" If the answer is yes, do it, even if the house looks ugly.
Secondary Objective: Prevent Board Clogging
Because you are digging through layers of ice and debris, new cups will constantly fall from the top. If your 5 slots are full, the physics engine can't drop new cups. This halts your progress. You must maintain a "flow state"—constantly pouring paint to free up slots for incoming ammunition.
Micro-Management: The "7" HP Blocks
On the left and right sides of the tray, there are smaller Ice Blocks with 7 HP. Ignore them. They are traps. Breaking them gives you a small amount of paint, but the cups you waste to break them could have been used to damage the main 35 HP block. They will break naturally as you clear the rows above them. Do not target them directly.
Painting Efficiency: Background Last
Resist the urge to fill in the Blue sky. It is tempting because it's a large area, but Blue cups are your most precious resource early on. Using a Blue cup on the sky before the Ice Block is broken is a critical mistake. Save every single Blue cup for the Ice Block until it shatters.
Accuracy Check: The Cyan Trim
The roof trim is thin. If you accidentally pour White or Red into the Cyan trim, you create a "pixel error." Fixing errors costs moves. Since moves are limited by the Ice Block's health, you cannot afford to fix mistakes. Patience is key. Wait for the dispenser to align perfectly before pouring on the trim.
3. Step-by-Step Walkthrough
Phase 1: The Opening Gambit (Moves 1-15)
The board is set. The top row is accessible. Do not paint the house yet.
Action: Look at the top-left and top-right corners. You will see White and Red cups. Tap them to load them onto your belt.
Strategy: Pour the White cups onto the ground snow (bottom of the canvas). Pour the Red cups onto the main body of the house. Your goal here is not to finish the art, but to "burn" the top layer of the supply tray. You need to remove these top cups to expose the ones touching the Ice Block.
Note: If a Cyan cup appears in the top row, grab it immediately. Do not paint with it. Hold it or pour it directly onto the center Ice Block.
Phase 2: The Cyan Assault (Moves 16-40)
The top layer is gone. Now you are face-to-face with the 35 HP Ice Block.
The Grind: This is the hardest part of the level. You need to deal 35 damage. The only cups that can do this effectively are Cyan.
Tactics: You will see a mix of White, Red, and Cyan cups. Use White and Red to keep your slots open (painting the house body). As soon as a Cyan cup enters the active slot, divert it to the center block.
Slot Trap Warning: If you have 4 cups (e.g., Red, White, White, Red) and the dispenser is showing Cyan, do not tap the supply tray. You have no room for the Cyan cup. Wait for one of the 4 cups to pour, freeing up a slot, then tap the tray to grab the Cyan.
Phase 3: The Mid-Game Transition (Moves 41-70)
The 35 HP block shatters! You are now staring at the 30 HP Blue Ice Block.
The Shift: Immediately stop hunting for Cyan. Your new target is Blue.
Unlocking the Wings: With the center block gone, the side "wings" of the supply tray will start dropping cups into the middle. This is where the Blue cups are hiding.
Painting: By now, the house should be mostly Red and White. The roof is White. The windows are Dark Maroon. You can fill these in while waiting for Blue cups. The "7" HP side blocks are likely taking damage from your clearing efforts; ignore them.
Phase 4: The Blue Breakthrough (Moves 71-90)
You are chipping away at the Blue Ice Block. It has 30 HP.
Efficiency: Use this time to clean up the Dark Maroon windows. Make sure the Red body of the house is solid. You want the house 90% complete before the Blue block breaks.
Why? Once the Blue block breaks, you will be flooded with Blue cups. If you are still trying to paint Red windows when the flood comes, you will get clogged with Blue cups you can't use. Finish the Red/Dark work before the Blue dam bursts.
Phase 5: The Sky and Smoke (Moves 90+)
The 30 HP block is gone. The bottom of the tray is open.
The Sky: You will have a reserve of Blue cups at the bottom of the screen. Spam these into the Blue sky background. It’s a large area, so feel free to pour rapidly.
The Smoke: This is the final challenge. You need White smoke coming from the chimney.
Precision: The smoke is curved and touches the Blue sky. If you pour White when the dispenser is hovering over the Blue sky, you waste a cup. Tilt your device carefully or time your taps to ensure the White paint hits only the smoke pixels and the roof snow.
4. Optimal Color Order
Priority Tier 1: Cyan (The Key)
Cyan is the most critical color in the first half of the level. It is the only color that can efficiently damage the primary obstacle (35 HP Block). If you have a choice between painting a Red wall or grabbing a Cyan cup from the tray, grab the Cyan cup. You can paint the wall later; you cannot win without breaking that ice.
Priority Tier 2: White (The Space Maker)
White paint is abundant. The ground and roof are huge areas. Use White paint as a "dump" for your extra slots. If your belt is full and you need to cycle cups to find Blue, pour White onto the roof. It’s low-risk because the area is large and easy to hit.
Priority Tier 3: Bright Red / Dark Maroon (The Filler)
These are your mid-game colors. Use them to keep your completion percentage up while you are hunting for Cyan and Blue. However, be careful: the Dark Maroon windows are small. If you have too many Dark Maroon cups on the belt, you might get stuck waiting for the tiny window to align with the dispenser.
Priority Tier 4: Blue (The Endgame)
Blue is last. Do not pour Blue until the center column is clear. The only exception is if you have a Blue cup and the dispenser is perfectly aligned with a sky pixel, and pouring it will free up a slot to get a Cyan cup. But generally, hoard Blue for the Ice Block.
The "Danger" Interactions
Avoid mixing Cyan and White in the same dispenser queue if the target is the roof trim. If a White cup is followed immediately by a Cyan cup, and you pour the White slightly too high, the subsequent Cyan pour might land on the snowy roof instead of the trim, wasting the Cyan. Always try to clear one color completely from the belt before switching to a delicate trim color.
5. Key Tips and Common Mistakes
Common Mistake: The "Pretty Picture" Trap
Many players lose because they try to paint the house perfectly from the start. They see an unpainted Red wall and instinctively fill it. Meanwhile, they are ignoring the Cyan cups needed for the Ice Block. The Fix: Play ugly. If the house is half-painted but the Ice Block is gone, you are winning. If the house is pretty but the Ice Block is full, you are dead.
Common Mistake: Ignoring Slot Capacity
Reaching 5/5 slots is a game-over state. You cannot tap new cups. You are at the mercy of the dispenser. The Fix: If you have 4 cups loaded, stop tapping the supply tray entirely. Focus entirely on pouring what you have to free up space. Only tap the tray when you have 3 or fewer slots filled.
Key Tip: The "Center-Out" Strategy
Always clear cups from the center of the supply tray first. The physics engine causes cups to slide inward. By clearing the center column, you allow the side cups to slide into the middle, making them easier to catch with the dispenser.
Key Tip: Pre-loading for the Ice
Before the 35 HP block breaks, try to have 1 or 2 Blue cups already waiting on your belt. As soon as the Cyan block shatters, you can immediately start hitting the Blue block without waiting for Blue cups to spawn. This saves valuable moves.
Stuck Solution: What to Do When Deadlocked
If you have 5 cups (e.g., Red, Red, White, White, Dark Maroon) and the dispenser is stuck on a color you don't have (or a color you have isn't aligned):
- Check the Ice: Can any of your 5 cups hit the Ice Block? If yes, do it.
- Check the Dump: Can you pour White on the roof or Red on the body? Do it, even if that area is already 90% painted. Over-painting is better than being stuck.
- The Cycle: You must force a pour to cycle the dispenser to the next color.
6. Speed Run and Advanced Tactics
Speed Run Tip: Pre-emptive Tapping
Advanced players know that there is a delay between a cup pouring and the next cup entering the dispenser. You can "queue" your next move. As the last drop of paint falls from a White cup, immediately tap the area of the tray where your next desired color (Cyan) is located. This minimizes the downtime between pours.
The "7 Block" Shortcut
While we advised ignoring the 7 HP blocks, there is a speed run exception. If you have a powerful combo (e.g., a large cup) that will clear a 7 HP block AND reveal a row of 4 Cyan cups, it might be worth it. This is high-risk, high-reward. Only attempt this if you can clearly see that breaking the small block will release a flood of the color you actually need.
Advanced Pathing: The Roof Line
When painting the Cyan trim, don't move the dispenser linearly. Move it in a "Z" pattern or a zigzag. This covers the thin line more efficiently than trying to trace a straight line, which often results in misses due to the dispenser's movement speed.
Resource Forecasting
Count your cups. If you see that there are only 5 Blue cups remaining in the entire tray (visually scan the board), you know you have exactly 5 shots left to break that 30 HP block. If you miss one, you lose. This awareness helps you tighten your aim and stop taking risks on the painting aspect.
Good luck with the Winter Cottage. Follow this flow, respect the Ice Block, and you will clear Level 238 in no time.