
Level 271
HARDHow to solve Sand Loop level 271? Get instant solution for Sand Loop 271 with our step by step solution & video walkthrough. Sand Loop 271 tips and guide.
Play Sand Loop Now
Experience the puzzle challenge firsthand
Game Screenshots
Sand Loop Level Guides
Level Overview: The Summer Tree Strategy
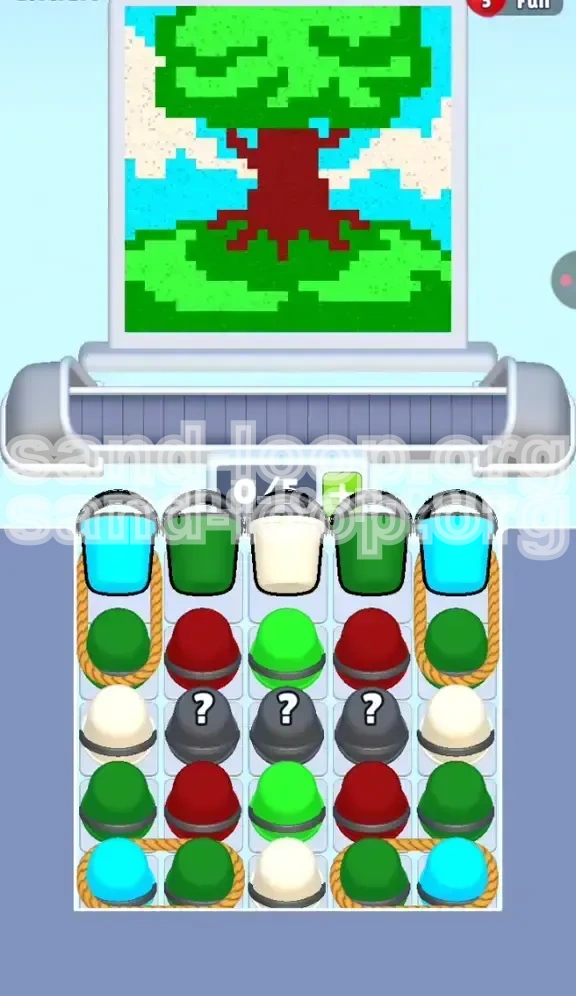
Level 271 in Sand Loop presents a deceptive challenge that blends aesthetic pixel art with complex logistical puzzles. While the visual target—a majestic Summer Tree against a blue sky—appears peaceful and static, the underlying mechanics are purely dynamic and unforgiving. This stage is not about reflex; it is a rigorous test of capacity management and queue optimization.
The primary difficulty in this level stems from the Dual Rope System governing the outer columns. Unlike standard levels where you can cherry-pick colors, the ropes link multiple buckets together. Pulling one color inevitably drags others along, threatening to overflow your limited 5-slot belt capacity. Furthermore, the board is cluttered with Mystery Buckets that obscure critical colors, specifically the browns and light greens required for the tree's trunk and grass highlights.
Success in Level 271 depends on your ability to sequence colors in a specific "Snake" pattern. You must aggressively clear the center columns to create breathing room before daring to trigger the rope mechanisms on the flanks. If you treat this as a simple "connect the dots" painting game, you will quickly find your belt jammed with unusable colors, leading to a premature Game Over.
The Core Mechanic: Linked Columns
The defining feature of this level is the rope physics. The leftmost and rightmost columns are vertically synchronized. This means accessing the Cyan (Sky) buckets at the top of these columns requires you to have enough inventory space to accept the Dark Green and White buckets that are tethered to them. It is a "package deal" that forces you to plan your moves 3-4 steps in advance.
The Mystery Element
Scattered in the center tray are Gray Mystery Buckets. These act as temporary blockers, preventing you from accessing the lower tiers of the supply tray. They typically conceal the rare Earth tones (Red/Brown) needed for the trunk. You cannot rely on luck; you must clear the upper layers intentionally to force these Mystery Buckets into the light and identify their contents.
Belt Capacity Management
Your conveyor belt has a strict limit of 5 units. In Level 271, the average rope pull will deposit 2 to 3 units onto the belt simultaneously. This leaves you with a razor-thin margin for error. Keeping your belt at 50% capacity or lower is the only safe way to interact with the roped columns without causing a catastrophic overflow.
Visual Complexity Analysis
The pixel art canvas requires high precision. The tree foliage is not a solid block; it requires a specific blend of Dark and Light greens. The clouds, rendered in White, have jagged edges that penetrate into the Green and Blue zones. This interlocking design means you cannot simply "flood fill" the sky first; you must weave the colors to avoid contaminating the cloud boundaries with blue or the tree line with white.
Clear Objectives: Your Mission Goals
To achieve a perfect clear and three-star rating in Level 271, you must move beyond simply filling the canvas. You need a structured approach that minimizes belt congestion and maximizes color efficiency.
Primary Goal: Trunk and Foundation
Your first and most critical objective is to secure the Red/Brown buckets. The tree trunk serves as the central anchor for the entire image. If you delay this and fill your belt with Sky Blue or Leaf Green, you will have no space to store the trunk color, forcing you to waste moves dumping other colors. Securing the Brown/Rouge stream is priority number one.
Secondary Goal: Sky Management
The Cyan (Sky) buckets are abundant but trapped under the rope mechanics. Your goal here is to release them in small batches. You must avoid the temptation to clear both side columns simultaneously. Instead, alternate between left and right to keep a steady flow of Blue without overwhelming your inventory slots.
Tertiary Goal: Foliage Density
The tree crown consumes approximately 60% of the total pixels. This requires a massive volume of Dark Green. Your objective is to use the Light Green (grass/highlights) sparingly to clear those specific small zones, then transition into a "mass production" phase where you continuously feed Dark Green buckets to the belt until the canopy is complete.
Final Goal: Cloud Precision
The White buckets are the most dangerous due to their scarcity and awkward placement on the ropes. The objective is to time the release of White buckets so that they arrive on the belt exactly when the nozzle is passing over the cloud sections. Delaying this too long results in White buckets clogging up slots needed for the final Green push.
Step-by-Step Instructions: The Complete Walkthrough
Follow this exact sequence to dismantle the puzzle. Deviating from this order often leads to bottlenecks that are difficult to recover from.
Phase 1: The Center Breakthrough (Turns 1-5)
Do not touch the outer columns yet. Begin by tapping the three center buckets in the top row.
- Action: Tap the Center White bucket.
- Reason: This clears the immediate blocker and begins the cloud base.
- Follow-up: Immediately tap the two Dark Green buckets flanking the White one.
- Result: This empties the top-center row, causing the row below to shift up. This reveals the first wave of Red/Brown buckets and potentially exposes the Gray Mystery buckets.
Phase 2: Securing the Trunk (Turns 6-10)
With the center top cleared, you now have access to the color vital for the tree structure.
- Action: Identify the Red/Brown buckets now available in the middle column.
- Move: Send all available Red/Brown buckets to the belt immediately.
- Focus: Do not worry about the leaves or sky yet. Aggressively filling the trunk area now clears inventory space because the trunk is a vertical column that processes colors relatively quickly.
- Note: If you encounter a Mystery Bucket in this phase, tap it to reveal its color. If it is Brown, add it to the belt. If it is a duplicate color you already have (like Green), leave it for now to save space.
Phase 3: The Controlled Rope Trigger (Turns 11-15)
Now that the trunk is underway and your belt has some temporary space, it is time to engage the ropes.
- Check: Ensure your belt capacity is at 2/5 or 3/5 maximum.
- Action: Tap the Left Cyan bucket (top of the left column).
- Consequence: The rope will yank up the Cyan, plus the attached Green and White buckets.
- Management: Watch the belt fill up. Allow the Cyan to pour into the sky section. As soon as the belt drops below 50% again, move to the next step.
Phase 4: The Mirror Image (Turns 16-20)
Repeat the logic for the right side to balance the flow of colors.
- Action: Tap the Right Cyan bucket.
- Result: This releases the second batch of Cyan and Green.
- Strategy: By alternating Left and Right rope pulls instead of doing them back-to-back, you prevent the belt from overflowing. This staggered approach gives the game engine time to process the Sky pixels before dumping more Green for the leaves.
Phase 5: The Green Flood (Endgame)
With the sky and trunk mostly finished, the board should be dominated by Green variations.
- State: The Mystery Buckets should be revealed or cleared by now.
- Action: Tap every remaining Dark Green bucket on the screen.
- Technique: Spam the Green supply. The tree crown is the largest area. Since the trunk and sky are done, you can dedicate your entire belt capacity to Green variations without worrying about clogging other colors.
Color Order: The Logical Processing Sequence
Understanding the hierarchy of colors is essential for knowing when to prioritize one bucket over another.
Priority 1: Red / Brown (Structure)
Why first? The trunk is the "spine" of the level. It is vertically adjacent to almost every other color zone. If you paint the green leaves first, you have to be extremely careful not to bleed the green into the trunk zone. By painting the Brown trunk first, you establish hard boundaries that make the subsequent "Green Flood" much easier to execute without pixel errors.
Priority 2: Cyan (Background)
Why second? The sky is the largest single block of color, but it is uniform. Processing the Cyan early is beneficial because it clears the bulky rope chains from the board. Once the Cyan is poured, the ropes disappear, simplifying the board state and leaving you with a flat field of Greens to manage.
Priority 3: White (Details)
Why third? White is a "high risk" color. Because the clouds are small and irregular, they require less volume but more timing. If you do White too early, the buckets sit on the belt taking up space needed for Brown or Cyan. If you do them last, you might not have enough belt slots free to catch them from the ropes. The middle ground—after the trunk is secured but before the final green push—is the sweet spot.
Priority 4: Dark Green (Mass Fill)
Why last? Dark Green is the "bulky" remainder. It accounts for roughly 55-60% of the screen. You leave this for last because it is the most forgiving. Once the sky and trunk are defined, you can pour Dark Green continuously until the level ends. It requires no precision, just volume.
Key Tips & Common Mistakes
Mastering Level 271 requires avoiding the pitfalls that trap 90% of players. Here is what you need to watch out for.
Common Mistake: The Rope Chain Reaction
The most frequent error is tapping a roped bucket when the belt is already at 4/5 or 5/5 capacity.
- The Scenario: You see a Cyan bucket you need. You tap it.
- The Failure: The rope pulls up the Cyan, plus two Green buckets and a White bucket. That is 4 items hitting a belt that only has 1 slot open.
- The Fix: Always count the items on the rope. If you see a vertical stack of 3 or 4 buckets tied together, ensure you have that many empty slots on your belt before pulling.
Common Mistake: Ignoring the Mystery Buckets
Players often leave the Gray Mystery Buckets sitting in the middle column while they focus on the easy Green picks on the outside.
- The Risk: Those Mystery Buckets often hide the exact color you need later (Light Green or Red). If you ignore them, they become "dead weight" that block the fall of other useful buckets.
- The Fix: Treat Mystery Buckets as "free moves." Tap them early. If the color is useless, it was a low-cost check. If it is useful, you gain early access to a critical resource.
Key Tip: The "Alternating Side" Strategy
When dealing with the Left and Right columns, never clear one side entirely before starting the other.
- The Strategy: Pull Left -> Process -> Pull Right -> Process.
- Why: If you clear the Left column completely, you end up with a belt full of Left-side colors. This forces the game to sort through a messy inventory to find the color needed for the Right side. Alternating keeps your color inventory balanced and prevents "color starvation" on the belt.
Key Tip: Watch the Nozzle Position
Keep an eye on the pouring nozzle at the top of the screen, not just the belt at the bottom.
- The Insight: If the nozzle is currently over the Sky section (Blue), do not panic about loading your belt with Green. The game will not pour the Green until the nozzle moves over a Green area.
- Application: Use this timing window. If the nozzle is on the Sky, load up the belt with Green for the upcoming Tree section. This "pre-loading" saves precious seconds.
Stuck Solutions & Speed Run Tips
If you find yourself repeating the level or stuck with a full belt, these advanced techniques will get you back on track.
Stuck Solution: The "Soft Lock" Recovery
Sometimes, you will have a belt full of Green, but the nozzle is stuck over a small White cloud section, and the White bucket is buried deep in the tray.
- The Problem: You cannot pour the Green (wrong zone), and you can't reach the White.
- The Fix: Stop tapping. Wait for the nozzle to move to a Green zone. Even if it paints a pixel you already painted, this empties the Green bucket from the belt. Once the slot is empty, tap the Mystery Buckets or ropes in the center to shuffle the board and hopefully bring the White bucket into a tappable position.
Stuck Solution: Mystery Bucket Gridlock
If the center column is jammed with unknown Gray buckets and you can't tap them because your belt is full:
- Action: You must waste a move. Look at the canvas. Is there a single pixel anywhere that matches a color currently on your belt? If so, tap that bucket to force a pour. Even if it's redundant, it frees up a slot. You need 1 empty slot to investigate a Mystery Bucket.
Speed Run Tip: Pre-Loading the Belt
For speed runners, efficiency is key. Do not wait for the nozzle to arrive at a zone before loading that color.
- The Tactic: While the nozzle is pouring Cyan in the Sky, aggressively tap the Green buckets in the center. By the time the nozzle finishes the Sky and swings down to the Tree, your belt should already be fully stocked with Dark Green, ready to fire instantly. This eliminates the "wait time" between phases.
Speed Run Tip: The 3-Slot Safety Buffer
Maintain a rhythm of keeping your belt at 3/5 full.
- Why: A 3/5 belt gives you 2 empty slots. This is the magic number for Level 271. It allows you to trigger any single rope chain (which usually adds 2 items) without overflowing. If you let the belt hit 4/5 or 5/5, you are forced to wait for a pour, breaking your rhythm. Keeping it at 3/5 ensures constant movement.