
Level 323
HARDHow to solve Sand Loop level 323? Get instant solution for Sand Loop 323 with our step by step solution & video walkthrough. Sand Loop 323 tips and guide.
Play Sand Loop Now
Experience the puzzle challenge firsthand
Game Screenshots
Sand Loop Level Guides
Sand Loop Level 323 Walkthrough: Mastering the Beaver Strategy
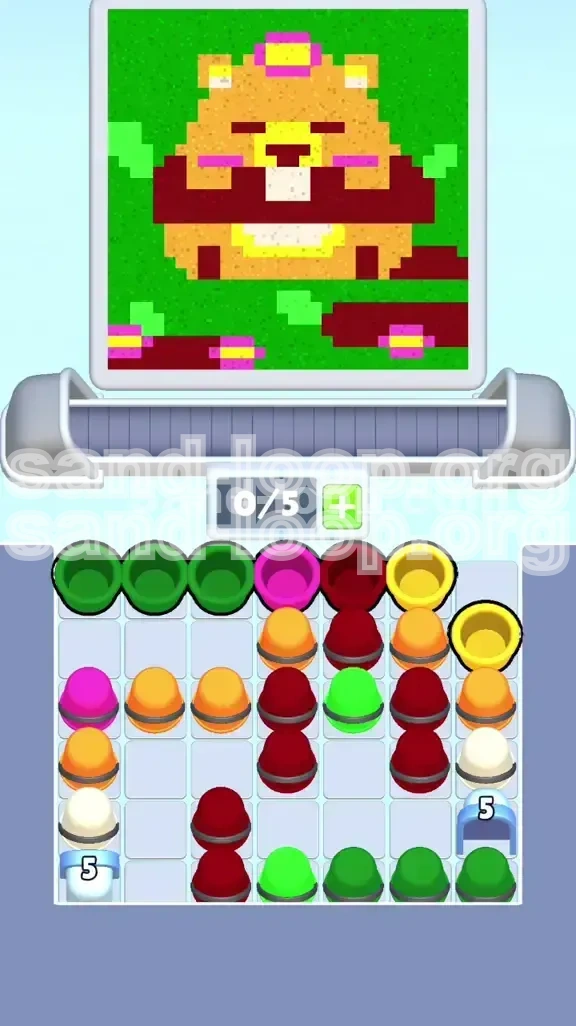
Welcome to the ultimate guide for conquering Level 323 in Sand Loop. This stage presents a unique pixel art challenge featuring a beaver (or perhaps a very hungry hamster) clutching a log. While the imagery is charming, the gameplay is a test of logic and tray management. Unlike speed-based levels, this stage is a puzzle of resource management. You are limited to a strict 5-slot conveyor belt, meaning every move must be calculated to prevent a bottleneck that stalls your progress.
In this walkthrough, we will dissect the level's mechanics, analyze the color palette, and provide a step-by-step blueprint to secure the win. We will focus heavily on managing the "Ice Block Columns"—frozen cups that require a specific number of actions to unlock—which are the true bottleneck of this stage.
Identifying the Core Challenge
The primary difficulty in Level 323 is not the pixel art itself, but the chaotic state of your supply tray. The colors you need most urgently (White for teeth, Maroon for the log) are buried deep under layers of less critical "junk" colors. The 5-slot conveyor limit means that if you load the wrong colors early, you will have no space to accept new cups, effectively freezing your production line.
Analyzing the Canvas Layout
The pixel art is bottom-heavy. The beaver's body and the large horizontal log occupy the center and bottom sections of the canvas. This means that pouring lighter background colors too early can result in them being "locked out" by the heavier, darker foreground colors poured later. You must build the image from the inside out, prioritizing the central elements before filling the peripheral background details.
The Time and Move Constraints
While not a strict "time attack" level, efficiency is key. The Ice Blocks in the corners require a set number of cup clearances (typically 5 actions) to melt. Every second you waste waiting for a cup to pour when you could have been clearing the tray adds up. Speed is a byproduct of good strategy here, not just fast tapping.
Why the "Background First" Rule Fails Here
In standard color sorting games, you often fill the background first. In Level 323, applying the Green background foliage first is a trap. Doing so consumes valuable conveyor slots that are desperately needed to shuffle the Orange and Maroon cups blocking your critical White supplies. You must resist the urge to paint the sky and trees until the structural integrity of the beaver is established.
Decoding the Color Palette and Priority
Success in Level 323 depends on understanding the hierarchy of your colors. Not all cups are created equal. Some are structural necessities, while others are cosmetic fillers. Misidentifying a priority color is the fastest way to get stuck.
Tier 1: The Anchor Colors (Maroon & Orange)
These are your most critical resources. The Maroon (Dark Red) forms the log, and the Orange forms the beaver's body. These colors occupy the largest surface area and are physically blocking the Ice Blocks in your tray. You *must* pour these colors first to clear the physical obstacles in your supply line. Treat these as your primary objective.
Tier 2: The Obstruction Colors (Yellow & Pink)
The Yellow cups (for the belly and face highlights) and Pink cups (for the headband/flowers) are medium priority. They are often stacked on top of the Tier 1 cups or the Ice Blocks themselves. You will need to process these not necessarily because the canvas needs them immediately, but because removing them from the tray is the only way to reach the Ice Blocks below.
Tier 3: The "Danger" Colors (White)
The White cups are the most dangerous asset in the game. They are required for the beaver's teeth—tiny, pixel-perfect areas that are incredibly difficult to fix if you overfill. Because these are locked in Ice Blocks at the bottom of the tray, they are naturally delayed, which is actually a blessing. You want a clear canvas before you touch these.
Tier 4: The Fillers (Green)
Green is the lowest priority color. It represents the background foliage. While it takes up significant space, it can be filled in almost anytime there is a gap. The only exception is if Green cups are actively blocking the release of other colors. Otherwise, keep them in the tray until you have space to breathe.
Strategic Overview: The Ice Block Mechanic
The defining feature of Level 323 is the Ice Block mechanism located in the bottom corners of your supply tray. Understanding this is the difference between a win and a loss.
Understanding the Ice Block Stack
In the bottom left and right corners of the tray, you will notice White cups encased in Ice with a number (usually '5'). This indicates a "dependency chain." You cannot access these White cups until you have cleared 5 other cups from the screen. This mechanic forces the specific order of operations for the entire level.
The Left Column Bottleneck
On the left side, the Ice Block is buried beneath an initial layer of Green and Pink cups, followed by a heavy stack of Orange cups. This means you must clear the initial Green/Pink debris and then process the Orange body color before the game will even register progress toward unlocking the White teeth color.
The Right Column Bottleneck
The right side is even more complex. It is buried under a mix of Yellow, Orange, and Maroon. This creates a logic puzzle: you must pour the Yellow and Maroon colors (even if the canvas isn't perfectly ready for them yet) purely to clear the vertical space in the tray to reach the Ice Block.
The "Burn" Strategy
Sometimes, you will have a color cup in hand (e.g., Yellow) that the canvas doesn't strictly need yet, but the cup is blocking the Ice Block counter. In this scenario, you must "burn" the cup—pour it into a safe, overflow-friendly area of the canvas just to get it off the conveyor belt. This is a critical advanced tactic for Level 323.
Conveyor Management During the Thaw
As you get closer to cracking the Ice Blocks, your conveyor belt will be at its fullest. You must maintain a rhythm of pouring and clearing. If the belt hits 5/5 capacity and the next required cup to clear the Ice Block is stuck in the tray, you have failed. Always keep 1 slot open if possible to allow for the "shuffle" of cups.
Step-by-Step Walkthrough: The Execution Phase
Now that we understand the components, let's assemble the strategy into a linear execution plan. Follow these steps in order to navigate the chaos of Level 323.
Phase 1: The Initial Clear (Greens and Pinks)
At the very start of the level, your tray will present a top layer of Green and Pink cups. Do not load them all at once.
- Step 1: Identify the Green cups. Tap one to send it to the conveyor.
- Step 2: Pour the Green sand into the bottom corners and sides of the canvas (the foliage areas). Use short taps.
- Step 3: Immediately send the Pink cup. Pour it into the flower accents.
- Goal: Your goal here is not to finish the art, but to remove the top layer of the tray to expose the Orange and Maroon cups underneath.
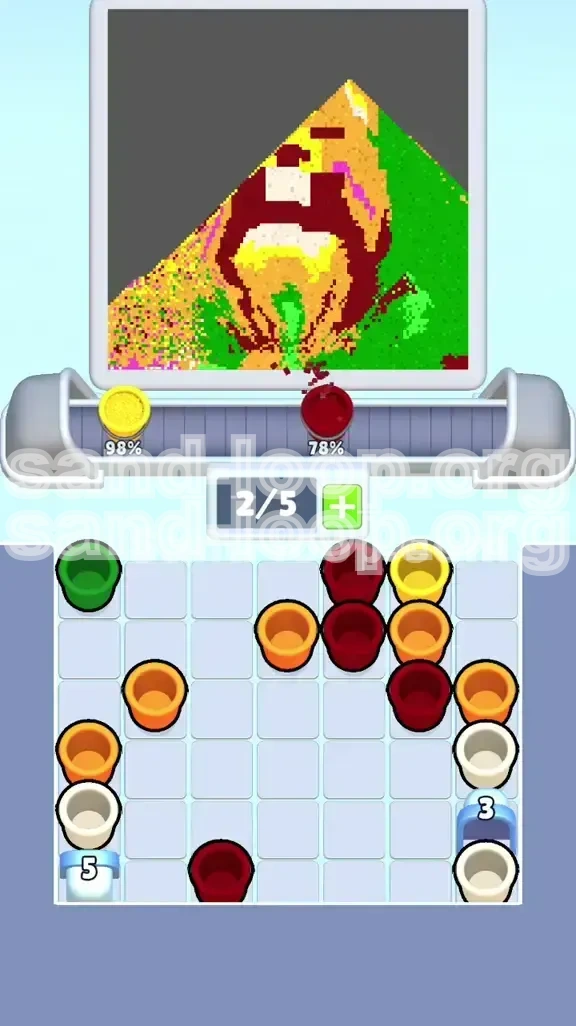
Phase 2: The Body & Log Foundation (Orange and Maroon)
With the top layer cleared, you now have access to the main structural colors. The conveyor should currently have 1 or 2 slots open.
- Step 1: Load a Maroon cup. Pour it into the horizontal log bar. Be extremely careful to stop pouring before it bleeds into the beaver's face area. The log is a straight line; keep it precise.
- Step 2: Load an Orange cup. Pour the main body of the beaver.
- Step 3: Alternate between Maroon and Orange. By filling these large areas, you are clearing the "heavy" cups from the tray, which brings you closer to the Ice Blocks at the bottom.
- Note: If you see a Yellow cup available, grab it. It’s likely sitting on top of the Ice Block column.
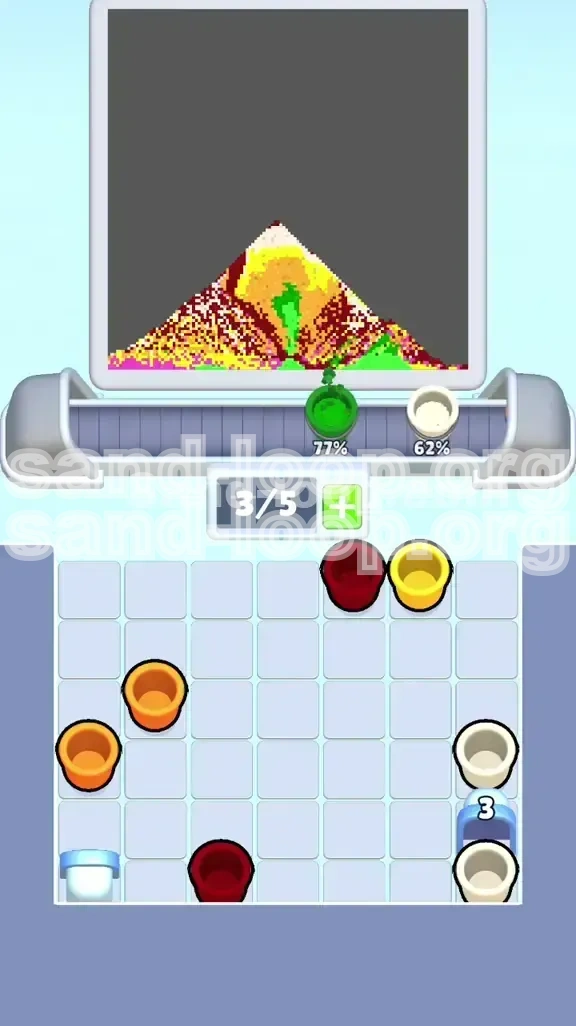
Phase 3: Breaking the Ice (Unlocking White)
This is the critical turning point of the level. You have been pouring to clear space, now you are pouring to unlock the win condition.
- Monitor the Counters: Look at the bottom corners of the tray. You need 5 more clears to break the ice.
- The Burn Move: If the Yellow cup is available but the belly isn't ready, pour the Yellow carefully into the existing Orange areas of the belly just to clear the cup. Do not start a new, messy pile.
- The Unlock: Once the counter hits zero, the Ice Blocks will shatter, revealing the White cups.
- Action: Immediately send the White cups to the conveyor. Do not wait.
Phase 4: The Precision Finale (White Details)
You now have the White cups, but the canvas is mostly filled. This is the highest risk phase.
- Targeting: The White sand is destined for the beaver's teeth (and possibly eyes). These are small, isolated pockets of color surrounded by Maroon and Orange.
- Pouring Technique: Do not hold the screen. Tap rapidly and release. Let the sand settle. If you pour too fast, the White sand will spill over the Maroon log lines, creating a permanent stain that ruins the "Pixel Perfect" score.
- Damage Control: If you make a mistake, do not panic. Sometimes you can use a subsequent color (like Maroon) to "paint over" a small white spill, but it is risky.
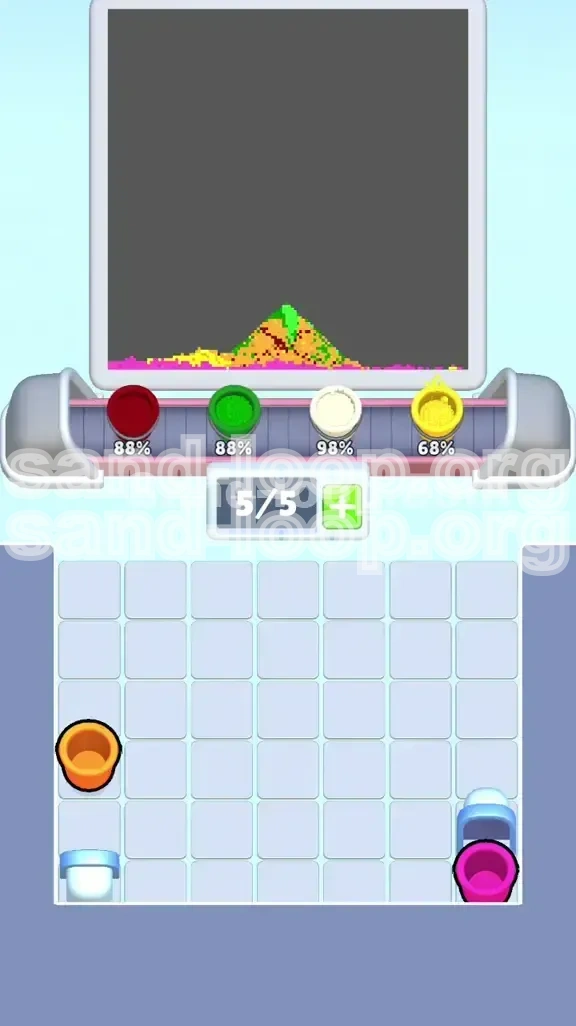
Phase 5: The Final Cleanup (Green Overflow)
With the beaver complete and the teeth painted, you will likely be left with a few Green cups remaining in the tray.
- Assessment: Check the canvas for any remaining empty pixels in the background.
- Filling: Send the remaining Green cups to fill these gaps.
- Warning: If the level is at 98% or 99% completion, stop pouring. Sending extra cups when the level is essentially done increases the risk of a fatal spill. Sometimes it is better to let the level auto-finish the final few pixels than to force a pour and fail.
Pro Tips and Common Pitfalls
Even with a solid strategy, the physics of the game can betray you. Here are detailed tips to ensure consistency in your runs.
The "Teeth Zone" Safety Protocol
The beaver's teeth are the most dangerous part of this level. They are surrounded by the Maroon log. When pouring the Maroon, stop approximately 2-3 pixels away from the white area. Let the sand flow naturally into the zone rather than forcing it. Overfilling the log is the number one cause of restarts on this level.
Conveyor Belt Optimization
Keep your belt moving. An idle belt is a wasted opportunity. Ideally, you want a rhythm of: Pour -> Wait for Settle -> Send Next Cup -> Pour. If you find yourself staring at the screen waiting for sand to settle, you aren't managing the queue efficiently. Try to have the next cup ready to go as soon as the current one is about 80% done.
Mistake Recovery Tactics
What if you accidentally spill Green into the Orange beaver body?
- Immediate Action: Stop pouring immediately. Do not try to "fix" it by adding more sand.
- The Fix: Wait for the level to progress. If the spill is small, you can often cover it up later with the correct color (Orange) by pouring carefully over the spot. However, this reduces your margin for error significantly.
- When to Restart: If you spill White into the Green background or vice versa at a large scale, restart immediately. You will not be able to cover that up effectively.
Speed Run Shortcuts (For Advanced Players)
If you are aiming for a high score or fast time, you can combine steps.
- Combo Pouring: If you have two colors that are far apart on the canvas (e.g., Green foliage and Pink flowers), you can load both onto the belt and pour them in quick succession without fear of mixing.
- Pre-loading: As the Ice Block counter is ticking down (e.g., at 1/5), you can pre-load the conveyor with cups you *don't* need just to clear them from the tray, effectively "staging" the board for the final White unlock.
Analyzing Failure Patterns
If you fail Level 323 multiple times, look at *where* you failed.
- Stuck Tray? You failed in Phase 1 or 2. You weren't aggressive enough in clearing the top layer cups.
- Bleeding Colors? You failed in Phase 4. You were too aggressive with the White sand or didn't secure the Maroon borders properly.
- Time Out? You were too cautious. Speed up your tapping rhythm during the "Body & Log" phase.
Final Mental Checklist
Before you start your next run, recite this mental checklist:
- Background is secondary; the Beaver is primary.
- Clear the tray to break the Ice.
- Maroon first, then Orange.
- White is last, and requires patience.
- Never overload the conveyor at 99%.
By following this guide, you transform Level 323 from a chaotic mess of colors into a manageable, logical assembly line. Focus on the Ice Blocks, manage your belt space, and pour with precision. The beaver's smile is waiting for you!