
Level 409
EXPERTHow to solve Sand Loop level 409? Get instant solution for Sand Loop 409 with our step by step solution & video walkthrough. Sand Loop 409 tips and guide.
Play Sand Loop Now
Experience the puzzle challenge firsthand
Game Screenshots
Sand Loop Level Guides
Level Overview: The Tropical Angelfish Challenge
Welcome to Level 409, widely regarded as the first major "gatekeeper" challenge in the Sand Loop tropical chapter. This stage presents a deceptive difficulty spike, shifting focus from simple color matching to strict resource management and spatial logic. The canvas features a vibrant Tropical Angelfish hovering above a branching coral reef, set against a deep, contrasting ocean backdrop. While the visual design appears serene, the gameplay mechanics are ruthless.
The primary challenge lies in the "Rope Binding" mechanic integrated into the supply tray, which restricts your ability to access specific color cups. You are not just playing against the clock; you are playing against a 5-slot capacity limit on your conveyor belt. Panic tapping will lead to an immediate deadlock. To succeed, you must treat this level as a puzzle game, requiring a pre-planned sequence of moves rather than reflexes.
The Strict Slot Economy
Unlike earlier levels where you could load up your belt and sort them out, Level 409 enforces a strict 5-slot limit. If your belt is full, the input mechanisms lock up, preventing you from accessing crucial colors. This level forces you to maintain an average belt occupancy of 60% or lower to handle the unexpected "Rope Binding" drops. Understanding this constraint is the difference between a flawless clear and a restart.
Visual Analysis of the Canvas
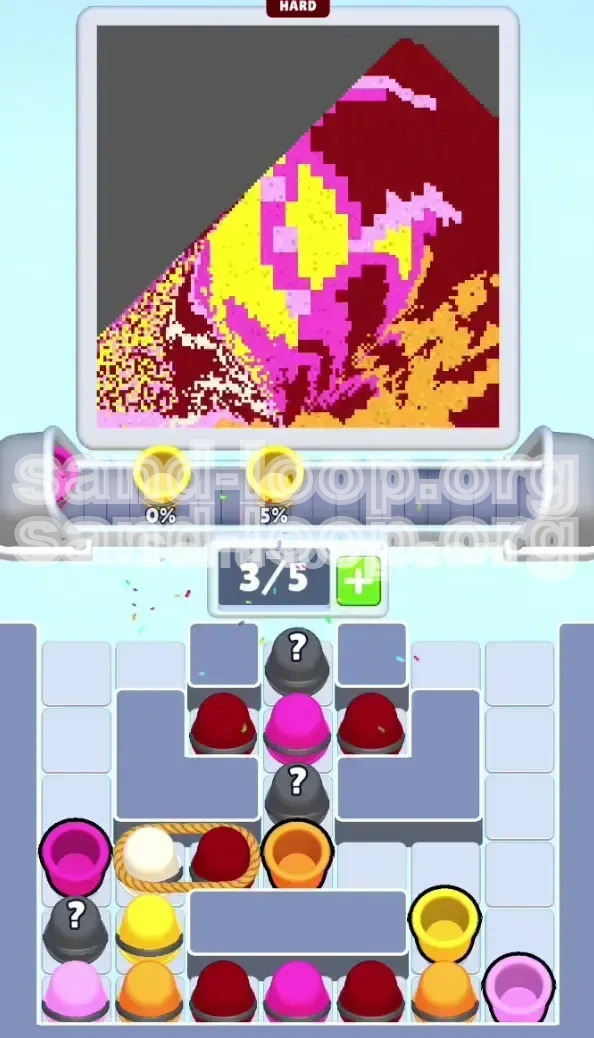
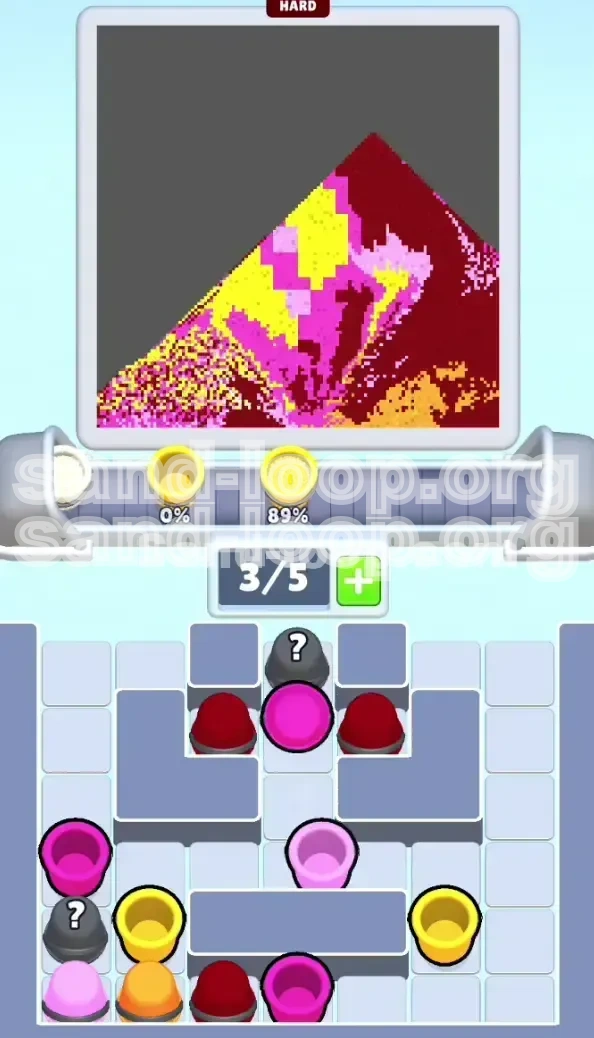
The target image is divided into three distinct layers, each requiring a different approach. The foreground contains the Angelfish, composed of Bright Pink and Yellow pixels. The mid-ground features intricate, single-pixel wide Orange coral branches. The background is a massive field of Dark Red. The difficulty comes from mixing these layers; if you fill the background first, you risk overwriting the delicate coral details later.
The Rope Binding Mechanic
This is the unique feature of Level 409. In the supply tray, specific White and Dark Red cups are tied together with horizontal white ropes. You cannot separate them. Clicking one cup sends both to the belt instantly, consuming two slots at once. This mechanic effectively reduces your belt capacity from 5 to 3 slots whenever you interact with these bound pairs, forcing you to plan your moves around these "double-cost" items.
The Mystery Cup Variable
Scattered throughout the center column are grey Mystery Cups. These function as random variables that can disrupt a perfect run. They can contain any color needed for the level, but because they are unpredictable, they represent a significant risk to your slot economy. Opening a mystery cup while your belt is full is a guaranteed fail state.
Logic Block vs. Speed Run
Level 409 is categorized as a "Logic Block." While speed is a factor for bonus points, the primary goal is completion. The game punishes fast, uncalculated inputs with a high frequency of deadlocks. You must adopt a rhythmic, stop-and-go playstyle, tapping a cup, waiting for the pour, and then tapping the next.
Clear Objectives: Your Mission Checklist
To conquer the Tropical Angelfish challenge, you must adhere to a specific set of goals. Randomly clearing colors will inevitably lead to a situation where the colors you need are trapped behind cups you cannot move. The following objectives outline the optimal path to victory.
Establish the Structural Core First
Your initial goal is to deposit the large volumes of Pink and Yellow sand. These colors form the main body of the Angelfish. Because they occupy the most visual space, they are the most forgiving to place early. By securing these blocks, you ensure that even if you make minor mistakes later, the main subject of the pixel art remains recognizable.
Isolate and Eliminate Rope Bindings
The Rope Bindings act as the primary bottleneck in the supply tray. Your secondary objective is to clear these bound pairs as early as possible. Specifically, the White/Dark Red pairs on the left and right edges must be dispatched to free up the lower rows of the tray. Ignoring them leaves your tray clogged, making it impossible to access the critical Pink and Yellow cups buried beneath.
Execute Precision Coral Placement
The Orange coral represents the highest difficulty technical challenge. It consists of thin lines that require precise pouring. You must aim to place these colors after the main body of the fish is down but before the background flood. If you pour the Dark Red background before the Orange coral, you will likely bury the coral anchors, making it impossible to complete the level.
Manage the 5-Slot Capacity Limit
Throughout the level, your operational objective is to keep the conveyor belt flowing. Never allow the belt to reach maximum capacity (5/5). Ideally, you should operate with 3 or fewer active cups on the belt at any given time. This "buffer zone" is essential for handling the forced double-drops from the Rope Bindings.
Complete the Background Flood
The final objective is the bulk filling of the Dark Red background. This is the cleanup phase. Once the fish and coral are perfectly placed, you must rapidly drain the remaining Dark Red cups from the tray. This phase requires rapid tapping but only after the delicate details are safely secured.
Step-by-Step Instructions: The Exact Execution Plan
This section provides the actionable sequence required to beat Level 409. Follow these steps in order. Do not deviate from the path unless you are forced to adapt to a specific random drop from a Mystery Cup.
Phase 1: The Outer Column Sweep
Start the level by ignoring the center completely. The center column is a trap filled with Mystery Cups that will clog your belt. Instead, focus your attention on the far-left and far-right columns.
- Identify Targets: Look for the top-most Dark Red cups on the outer edges.
- Initial Tap: Tap the top-left Dark Red cup. Immediately check your belt.
- Follow-up: Tap the Yellow cup directly underneath the Dark Red cup you just dispatched.
- Repeat Mirror: Perform the exact same sequence on the far-right column (Dark Red then Yellow).
- Result: This clears the vertical stack, revealing the Rope Bindings hiding in the lower rows.
Phase 2: Triggering the Rope Bindings
With the outer columns cleared, you now have access to the Rope Bindings. This is the most dangerous part of the level.
- Check Capacity: Ensure your conveyor belt has exactly two empty slots (3/5 full or less).
- Trigger Left: Tap the White cup on the left side that is tied to a Dark Red cup. Both will launch.
- The Pause: Wait for the White cup to pour. This forms the bubbles. The Dark Red will act as background filler.
- Trigger Right: Once the left pair has cleared the dispenser, tap the mirrored pair on the right side.
- Result: The bottom rows are now accessible, and the dangerous "double-cost" items are gone.
Phase 3: Mystery Cup Mining
Now that the sides are clear, you must tackle the center column to get to the Pink cups.
- Assess Belt: Make sure your belt is completely empty (0/5) or nearly empty.
- Tap Mystery: Pop the top Mystery Cup in the center.
- React: If it reveals a Pink cup, send it immediately. If it reveals a color you don't need (like extra Red), let it sit or clear it only if you have space.
- Dig Deep: Continue popping Mystery Cups until you reach the solid Pink cups underneath.
- Result: You have secured the primary color for the Angelfish body.
Phase 4: The Coral and Body Construction
With Pink secured, it's time to build the image.
- Deploy Pink: Send all available Pink cups to the canvas.
- Yellow Reinforcement: Retrieve Yellow cups from the tray to finish the Angelfish's stripes and fins.
- Coral Placement: Locate the single-pixel Orange cups. Tap them one by one. Watch the canvas; ensure the sand lands on the reef branches.
- Verify: Check the canvas. The fish should be solid Pink/Yellow. The reef should be Orange. Do not proceed until this is true.
Phase 5: The Dark Red Flood
The cleanup phase. Speed is now your friend.
- Scan Tray: Look for remaining Dark Red cups. They are likely clustered at the bottom.
- Rapid Fire: Tap three Dark Red cups in quick succession.
- Monitor Fill: Watch the background fill up. It should cover the negative space without touching the fish or coral.
- Final Drains: Clear any remaining cups in the tray.
- Result: Level Complete.
Color Order: The Strategic Palette Guide
The order in which you process colors is the single most critical factor in Level 409. Processing them in the wrong order leads to "overwrites," where a background color covers a foreground detail. Follow this hierarchy strictly.
Priority 1: Bright Pink (The Anchor)
Bright Pink must be your primary focus. It forms the bulk of the Angelfish and is the most prominent visual feature. By clearing Pink first, you establish the boundaries of the image. If you save Pink for last, you will find it nearly impossible to fit the pixels into the canvas without spilling over into the background areas.
Priority 2: Yellow (The Definition)
Yellow is your secondary structural color. It defines the stripes and fins of the Angelfish. Because Yellow is often adjacent to Pink in the supply tray, it is natural to process them together. Yellow pixels are generally larger than the coral lines, making them safer to place before the background. Ensure 100% of the Yellow and Pink pixels are locked in before moving to Priority 3.
Priority 3: Orange (The Precision)
Orange is the "Trap Color." It is tempting to clear it early because there isn't much of it, but the lines are so thin that they require precision. If you pour the background (Dark Red) first, the contrast between the canvas and the target disappears, making it nearly impossible to see where the Orange coral goes. Process Orange only after the fish is fully visible.
Priority 4: White (The Utility)
White is used for the floating bubbles. These are small, isolated pockets of color. Because they are distinct and separate from the main fish body, they can be filled at almost any time. However, because the White cups are Rope Bound to Dark Red cups, they effectively force you to process some Dark Red early. Treat White as a "bonus" color that you clear when the Rope Bindings dictate.
Priority 5: Dark Red (The Filler)
Dark Red is the "danger" color. It constitutes approximately 60% of the canvas. In puzzle logic, you always fill the negative space last. Filling it first creates a red sea where you can't distinguish where the Pink fish or Orange coral is supposed to go. You must resist the urge to tap the abundant Red cups until the very end.
Key Tips: Insider Knowledge for Success
These tips are gathered from high-level play strategies. They address the specific pain points of Level 409 that cause most players to fail.
The "Rhythm Tap" Technique
Avoid "mash tapping" or clicking as fast as possible. In Level 409, physics simulation matters. If you tap three cups instantly, they collide on the conveyor belt. This collision can alter the angle at which the sand pours, causing it to miss the target pixel. Adopt a "Tap-Pause-Tap" rhythm. Wait for the cup to center itself under the dispenser before triggering the next one.
Visualizing the "L-Shape" Choke Point
The grey Mystery Cups are not just random; they form an L-shape in the center of the tray. This shape physically blocks access to the bottom row. You must visualize the tray not as a grid, but as a series of tunnels. You have to clear the vertical tunnels (columns) on the sides before you can touch the horizontal tunnel (row) at the bottom.
The Emergency Brake Strategy
If you find yourself with a full belt (5/5) and a critical color (like Pink) trapped in the tray, you have two options: restart or hope for a combo. However, there is a third option. If a cup is currently pouring, you can sometimes quickly tap a cup you don't need (like a Dark Red) to force it onto the belt, knowing it will jam the system but potentially buying you time to clear a slot. This is high-risk and not recommended for casual play.
Understanding the Rope Binding Economy
Every Rope Binding is a 2-for-1 deal. Mathematically, this means that if you have a belt with 3 occupied slots and 2 empty slots, a single Rope Binding will max you out instantly. If you have 4 occupied slots, you cannot trigger a Rope Binding at all. Always keep your slot count even (2/5 or 0/5) to prepare for these uneven drops.
The Mystery Cup Gamble
Mystery Cups are statistically more likely to drop the color you currently have the least of on the canvas. If you are missing Pink, the Mystery Cup has a higher probability of being Pink. Use this to your advantage. If you are desperate for Pink, the Mystery Cup is a better bet than waiting for a cycle that might not come.
Common Mistakes: What Not to Do
Analyzing failure modes is just as important as knowing the solution. These are the specific errors that lead to a "Game Over" screen in Level 409.
The Premature Background Fill
This is the number one cause of failure. Players see the abundance of Dark Red cups and start clearing them early. This floods the canvas with red sand. When they finally get to the Orange coral or Pink fish, the "anchor" points are gone, and the sand spills over into the red background, ruining the contrast. Rule of thumb: If the fish isn't finished, do not touch the Red cups.
The Full Belt Deadlock
This happens when players treat the belt like a storage container. They load up 5 cups, then realize the next cup they need is trapped behind a Rope Binding. They try to tap the binding, but the game rejects the input because the belt is full. The game soft-locks, forcing a restart. Rule of thumb: Never exceed 3 cups on the belt unless you are 100% sure of the next 3 moves.
Ignoring the Coral
It's easy to focus on the big Angelfish and forget the tiny Orange coral branches at the bottom. Because these are single-pixel lines, they are easy to miss. If you fill the background first, the coral becomes invisible. Many players reach the end of the level with a perfect fish but an incomplete reef, and no way to fix it because the background is already Red.
Mishandling Mystery Cups
Do not pop a Mystery Cup when your belt is at 4/5 capacity. If the Mystery Cup contains a color you need, it goes to the belt. If it contains a color you don't need, it still goes to the belt. If the belt is full, it blocks the dispenser. Popping a mystery cup is a commitment to processing whatever comes out, so you must have the space to handle it.
The "Domino Effect" Tap Error
This occurs when a player taps a column of stacked cups too quickly. The top cup moves to the belt, and the cup underneath it instantly drops into place. If the player taps again immediately, they accidentally select the cup that just dropped, which might not be the color they wanted. This creates a "domino effect" of wrong colors filling the belt. Rule of thumb: Always verify the color of the cup after the stack drops before tapping.
Stuck Solutions: Troubleshooting the Grid
If you reach a point where no moves seem possible, or the level isn't progressing, use these diagnostic steps to find the problem.
Diagnosing a Soft Lock
Symptom: You tap cups, but nothing happens. The dispenser doesn't move.
Cause: Your belt is full (5/5).
Solution: You must wait for the current cup to finish pouring. If the current cup is stuck or taking too long, you have made a sequencing error. You likely needed to tap a different cup earlier to free up a slot. Restart the level and focus on keeping the belt lower.
The "Missing Color" Crisis
Symptom: You need Pink, but there are no Pink cups visible on the screen.
Cause: The Pink cups are buried under Mystery Cups or are blocked by the Rope Bindings.
Solution: You must clear the obstacles. If there are Mystery Cups above the Pink, you have to gamble and pop them. If the Pink is buried under a Rope Binding, you must clear the columns on the side to access the binding mechanism.
Spillage Issues
Symptom: Sand is pouring outside the lines of the Angelfish or Coral.
Cause: You are filling the background (Dark Red) before the foreground details.
Solution: Unfortunately, this is usually a critical error. Once the background is filled, you cannot place foreground details accurately without overlap. You need to restart the level. Focus on placing Pink, Yellow, and Orange before touching the Dark Red.
Dealing with Bad RNG
Symptom: The Mystery Cups keep giving you Dark Red when you need Pink.
Cause: Random Number Generation (RNG) is not in your favor.
Solution: This is a test of patience. Do not force the bad colors onto a full belt. Let the belt run dry. Tap a Mystery Cup. If it's bad, let it pour onto the canvas (it might be background filler anyway) and then try again. Do not compound bad RNG with bad belt management.
Speed Run Tips: Optimizing Your Time
Once you have mastered the logic, you may want to aim for a faster completion time. These tips are for players who are comfortable with the mechanics and want to maximize efficiency.
Pre-Loading the Belt
Before the level even starts or during the initial loading phase, visualize your first three moves. As soon as the level begins, execute the "Outer Column Sweep" instantly. Don't wait to see where the sand lands. Trust that the first tap (Left Dark Red) is correct and immediately tap the second (Left Yellow). This pre-loading shaves seconds off your time.
Bulk Processing Mystery Cups
If you are confident in your ability to clear the belt, you can pop two Mystery Cups in rapid succession. This is a high-risk maneuver. It works best when your belt is completely empty. Pop one, then immediately pop the one below it. This forces the game to process two random colors at once, potentially clearing the center column in half the time.
The "Double Tap" Rope Binding
When you clear the outer columns, the Rope Bindings are exposed. Instead of tapping the left side, waiting, and then tapping the right side, you can tap both sides in rapid succession if and only if your belt is empty. This sends 4 cups to the belt at once (2 pairs). It creates a chaotic belt but clears the obstacles much faster.
Skip the Perfection
For a speed run, you don't need 100% pixel perfection on the background. The scoring system in Sand Loop usually prioritizes completion over absolute precision in the negative space. If the background is 95% filled, the game will often register it as complete. Don't waste time trying to fill the very last pixel of Dark Red in the corner if the main image is done.
Memorization Over Scanning
Speed runners do not scan the board; they memorize patterns. The layout of Level 409 is static. The Mystery Cups are the only variable. Memorize the location of the Rope Bindings and the Pink cups. This allows you to tap based on memory and position rather than visual confirmation, drastically increasing your Actions Per Minute (APM).