
Level 408
HARDHow to solve Sand Loop level 408? Get instant solution for Sand Loop 408 with our step by step solution & video walkthrough. Sand Loop 408 tips and guide.
Play Sand Loop Now
Experience the puzzle challenge firsthand
Game Screenshots
Sand Loop Level Guides
Level 408: The Flower Vase Still Life - Level Overview
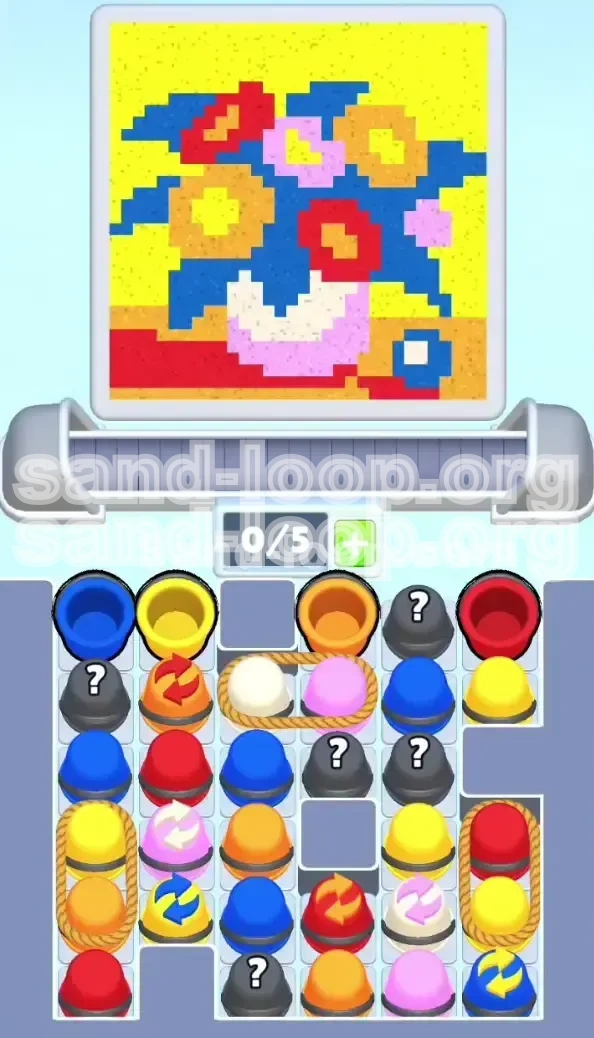
Welcome to the comprehensive walkthrough for Sand Loop Level 408, famously known as "The Flower Vase Still Life." This stage represents a significant spike in difficulty, shifting the focus from simple color-matching to complex resource management and spatial logic. You are tasked with assembling a classic still-life image featuring a blue-petaled flower with a red-orange center, resting in a pink-and-white vase against a bright yellow background.
The core challenge of Level 408 lies not in the artistic execution, but in the logistics. The supply tray is deceptively cluttered, introducing "Roped Pairs," "Swap Cups," and "Mystery Buckets" into a very tight inventory system. With a conveyor belt limit of only 5 slots, you cannot simply grab every color you see. You must prioritize moves that clear physical obstructions (ropes) before you can access the specific colors required for the fine details.
Players often fail here by treating this like a standard fill-level. The "Yellow Trap" is the most common cause of soft-locks; filling the vast background too early leaves you with no inventory space to maneuver the cups needed for the intricate flower petals. This guide will break down the precise order of operations to ensure you maintain a fluid supply chain from start to finish.
The Core Mechanic: Dependency Chains
Unlike previous levels where cups are freely accessible, Level 408 utilizes a "Stacking" mechanic in the tray. The cups you need for the end-game (specifically the White and Pink for the vase) are physically buried behind or underneath other cups. Pulling a random cup at the top might accidentally drop a needed color into an unreachable corner of the tray. You must visualize the tray as a 3D grid where removing one object shifts the position of others.
The Inventory Limit (5-Slot Hard Cap)
Your conveyor belt has a maximum capacity of 5 distinct cups. In this level, hitting 5/5 capacity is dangerous. If the Sand Dispenser at the top of the screen switches to a color you don't currently have on the belt, you are forced to waste time waiting. The strategy here is to keep your belt "lean"—aiming for 3/5 or 4/5 capacity at all times to allow for rotation.
The Dispenser Rhythm
The Sand Dispenser cycles through colors in a fixed loop: Blue -> Yellow -> Red -> Orange -> Pink -> White. If you pull a Blue cup but the dispenser is currently set to Yellow, you cannot pour that Blue cup. You must either wait for the dispenser to rotate back to Blue (wasting precious seconds) or use a "Swap Cup" to force a rotation. Understanding this timing is critical for the Speed Run strategy.
Sand Physics and "Bleeding"
The sand physics in Level 408 feel slightly "lighter" or more powdery than usual. This means the sand piles have a wider angle of repose—they spread out more upon impact. This is crucial for the flower centers, which are small circular targets. Pouring from too high will cause the sand to bleed into the surrounding blue petals. You must perform "Low-Altitude Drops" (tapping close to the canvas surface) to maintain precision.
The Mystery Element
Scattered throughout the tray are grey cups marked with a question mark. These contain random colors from the level palette. Pulling one is a gamble. If you are already full on Blue cups, pulling a Mystery Cup that turns out to be Blue is a waste of a pull. You should only interact with these when you have an open slot and can afford to hold a "wildcard" item.
Clear Objectives: What You Need to Do
To conquer Level 408, you need to move beyond just "filling the picture." Your primary goals are logistical. You must clear the tray of blockers to free up the specific colors required for the bottom half of the image. The objective is divided into three distinct phases: Structural, Detail, and Background.
Phase 1: Unblocking the Tray
Your first objective is not to fill the canvas, but to clear the supply tray. You must identify the "Roped Pairs"—two cups tied together with twine. You cannot access the rear cup until the front cup is pulled. Prioritize pulling the front cup even if you don't need its color immediately, just to clear the logjam and free the valuable real estate behind it.
Phase 2: The Flower Core Lock
The Red and Orange flower centers are the smallest targets on the board, comprising less than 5% of the total pixel count. However, they are surrounded by large areas of Blue and Yellow. Your objective is to secure the Red and Orange cups and fill these centers *before* you flood the surrounding area with Yellow sand. If you fill the background first, you will lose the visual boundaries for the flower centers, making precision placement nearly impossible.
Phase 3: The Vase Coloring
The vase requires a mix of White and Pink. These cups are often the hardest to retrieve because they are trapped at the bottom of the tray stack. You must clear the upper layers of the tray (Blue/Yellow/Red) to trigger the drop of these lower-layer cups. Do not attempt to start the vase until you have both White and Pink physically on your conveyor belt.
Phase 4: The Yellow Flood
The Yellow background is the "Filler" objective. This should be your last step. The Yellow cups are abundant, but they are heavy. Filling the background is time-consuming and offers the least strategic value. Save this for the end when you have 1 or 2 empty slots left and can just cycle Yellow cups until the image is complete.
Phase 5: Slot Management
Throughout all phases, your constant objective is to prevent a belt deadlock. A deadlock occurs when you have 5 cups on the belt, none of them match the current Dispenser color, and you have no empty slots to pull a new cup. If you reach this state, you have effectively failed the Speed Run and risk running out of time on the clock.
Step-by-Step Walkthrough: The Blueprint
Follow this exact sequence to maximize efficiency. This walkthrough assumes a standard playthrough without using power-ups.
Step 1: The "Blue" Start
As soon as the level loads, ignore the Yellow cups. Look for the large Blue cup on the top left of the tray. Tap it immediately. Get the Blue sand pouring into the large flower petals. The petals are forgiving targets; they don't require pixel-perfect accuracy. Fill about 50% of the blue area. This establishes the visual "walls" for the rest of the image.
Step 2: Cutting the Rope (Red/Orange)
Locate the roped pair on the right side of the tray. It usually consists of a Yellow cup tied to an Orange or Red cup. You need that Red/Orange for the flower center. Tap the roped pair to pull the lead cup (likely Yellow). Use it or dump it quickly to clear the slot, then pull the trailing Red/Orange cup. Focus entirely on filling the small flower centers now. Do not worry about the background yet.
Step 3: Managing the Swap Cup
In the center of the tray, you will see a cup with two rotating arrows (the Swap Cup). Do not pull this yet. Wait until the Sand Dispenser at the top cycles to a color you are missing (like White or Pink). If the Swap Cup offers a White/Pink split and the dispenser is on White, pull the Swap Cup immediately. It will align with the dispenser, allowing you to pour instantly without waiting for the cycle.
Step 4: Digging for Pink and White
Once the top layers are cleared, the Pink and White cups (buried at the bottom of the tray stack) will slide forward. Pull them as soon as they appear. Now, switch your focus to the vase. The vase is at the bottom of the screen. Pour the Pink sand to create the main body of the vase, leaving the "highlight" areas empty for the White sand.
Step 5: The Cleanup Sweep
With the flowers and vase complete, the board is mostly colored except for the large Yellow background. Your belt should be relatively clear now. Pull the Yellow cups that you ignored in Step 1. Since the yellow area is massive, you can be aggressive. Pour over the entire top half of the canvas. The sand will pile up against the Blue petals and Pink vase you already placed, filling the gaps automatically.
Color Order: The Strategic Sequence
Why does the order matter? In Sand Loop, sand is physical. If you pour Yellow over a wet Red spot, the colors mix (or the game prevents the pour), creating a mess. Here is the scientifically optimal order to process colors in Level 408 to prevent contamination and maximize speed.
1. Blue (The Boundary Layer)
Priority: CRITICAL. You must do Blue first. The Blue petals act as a dam. By filling these large, defined shapes first, you create physical barriers that will catch the sand you pour later. This allows you to pour the Yellow background carelessly without worrying about staying in the lines—the Blue petals will stop the sand for you.
2. Red & Orange (The Isolation Layer)
Priority: HIGH. These colors are isolated in the center of the Blue petals. If you do Yellow first, the Red centers become harder to see and target. Furthermore, Red and Orange are scarce resources in this level's tray. You want to secure them and pour them while your accuracy is fresh. These pixels are small; pouring them later when you are tired and rushing is a recipe for errors.
3. Pink & White (The Bottom Layer)
Priority: MEDIUM. The vase is at the bottom of the screen. In mobile game UI design, it is ergonomically easier to control pours at the bottom of the screen (closer to your thumb) than at the top. Save these for the middle of the run when your hands are warmed up but not yet fatigued. Also, these colors are unlocked later in the tray-clearing process, so the game naturally forces this order on you.
4. Yellow (The Flood Layer)
Priority: LOW (Last). Yellow covers 50% of the canvas. It is the "Filler." It is also the most dangerous color for slot management because there are so many Yellow cups. If you start with Yellow, your belt will clog. By saving it for last, you ensure that you have already completed the difficult parts of the level. You can then relax and simply cycle Yellow cups until the timer runs out or the level finishes.
The "Tan" Edge Case
There is a very thin strip of Tan/Sand color representing the table edge. It is barely 10 pixels wide. Do not waste a cup slot on this specifically. Wait until you have a cup that is nearly empty (less than 10% sand remaining) and use the dregs to fill this tiny strip. This is a pro-level slot management technique.
Contamination Prevention
Never pour a dark color (Red) next to a light color (White) if the divider is missing. The sand physics in Level 408 have a "spread" value of about 1.5 pixels. If you pour Red directly next to a White vase highlight without a clear gap, the Red sand will bleed into the White, turning it pink. Always leave a 1-pixel buffer zone when filling high-contrast areas.
Key Tips and Common Mistakes
Even with a plan, things can go wrong. Here are the pro-tips to keep you moving and the pitfalls to avoid.
Tip 1: The "Tap and Hold" vs. "Tap and Release"
For the large Yellow background areas, use the "Tap and Hold" method. Keep your finger on the cup to maintain a steady, high-pressure stream. This fills the space faster. However, for the Flower Centers (Red/Orange), use "Tap and Release" (tapping rapidly). This creates smaller piles of sand that are easier to control and prevents overflow into the Blue petals.
Tip 2: Watch the Rope Physics
When you pull a roped cup, the second cup doesn't just appear; it slides into place. This sliding animation takes about 0.5 seconds. Do not try to tap the sliding cup immediately. Wait for it to "settle" (stop moving) before you tap it. If you tap too early, the game registers it as a miss, and you lose valuable time.
Common Mistake: The Mystery Cup Gamble
The Trap: Seeing a Mystery Cup (?) and pulling it hoping for a rare color like White.
Why it fails: 80% of the time, Mystery Cups in this level yield Yellow or Blue—the colors you already have plenty of. Pulling a Mystery Cup when you have 4/5 slots full usually results in a 5th cup that you can't use, clogging your belt.
The Fix: Only pull Mystery Cups if you have 2 or more empty slots. This gives you the flexibility to discard the cup if it's a duplicate.
Common Mistake: Ignoring the Swap Cup Timer
The Trap: Pulling a Swap Cup when the dispenser is on the wrong color, forcing you to wait a full 10-second cycle for the dispenser to rotate.
The Fix: Look at the Sand Dispenser at the top. If it's Blue, and you pull a Red/Blue Swap cup, tap it *once* to swap it to Red. If the dispenser is about to turn Red in 1 second, wait! Let it turn Red naturally, then pull the cup. Using the Swap ability costs a moment of animation time; patience is sometimes faster.
Common Mistake: Pre-filling the Background
The Trap: Filling the Yellow background corners first because "they are easy."
Why it fails: Once the corners are full, the Yellow cups on your belt become dead weight. They are taking up slots that you need for the Red/Orange flower centers. You will be forced to pour perfectly good Yellow sand into the trash just to free up the slot. This is a massive waste of potential progress.
Tip 3: Use the "Vase Shape" as a Funnel
The vase is narrow at the top. When pouring the Pink sand, aim for the neck of the vase. The sand will funnel down into the wider base automatically. This saves you from having to move your finger around to cover the whole vase area. Just pour into the neck and let gravity do the work.
Solutions for When You Are Stuck
Level 408 has a specific state known as the "Deadlock." If you find yourself staring at a full belt of cups you can't use, use these recovery protocols.
Solution: The Belt is Full (5/5) and Nothing Matches
You have 5 cups: Yellow, Blue, Blue, Yellow, Red. The Dispenser is Orange. You are stuck.
Protocol: You must perform a "Controlled Dump." Identify the cup that is most full (e.g., a Blue cup). Pour that Blue sand into a Blue area on the canvas that is *already* 100% full. The game will allow overfilling. This wastes the sand but empties the cup. Once the cup is gone, you have a free slot to pull the Orange cup you actually need.
Solution: The Cup You Need is "Buried"
You need the White cup, but it is physically stuck behind three other cups in the tray, and you can't click it.
Protocol: You must "Cycle the Tray." Sometimes, if you clear a cup from the top row, the game triggers a physics event that shifts the lower rows up. Pull a cup from the top left, then immediately pull a cup from the top right. This cross-pulling can trigger a "shift" that brings the bottom-row White cup into the playable zone.
Solution: The Dispenser is "Stuck" on a Color
Sometimes the dispenser seems to take forever to reach the color you want.
Protocol: Look for a Swap Cup on the tray. Even if you don't need the colors in the Swap Cup, pull it and swap it rapidly. The act of swapping can sometimes "nudge" the dispenser logic or simply give you something to do while you wait. Alternatively, pause the game for a few seconds; some players report this resets the cycle timing (though this is unconfirmed, it helps with frustration).
Solution: Small Pixel Gaps Remain
The image is 98% done, but there are tiny 1-pixel gaps of Blue in the Yellow background that you can't hit without spilling over.
Protocol: Stop trying to be precise. Switch to a Yellow cup (which is abundant) and pour a heavy stream over the entire area. The volume of Yellow sand will fill the small gaps by sheer force. It's better to waste 10% of a Yellow cup fixing errors than to fail the level with 99% completion.
Speed Run Tips and Shortcuts
For players aiming to achieve the 3-Star rating or complete the level in under 60 seconds, optimization is key. These tips are for advanced players who have mastered the basic mechanics.
Shortcut 1: The "Blue Dump"
Don't try to color inside the lines for the Blue petals. The Blue petals are huge and separated by Yellow. Pour the Blue sand so aggressively that it spills slightly into the Yellow zones. This is actually faster. Why? Because when you switch to Yellow later, the Yellow sand will cover up your Blue spills. Since Yellow is the last color you use, it acts as an "eraser" for your sloppy Blue work. Be messy early, clean up late.
Efficiency: Pre-loading the Belt
While a cup is pouring, you cannot interact with the tray—usually. However, you can "Queue" a tap. As your current cup is pouring its last few grains, tap the next cup you want in the tray. The game will register the tap the instant the current cup finishes. This "Queuing" shaves off 0.5 seconds per cup. Over 20 cups, that's 10 seconds saved.
The Swap Cup Glitch (Advanced)
If you pull a Swap Cup (e.g., Red/Blue) and the dispenser is currently on Red, the game auto-fills the Red half of the cup instantly. You can exploit this to "transfer" sand. If you pull a Red/Blue swap cup while it's Red, pour it out, and then swap it to Blue, you effectively get two half-cups of sand for the price of one pull. Use this to double-dip on colors if you are running low on a specific hue.
Timing the "Mystery" Pull
If you are going for a speed record, pull the Mystery Cup only when the Dispenser is cycling through a color you *don't* need. For example, if the Dispenser is on Yellow (and your background is already done), that is the "dead time" of the cycle. Use that specific 3-second window to pull and check Mystery Cups. This ensures you aren't wasting active pouring time.
Ignore the 100% Perfection Rule
For a Speed Run, 95% completion is often enough to trigger the "Level Complete" flag. Do not waste time trying to fill the microscopic corners of the vase or the tiny gaps between petals. Once the image is recognizable and the "Complete" bar is nearly full, stop micromanaging. Focus on moving the next cup onto the belt. Momentum is more important than perfection in Level 408.