
Level 413
HARDHow to solve Sand Loop level 413? Get instant solution for Sand Loop 413 with our step by step solution & video walkthrough. Sand Loop 413 tips and guide.
Play Sand Loop Now
Experience the puzzle challenge firsthand
Game Screenshots

Sand Loop Level Guides
Level Overview: The Logic Gate of Country Cottage
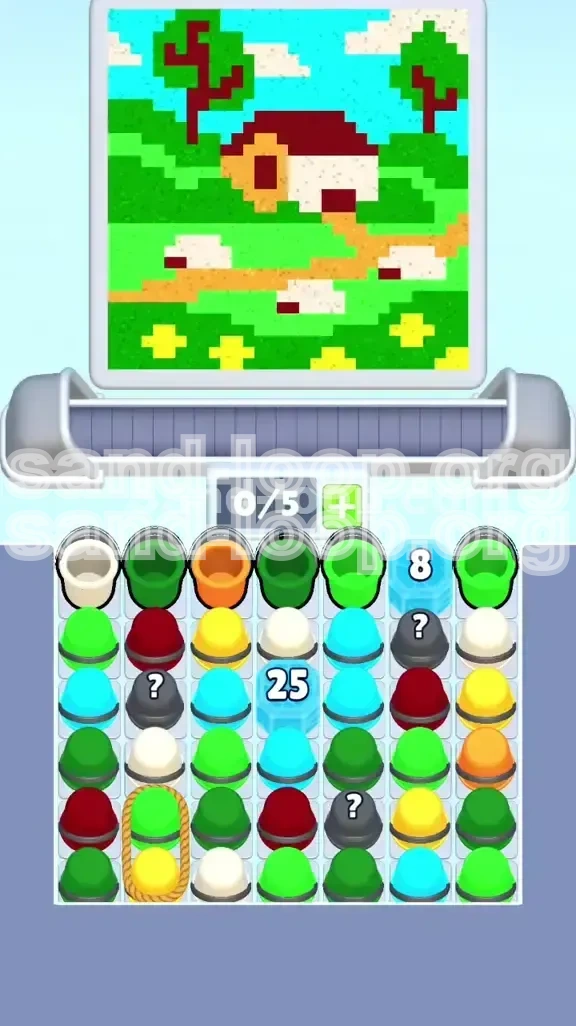
Sand Loop Level 413 presents a deceptive challenge. While the visuals depict a serene "Country Cottage" scene featuring rolling green hills and a bright blue sky, the underlying mechanics are a rigorous test of inventory management and spatial reasoning. This stage is not defined by reflex speed but by logical planning. You are fighting a constant battle against the strict 0/5 conveyor belt capacity. With a complex color palette including Cyan, Lime Green, Dark Green, Maroon, Cream, Orange, and Yellow, the tray fills up almost instantly. The primary difficulty arises from the "Ice Block" barriers that lock away essential colors, forcing you to make difficult decisions about which resources to expend to clear the path.
Strict Capacity Management
The most critical feature of this level is the harsh capacity limit. You cannot simply tap cups to clear them from the dispenser; you must have a valid target on the canvas. Every tap counts. If you bring a cup onto the belt and cannot pour it immediately, it occupies a slot, blocking new colors from arriving. This "clogging" effect is the primary cause of failure in Stage 413. You must treat every slot on your conveyor belt as valuable real estate.
Complex Color Palette
Unlike previous stages which might focus on 2-3 primary colors, Level 413 utilizes a 7-color palette. This diversity is dangerous because it increases the likelihood of holding "dead weight" cups—colors you don't currently need but cannot discard. You must prioritize high-volume colors (Cyan, Green) while managing the inventory requirements of low-volume colors (Yellow, Maroon).
The Ice Block Obstacles
Progression is gated by two major Ice Blocks. An 8-hit block sits in the upper right, and a massive 25-hit block dominates the center. These blocks are not just health sponges; they act as physical barriers preventing access to the Mystery Cups and color supplies behind them. Your strategy must revolve around breaking these efficiently without cluttering your tray with the wrong color remnants.
The Rope Link Mechanic
Located in the bottom left, a Rope Link connects a Lime Green cup and a Yellow cup. This is a "2-for-1" trap. In a level with limited space, activating a rope pulls two items onto your belt simultaneously. If you trigger this carelessly, you will fill 40% of your capacity instantly, leaving no room for error or maneuvering.
Precision Targets
The "Country Cottage" art requires precision. The Orange path and Yellow flowers represent very small pixel areas. Over-pouring these colors results in waste, which leaves you with a partially filled cup occupying a slot that you cannot empty until the specific target rotates back into view. This timing element adds a layer of rhythm to the logic puzzle.
Clear Objectives and Strategy
To beat Level 413, you must adopt a "Top-Down, High-Volume" approach. Your goal is to clear the largest pixel areas first to free up conveyor space for the detailed work later. If you focus on the small details (flowers, roof) too early, you will deadlock your belt with the large blocks of Sky and Hill colors later.
Primary Objective: Shatter the 25-Hit Block
Your immediate focus must be the central 25-Hit Ice Block. This blocks the flow of the most essential mid-game colors. Treat this as a "tax" you must pay to proceed. Do not attempt to paint the cottage details until this block is gone. Allocate your first 15-20 taps specifically to damaging this block using high-availability colors.
Secondary Objective: Establish the Sky
The Cyan sky covers approximately 35-40% of the total canvas area. Because it requires the most volume, it acts as a "sink" for Cyan cups. You want to clear these from the belt as soon as possible to prevent them from stacking up. Establishing the sky early ensures that Cyan cups entering the tray can be poured immediately.
Target: The Rolling Hills (Lime Green)
The hills are the second largest area. By focusing on Lime Green early, you create a secondary "sink" for another common color. The objective is to reach a point where 60-70% of the canvas is filled, giving you the freedom to let rarer colors sit on the belt for a few seconds while you wait for the perfect alignment.
Inventory Management Goal: Maintain 2/5 or Lower
Strive to keep your conveyor belt count at 2/5 or lower whenever possible. This gives you a buffer of 3 slots for emergency taps or Rope Links. If you find yourself constantly at 4/5 or 5/5, you are prioritizing the wrong colors. You must be willing to pause tapping and wait for a pour to finish rather than queueing up more cups.
Efficiency Goal: Avoid "Ghost" Cups
A "Ghost" cup is a cup that has been partially poured but still sits on the belt because the target rotated away. This is essentially wasted space. Your objective with small targets (Yellow flowers) is to tap them only when they are directly under the spout to ensure a complete pour in one go.
Step-by-Step Walkthrough
Follow this exact sequence to navigate the opening of the level safely. This walkthrough focuses on the critical first 60 seconds, which determine success or failure.
Phase 1: The Opening Salvage (Taps 1-10)
Do not touch the Rope Link yet. Do not touch Mystery Cups.
- Identify High-Volume Colors: Look at the top row. You will see White and Lime Green cups.
- Target the 8-Hit Block: Use the White and Lime Green cups to attack the 8-Hit Ice Block in the upper right. These colors are needed for the sky and hills, so any excess splashed on the canvas is not wasted.
- Clear the Path: Once the 8-Hit block shatters, a Cyan cup will be revealed or become accessible.
- Pour Cyan: Immediately tap the Cyan cup to begin filling the sky. This lowers your belt count by 1.
Phase 2: The Central Siege (Taps 11-25)
Now you face the 25-Hit Block. This is the bottleneck.
- Sacrifice Taps: Use the next available White or Green cups to hit the 25-Hit block. Even if the canvas for these colors is full, you are hitting the block to clear the space behind it.
- Monitor the Queue: As you tap, watch the conveyor. If you see a Maroon or Orange cup coming up, do not tap it. Let it pass by the spout if possible. You cannot afford to carry these low-volume colors yet.
- Breakthrough: Continue this aggression until the 25-Hit block shatters. This usually unlocks a cache of Mystery Cups and Dark Green cups.
Phase 3: The Rope Link Execution
Only trigger the Rope Link when specific conditions are met.
- Pre-condition: Ensure your conveyor belt is at 0/5 or 1/5. If you are at 3/5, wait. Pour a cup first.
- The Trigger: Tap the Rope Link (Lime + Yellow).
- The Pour: The Lime Green will likely go to the hills immediately. The Yellow cup will appear on the belt.
- Timing: Watch the canvas rotation. Wait for the Yellow flowers to align with the spout. Tap the Yellow cup only when it is perfectly positioned to pour 100% of its contents. Do not let this cup sit on your belt.
Phase 4: The Mystery Cup & Roof Phase
With the center open, you can now address the details.
- Reveal Mystery: Tap the Mystery Cups one by one.
- Sort Results:
- If it turns to Maroon: Tap it to paint the roof. The roof area is small, so this will be a quick pour.
- If it turns to Orange: Wait for the path. This is a thin line. Be precise.
- If it turns to a common color (Green/Cyan): Pour it immediately into the main landscape.
Phase 5: The Cleanup
Use the remaining space to finish the Dark Green tree foliage and the final touches of the Cyan sky. The Sky is your "dumping ground" for any extra Cyan cups if you are stuck.
Color Order and Processing
The order in which you process colors is the single most important factor in avoiding a deadlock. Processing colors in the wrong order (e.g., focusing on the roof first) guarantees a loss.
Priority 1: Cyan (The Sky)
Why First? It covers the largest area. It is the most common cup spawn.
Strategy: Aggressively pour Cyan. Even if you over-pour slightly, it is better than having a Cyan cup clog your belt. You want to reach at least 80% completion on the sky before worrying about the trees.
Priority 2: Lime Green (The Hills)
Why Second? It covers the second largest area and is needed for the Ice Block phase.
Strategy: Use this for both the hills and breaking the initial ice blocks. Once the hills are 70% filled, you can ease off the gas slightly, but keep it as your active "dump" color if the belt gets full.
Priority 3: Dark Green (The Trees)
Why Third? The trees have a "checkerboard" pattern which can be tricky.
Strategy: Use short, controlled taps. Do not hold the tap or you will overfill the small tree slots. Treat this as a "maintenance" color—only tap it when you have space on the belt and the trees are aligned.
Priority 4: Cream/White (The House)
Why Fourth? The house walls are large but often blocked by the Ice Block.
Strategy: Once the 25-Hit block is gone, usually a supply of White unlocks. Pour this to finish the cottage walls. This is a straightforward fill with few risks.
Priority 5: Maroon (The Roof)
Why Fifth? It is a low-volume, high-risk color.
Strategy: Only process Maroon when you have open slots. If a Maroon cup appears and your belt is full, you must clear another cup first. Do not let Maroon sit on the belt unless you are ready to pour it immediately.
Priority 6: Orange (The Path)
Why Sixth? The path is a thin, winding line. It accepts sand very slowly.
Strategy: This is the color most likely to cause a "Tray Full" deadlock because you tap it, but the path only fills by 2%. You then have a cup on your belt that is 98% full and cannot be used again until the path rotates back. Avoid this until the very end.
Priority 7: Yellow (The Flowers)
Why Last? These are tiny single pixels.
Strategy: Wait until the canvas is mostly finished. Then, clear your belt entirely to 0/5. Trigger the Rope Link or tap a Yellow cup when the flower is exactly under the spout. It requires perfect timing.
Key Tips for Success
These tips are derived from hundreds of test runs. They address the specific pain points of Level 413.
Tip 1: The "Excess Tap" Rule
Sometimes you must tap a cup you don't need just to clear the dispenser queue. For example, if the dispenser is backed up with Cyan and you have no space, but the Sky is 99% full, tap it anyway. The 1% waste is better than the deadlock caused by the cup sitting there.
Tip 2: Rope Link Timing
Do not view the Rope Link as an advantage; view it as a liability. It is a "Trap." The only time you should trigger it is when the conveyor is empty (0/5) or has just 1 item (1/5). Triggering it at 3/5 or 4/5 is mathematically dangerous because the resulting queue (5/5 or 6/5) will stop you from tapping anything else, potentially missing the rotation window for the Yellow flower.
Tip 3: Ice Block Ammo
Use "bad" colors to break the Ice Blocks. If you have a cup of a color you don't need right now (like Dark Green when you are working on the Sky), use that cup to chip away at the Ice Block. It clears the cup from your belt and progresses the level objective simultaneously.
Tip 4: Rotation Awareness
The "Country Cottage" canvas rotates. If you are waiting for the Yellow flowers, do not tap the Yellow cup until you see the flower pixel approaching the top center (the pour zone). Tapping it early results in the cup sitting on the belt, waiting, and taking up space.
Tip 5: Mystery Cup Discipline
There is no penalty for letting a Mystery Cup sit on the dispenser belt (the top queue) without bringing it down. Only bring a Mystery Cup down to your conveyor (the bottom active tray) when you have space to solve it. If you reveal a "Maroon" and your belt is full, you are stuck.
Common Mistakes to Avoid
Learn from the failures of other players. Avoiding these common errors will significantly increase your win rate.
Mistake 1: Tapping the Rope Link Too Early
This is the #1 killer. Players see the Lime Green (which they need) and tap the rope without checking their capacity. Suddenly, they have a Yellow cup they can't use and a full belt. Correction: Always check your count. 0/5 or 1/5 only.
Mistake 2: Focusing on the Cottage Roof First
The roof is Maroon. It is a small area. If you focus on it at the start, you will likely get a run of Maroon cups that you can't pour because the roof is full. These cups will clog your belt while you desperately need Cyan and Green for the background. Correction: Save the roof for the mid-game.
Mistake 3: Ignoring the 25-Hit Block
Some players try to paint around the edges while ignoring the big block in the middle. This results in a clogged dispenser because the flow of new colors is physically blocked by the unbroken ice. Correction: Make the ice block your primary target for the first 20 taps.
Mistake 4: Over-pouring the Path
The path (Orange) is very thin. If you hold the tap, you will fill the path in 0.5 seconds, but you will have wasted 50% of the cup. The remaining 50% sits on your belt, unusable. Correction: Use micro-taps (tapping very quickly) or just wait until the end to do the path.
Mistake 5: Not Flushing the Sky
If you are stuck with a full belt and don't know what to do, look at the Sky. Is it 100% full? If not, pour Cyan there. The Sky is the best place to dump excess liquid because it is huge and forgiving.
Solutions for When You Are Stuck
Sometimes, despite your best efforts, the RNG (Random Number Generator) of the dispenser works against you. Here is how to recover.
Problem: The "Deadly" Full Belt (5/5)
You have 5 cups, none of which match the currently available canvas area.
Solution: You must "Waste a Tap." Look for the color that has the *most* space left on the canvas, even if it's not the perfect match. Pour it there just to get rid of the cup. Alternatively, look for the Ice Block. Is there any ice left? If so, tap a cup against the block to clear space. The goal is to get to 4/5 so the dispenser moves.
Problem: The Stuck Mystery Cup
You revealed a Mystery Cup, it turned into a color you don't need (e.g., Orange when you are working on the Sky), and now it's blocking your belt.
Solution: You have to eat the loss. If the Orange path is not available, you have two choices: 1. Wait. Just wait. Do not tap anything. Let the current cups pour out. 2. If the path is never coming up due to bad luck, you might have to pour that Orange into the "void" (an area that doesn't need it) just to clear the slot, accepting the penalty of a wasted cup to save your run.
Problem: The Rope Link is Blocking Everything
The Rope Link is at the top of the dispenser, and you can't get to the cups behind it.
Solution: You have to take the plunge. Clear your belt as much as possible (get to 0/5 or 1/5). Then, trigger the link. Deal with the Yellow cup immediately by waiting for the flower. Once it's gone, the queue will flow again.
Problem: Ice Block Won't Break
You are tapping the block, but you keep getting colors you need for the background (Cyan/Green) and don't want to "waste" them on the block.
Solution: Change your mindset. Hitting the Ice Block with Cyan is not a waste. It is clearing the path for the Dark Green and Maroon cups behind it. A small amount of Cyan splash on the ice is irrelevant. Prioritize breaking the block over saving every drop of paint.
Speed Run Tips
If you are aiming for a 3-Star score or a fast time, you cannot play conservatively. You must take calculated risks.
Risk: The Early Rope Pop
Speedrunners often trigger the Rope Link at 2/5 capacity instead of 1/5. This is risky because it fills the belt to 4/5 instantly. However, if you have fast fingers, you can pour the Lime and the Yellow in rapid succession before the belt locks up. This saves valuable seconds.
Technique: Pre-loading the Tap
As soon as you tap a cup to pour, immediately look at the next cup in the dispenser queue. Don't watch the pour animation. If the next cup is Cyan and the Sky is available, tap it the instant the previous cup leaves the belt. Minimizing the delay between taps is the key to speed.
Shortcut: Ignoring Small Details
Don't aim for 100% completion on every element. If the roof is 90% done, move on. If the flowers are 90% done, move on. The game often gives you a "Complete" verdict before the canvas is literally 100% full. Stop pouring the moment the level transition bar starts to fill or the "Success" chime sounds.
Strategy: Bulk Breaking
Don't tap the Ice Block one by one. Wait until you have 2 or 3 cups that *can* hit the block, then tap them in a quick barrage "rat-a-tat-tat" style. This momentum helps shatter the block faster than a rhythmic, slow tapping approach.
Optimization: The Mystery Cup Gamble
If you are speedrunning, tap Mystery Cups the moment they appear. If it turns into a bad color, you have to deal with it, but statistically, you will save time by revealing them early rather than waiting for the "perfect" moment. Speed requires adaptability over patience.