
Level 412
HARDHow to solve Sand Loop level 412? Get instant solution for Sand Loop 412 with our step by step solution & video walkthrough. Sand Loop 412 tips and guide.
Play Sand Loop Now
Experience the puzzle challenge firsthand
Game Screenshots
Sand Loop Level Guides
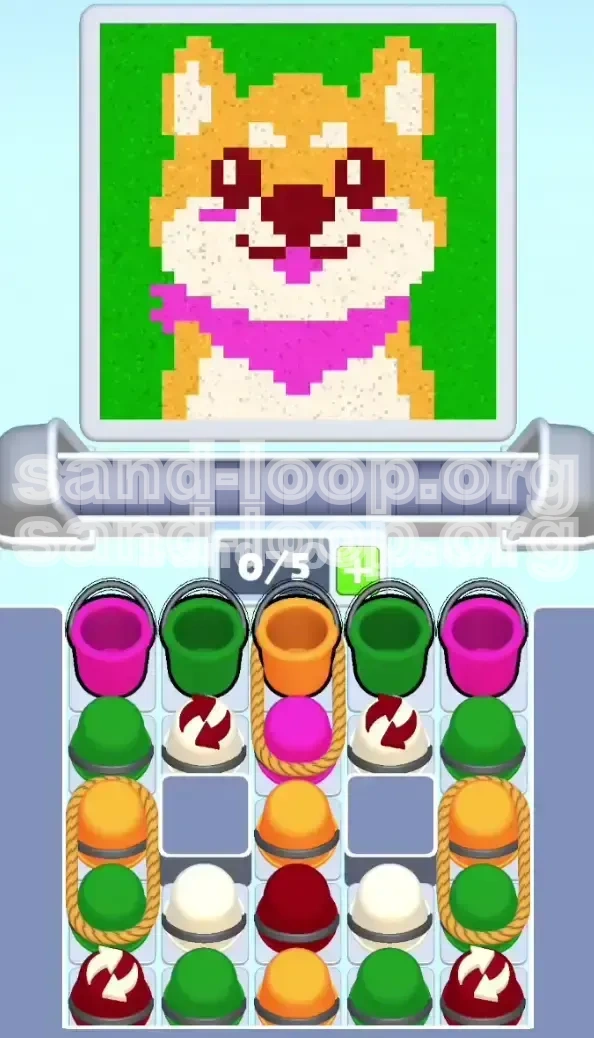
Level 412 Overview: The Shiba Inu Logic Puzzle
Sand Loop Level 412 is not a test of speed, but a test of inventory management and prioritization. While the screen displays a charming pixel-art Shiba Inu, the underlying mechanics are a rigid logic grid designed to trap players who over-commit to easy fills. This stage forces you to navigate a heavily restricted supply tray—your "hand"—with only five available slots. Between ropes binding critical colors together and grey blocks obstructing your view, blind tapping will result in an immediate deadlock. To succeed, you must treat your supply tray like a game of Tetris; if you clutter your limited slots with the wrong colors at the wrong time, the level becomes mathematically impossible to finish.
The "Trap" of the Green Background
The most prominent feature of this level is the massive Green background occupying the top corners and edges. New players will instinctively fill this first because it covers the largest surface area. This is a fatal error. Green is the "filler" color of this stage. While it takes up 40% of the visual space, it is abundant in the supply tray. Prioritizing it early clogs your inventory, preventing you from accessing the rarer colors needed for the dog's facial features.
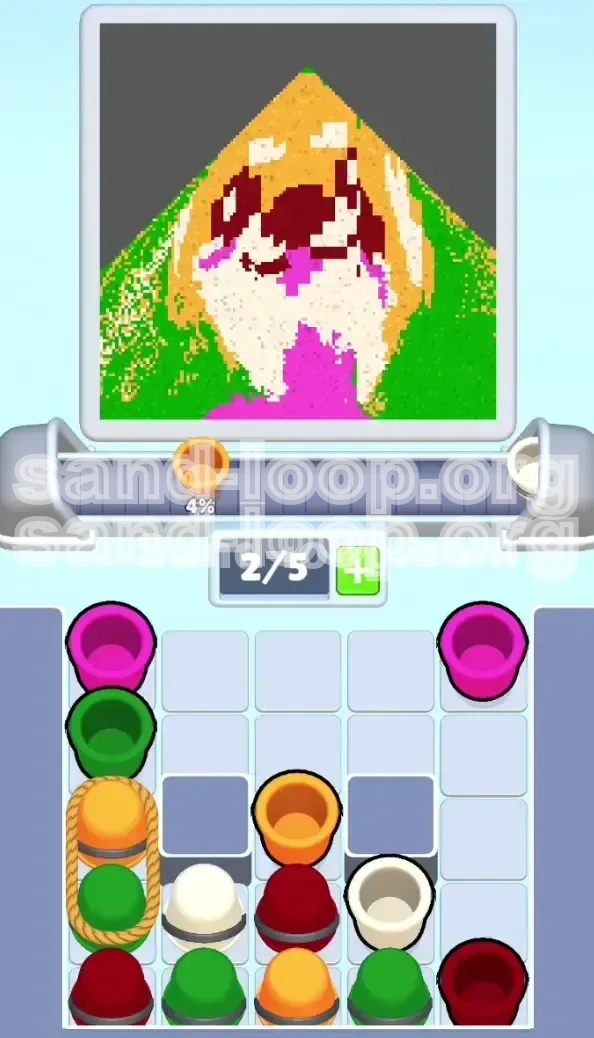
Visual Breakdown of the Canvas
Understanding the pixel density is crucial for planning your moves. The canvas is divided into five distinct color zones with varying difficulty levels. The Shiba Inu itself sits in the center, acting as a complex multicolored mask against the green field. You are dealing with layers: the background, the fur, the facial markings, and the accessories. The challenge is that the supply tray does not present these colors in a logical order; it presents them in a logistical chain that you must manipulate.
The Restricted Supply Tray
Your biggest enemy in Level 412 is the 5-slot limit on your conveyor. Unlike standard levels where you can queue up multiple shots, here you are handcuffed. You have two types of restrictions active simultaneously: Ropes and Grey Blocks. Ropes bind two cups together (usually a high-value color and a low-value one), forcing you to waste time on the first to unlock the second. Grey Blocks act as physical barriers, hiding the bottom row of cups until you clear the columns above them. This creates a "fog of war" element where you must remember what is coming next.
Why This Level Fails Most Players
The failure rate in Level 412 spikes at the 60% completion mark. Players successfully fill the background and the fur but get stuck waiting for Dark Red or Pink cups. By this point, their tray is filled with Green and Orange cups they can't use, and the conveyor is jammed. The level requires you to ignore the urge to "complete" sections visually and instead focus on keeping the flow of the conveyor belt moving, even if it means leaving a section 90% finished while you switch tasks.
Strategy: The "Keep One Slot Open" Rule
To survive the rope mechanics and swap traps, you must adopt a strict inventory rule. Never let your tray capacity reach 5/5 if possible. Ideally, keep it at 3/5 or 4/5. Having an empty slot allows you to break a Rope combination without immediately filling your hand with the resulting color. This flexibility is the difference between a smooth run and a restart. If you hold 5 cups, the conveyor stops moving, and if the next cup is the one you need, you have effectively lost the game.
Primary Objectives and Success Metrics
To clear Level 412, you need to move beyond simply "filling the picture." You need to accomplish three specific mechanical goals that control the flow of the game. These objectives are prioritized by scarcity and obstruction.
Objective 1: Unlock the Center Rope
The single most critical bottleneck in this level is the Center Rope located in the middle column of the tray. It ties an Orange Cup (top) to a Pink Cup (bottom). The Pink Cup is essential for the bandana, which is a large, awkward block to fill. You cannot access this Pink Cup until you have fully processed the Orange Cup above it. Therefore, your early game must focus on generating Orange demand to free up the Pink supply.
Objective 2: Clear the Side Column Ropes
On the far left and right edges of the tray (columns 1 and 5), you will find vertical rope pairings in the 3rd and 4th rows. These usually involve Green and Orange cups. Clearing these is not just about using the sand; it is about unblocking the vertical visibility of the tray. If you ignore the edges, the bottom rows remain hidden behind Grey Blocks, and you risk running out of accessible colors while the board clogs up.
Objective 3: Utilize Swap Cups Effectively
Level 412 introduces "Swap" mechanics, indicated by circular arrows on specific cups—specifically the Dark Red cups. These cups do not just dispense sand; they rotate the color of the slot or change the state of the cup. You must anticipate a timing shift when using these. The Dark Red is required for the eyes and nose, the smallest targets on the board. Missing a shot with these is costly because the recycling time for Dark Red is extremely long.
Objective 4: Manage the "Grey Block" Dead Zones
There are permanent Grey Blocks in columns 2 and 4, row 3. These are not obstacles you can remove; they are structural walls. Your objective is to manage the flow of cups *around* them. You must clear the cups in rows 1 and 2 of these columns to allow the conveyor to shift the hidden Row 4 and Row 5 cups into play. Failing to clear the top cups means the bottom cups (often White or Dark Red) never enter the screen.
Objective 5: Prioritize Small Targets Over Large Backgrounds
Your final objective is mental discipline. You must prioritize the 5-pixel eyes over the 500-pixel green background. The logic of Sand Loop dictates that rare colors (Red/Pink) have longer spawn cycles than common colors (Green). If you fill the background first, you will be staring at a full green board for two minutes while you wait for the game to spawn the single Red cup you need for the nose. Always pour the rare colors when they are available, regardless of how much "Green" remains.
Objective 6: Prevent Tray Deadlocks
The ultimate success metric is Conveyor Flow. If the belt stops moving for more than 5 seconds, you are in danger. Every move you make should be calculated to clear a slot in your tray. If you have a choice between filling a large easy patch of Green or a small annoying patch of Pink, and your tray is full of Green, you *must* choose the Green (or discard it) to unclog the machine. The level is won or lost in the inventory management, not the pouring accuracy.
Step-by-Step Walkthrough: Phase 1 (The Start)
The first 20 seconds of Level 412 define the entire run. Do not tap randomly. Follow this sequence to unlock your supply lines.
Step 1: The Initial Pink Tap
As the level loads, inspect the top row of the tray. You will almost always see two Pink Cups in the top left and top right corners (Row 1, Columns 1 and 5). These are "loose" cups—they are not roped to anything. Tap both of these immediately. Do not use them on the dog yet. Pour them into the bottom-center bandana area to get them out of your tray. This clears space for the incoming rope combinations.
Step 2: Targeting the Center Rope
Focus your eyes on the center column. You will see a vertical rope connecting a Top Cup (Orange) and a Bottom Cup (Pink). You need that Pink cup for the bandana detail work. Tap the Top Orange cup first. Immediately pour this Orange sand onto the Shiba Inu's ears or the top of its head. As the Orange cup clears the tray, the Pink cup attached to it will slide up into the accessible slot. Wait for the pour to finish before grabbing the Pink one.
Step 3: Managing the Green Overflow
After the initial Pink and Orange clears, you will notice a surge of Green Cups appearing in columns 2, 3, and 4. This is the game trying to bait you into a deadlock. Resist the urge to tap them all. Tap *one* Green cup, fill a small corner of the background, and stop. Your goal here is just to keep the conveyor belt moving. If you tap more than two Green cups in a row, you will push the necessary Orange and White cups off the screen or clog your slots.
Step 4: Unlocking the Side Ropes
Shift your attention to the far left and right edges. In the 3rd and 4th rows, you will see roped pairs. These are likely Green-over-Orange or Orange-over-Green. You need to clear the top cup of these pairs to free the space. Tap the top cup of the Left Side Rope. Pour it. Then tap the top cup of the Right Side Rope. Pour it. This "unlocks" the vertical columns, allowing the hidden cups at the bottom of the tray to cycle into view.
Step 5: The First White Cup Reveal
Once the Side Ropes are processed and the top row is cleared, the conveyor will shift. You should see a White Cup emerging from the bottom row, likely hidden under the Grey Blocks in the previous cycle. This White Cup is critical for the Shiba Inu's muzzle. Ensure you have an empty slot (or create one by using a Green cup) to catch this White Cup. Do not let it pass by if you have the capacity to hold it.
Step 6: Establishing the "Face Frame"
By the end of Phase 1, you should have roughly 30% completion. You should have started the Pink bandana, outlined the top of the head in Orange, and filled the corners with Green. The "Frame" of the face (the Orange perimeter) should be your primary focus. Do not worry about the eyes or nose yet; the Dark Red required for those features hasn't entered the high-cycle rotation. You are setting the stage for the mid-game complexity.
Step-by-Step Walkthrough: Phase 2 (The Mid-Game)
You are now in the thick of the puzzle. The easy loose cups are gone, and you are dealing with the swap mechanics and large fill zones.
Step 7: The "Swap Cup" Timing Challenge
A Dark Red cup with a circular arrow icon will appear. This is a Swap Cup. It behaves differently than a standard cup. When you tap it, you have a shorter window to pour before it cycles or swaps properties. Tap this cup the moment it enters the active slot. Immediately target the Shiba Inu's eyes. These are two single-pixel points. Accuracy is key. If you miss, you will have to wait for the Dark Red to cycle back around, which wastes valuable time.
Step 8: Filling the Muzzle (White Zone)
You should be holding a White Cup by now. The White zone (the muzzle and chest) is a large, irregular shape in the center. Pour the White sand to establish the "mask" of the dog. Be careful not to bleed White into the Green background or the upcoming Pink areas. The White zone acts as a separator; getting a clean fill here makes the Dark Red features pop later.
Step 9: The Bandana Expansion
Return to the Pink cups you unlocked in Phase 1. The bandana at the bottom is a large triangular block. It requires multiple Pink cups to fill. Since you managed your inventory well in Phase 1, you should have a steady stream of Pink coming from the center rope area you cleared earlier. Pour Pink until the bandana is roughly 80% full. Do not obsess over 100% perfection yet; you can fix jagged edges with leftovers at the end.
Step 10: The Grey Block Obstacle Maneuver
You will hit a point where the tray seems full of cups you don't need, and the cups you do need are hidden behind the Grey Blocks in the middle columns. To fix this, you must clear the "buffer" cups in the columns adjacent to the blocks. Tap and use any Green or Orange cups sitting in columns 2 and 4. Clearing these forces the conveyor to "drop" the hidden bottom-row cups into the active tray, revealing more White or Red options.
Step 11: The Nose and Mouth (Dark Red)
The Dark Red color is used for the nose, the mouth line, and the eyes. By now, you should have filled the eyes. If you have another Dark Red cup, target the nose. The nose is slightly more forgiving than the eyes but is surrounded by White fur. Pour carefully. If you have a Dark Red Swap Cup, use it on the mouth line (the thin line connecting the nose to the neck) as this requires precision.
Step 12: Inventory Purge
At this stage, you are likely at 4/5 or 5/5 tray capacity. You likely have extra Green or White cups. You must perform a "Purge." Look for the largest, easiest area to dump color—usually the top corners of the background. Quickly dump your excess sand there to open up slots. You cannot enter Phase 3 (The Cleanup) with a full tray, or you will miss the final cycle of specific colors needed to close the level.
Advanced Strategy: Color Order and Prioritization
Winning Level 412 requires knowing the hierarchy of colors. Not all colors are created equal, and treating them as such leads to failure.
The Color Hierarchy
Think of the colors in tiers based on supply rate and obstacle difficulty.
- Tier 1 (Critical/Rare): Dark Red (Eyes/Nose) and Pink (Bandana). These are roped, swapped, or scarce. They dictate your pace.
- Tier 2 (Structural): Orange (Fur) and White (Muzzle). These are abundant but necessary for the image's structure. Use them to fill gaps between Tier 1 actions.
- Tier 3 (Filler): Green (Background). This is your "trash" color. Use it only to clear the belt or fill space when Tier 1 and 2 are unavailable.
Optimal Pouring Order
The most efficient path through the level follows this specific sequence:
- Loose Pinks (Start the bandana).
- Roped Oranges (Unlock the center).
- Dark Red (Eyes) (Hardest target, do early).
- White (Define the center mask).
- Green (Background fill, done in bursts).
- Dark Red (Nose/Mouth) (Mid-stage precision).
- Final Polish (Clean up edges with remaining cups).
The "Sand Conservation" Principle
Unlike standard levels where overflow is fine, here, wasted sand costs you time. If you over-pour the Green background, you are using up a slot that could have been used to cycle the tray to find a hidden Pink cup. Pour only enough to clear the pixel. Do not build layers. This is especially true for the Dark Red eyes; over-pouring bleeds into the fur and creates a mess that is hard to fix later.
Understanding the "Rope Economy"
Every Rope in the level represents a "transaction cost." To get the Pink cup at the bottom of the center rope, you must "pay" by using an Orange cup. To get to the bottom row, you must "pay" by clearing the Side Ropes. Always ask yourself: "Do I have the inventory capacity to pay this cost right now?" If your tray is full, you cannot afford to break a rope, because the resulting cup will have nowhere to go, stopping the conveyor.
Timing the Swap Cups
The Swap Cups (Red) operate on a timer. If you tap them and don't pour immediately, they might swap with another cup in the tray or disappear. This is actually a useful mechanic if you are stuck. If you have a Red Swap Cup but the eyes are already full, tap it onto an empty slot or a color you don't need (like Green) to potentially swap it out for a more useful color. It's a gamble, but sometimes necessary in the late game.
Common Mistakes and Troubleshooting
Even experienced players fail at Level 412. Here is a diagnosis of why you might be getting stuck.
Mistake 1: The "Green Fog"
Symptom: You are stuck at 80% completion with a full tray of Green cups, waiting for Pink or Red.
Cause: You filled the background too early. The game continues to spawn Green because it detects the background isn't 100% full, but you've run out of other colors to use.
Solution: In the future, leave the background at 50% until the end. If you are currently stuck, you have no choice but to waste the Green cups. Pour them into the background until the tray forces a spawn of a different color, even if it means over-filling the green zones.
Mistake 2: Ignoring the Side Ropes
Symptom: The conveyor seems to have stopped moving, or you only see the same 5 cups cycling endlessly.
Cause: The bottom row of cups is trapped behind the Grey Blocks, and the columns above them are full of undispensed sand.
Solution: Stop what you are doing. Look at the left and right edges. Identify the roped cups. You must break these ropes to shift the conveyor grid. Even if you don't need the color from the roped cup (e.g., it's Green and you have enough Green), tap it and pour it into a safe zone just to advance the belt.
Mistake 3: Missed Micro-Targets
Symptom: The level says "Incomplete" but the picture looks done, or you are 99% done missing one eye or the nose.
Cause: You tried to pour Dark Red while the tray was moving, or you tapped the cup too late/early.
Solution: Use a "Tap and Wait" technique for the eyes. When the Dark Red cup is in the slot, tap it, but keep your finger ready. Watch the pixel flow. If the stream drifts, drag your finger slightly to correct it. Do not rely on auto-aim for the eyes. If you miss, you have to clear the rest of the board to cycle back to Red.
Mistake 4: Tray Clogging (5/5 Slots)
Symptom: You cannot tap new cups because your hand is full, and the colors you are holding are for areas you have already filled.
Cause: Lack of foresight. You held onto colors "just in case."
Solution: Panic-pouring is better than holding. If you are stuck with a full tray of useless colors, pick a corner of the screen (even if it's the wrong color) and dump the sand just to free up the slot. It is better to have a messy 10% of the screen than to be deadlocked with 0% progress.
Mistake 5: Bleeding the Bandana
Symptom: The pink bandana sand has bled into the white muzzle or the dark red mouth, making the face look muddy.
Cause: Overfilling the bandana block before the adjacent features were defined.
Solution: Always fill the White muzzle *before* finishing the Pink bandana. The white acts as a buffer. If you have already bled the color, you might need to use the specific "Clean" tools if available (rare in Sand Loop) or simply restart. Prevention is the only cure here: define the borders first, then fill the center.
Speed Run Tips and Shortcuts
Once you understand the logic, you can optimize your run to finish Level 412 in under 60 seconds. Speed running relies on rhythm and prediction.
Tip 1: The "Pre-Tap" Technique
You can tap the next cup in the tray *before* your current pouring animation finishes visually. While the sand is flowing from Cup A, tap Cup B. As long as Cup B enters the slot as Cup A finishes, there is no delay. This "queued" action shaves seconds off every single pour. Chain your pours: Loose Pink -> Loose Pink -> Center Orange -> Center Pink without letting the animation fully reset.
Tip 2: Bulk Dumping Green
Do not fill the Green background pixel-by-pixel. Wait until you have 2 Green Cups in your tray. Pour them simultaneously or in rapid succession into the large top corners. The "shatter" effect of the sand hitting a large area is faster than precision tapping. Treat the Green background as a dumping ground for inventory management rather than a puzzle to be solved artistically.
Tip 3: Ignoring the "Perfect Fill"
Perfectionism kills speed runs. You do not need 100% pixel-perfect coverage on the Shiba Inu's fur. If the Orange fur is 95% filled and the rest is just white space, move on. The game usually passes you with 95-98% completion. Spending 30 seconds finding that one last pixel is slower than restarting the level. Aim for the "Core Fill"—the eyes, nose, and distinct color blocks—and let the minor details slide.
Tip 4:预测 Ropes
Memorize the rope layout. Center: Orange/Pink. Sides: Green/Orange. You know what is coming next. Don't wait for the cup to fully rise before deciding where to put it. As the Center Rope is breaking, look at the bandana area. As soon as the Pink cup becomes active, tap it. By reducing your "reaction time," you increase the flow rate of the level significantly.
Tip 5: The Reset Strategy
If you make a mistake in the first 10 seconds (e.g., you tap the wrong color and clog the tray), hit the restart button immediately. Do not try to fix a bad开局. A bad start in Level 412 compounds because you miss the cycle of the center rope. Restarting is faster than untangling a deadlock at the 40% mark. A perfect run starts with a perfect Phase 1.
Tip 6: Utilize "Dead Time"
There are moments where you are waiting for a cup to move up the conveyor or for a rope to break. Use this 1-2 seconds of "dead time" to scan the board. Locate the next target (e.g., "Okay, next I need to hit the nose"). When the cup arrives, your brain is already ahead of the game. This reduces the cognitive load and prevents the "uh oh" hesitation that leads to missed taps.