
Level 415
EXPERTHow to solve Sand Loop level 415? Get instant solution for Sand Loop 415 with our step by step solution & video walkthrough. Sand Loop 415 tips and guide.
Play Sand Loop Now
Experience the puzzle challenge firsthand
Game Screenshots
Sand Loop Level Guides
Level Overview: The Romantic Lake Challenge
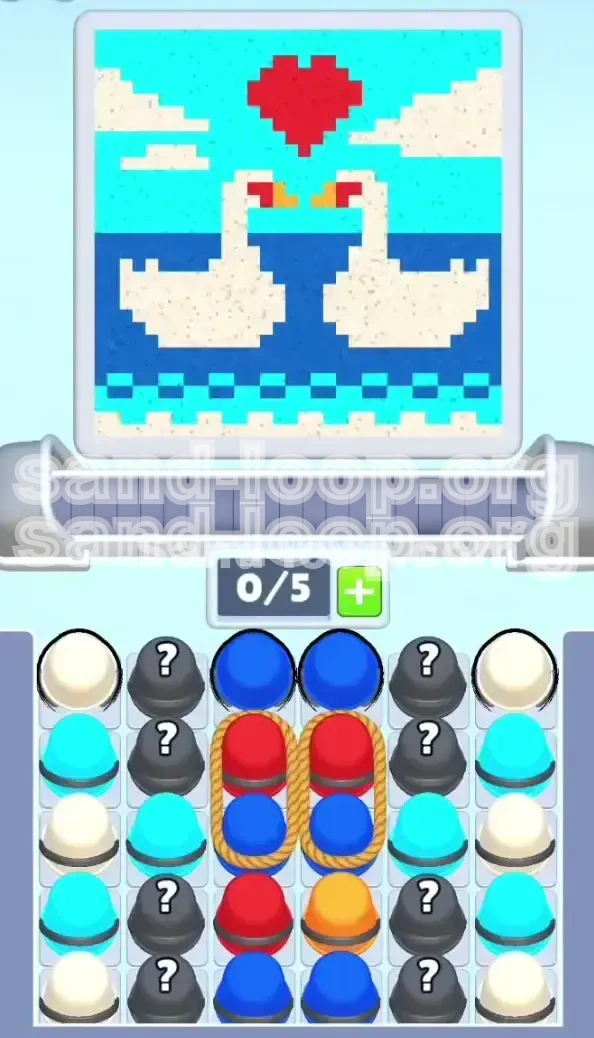
Welcome to the definitive walkthrough for Level 415, notoriously known as "The Swans in Love." At first glance, this level appears to be a simple, picturesque scene featuring two swans forming a heart shape against a split-toned blue sky and water background. However, beneath this serene aesthetic lies a logistical nightmare of color management and spatial reasoning. This level is not just about filling pixels; it is a test of your ability to manage a limited supply chain while dealing with conveyor belt bottlenecks.
The primary difficulty in Level 415 stems from the tight "Slot Capacity." You are restricted to a maximum of 5 active slots in your supply tray at any given time. Given the complex color palette—Cyan for the sky, Deep Blue for the water, White for the swans, Red for the heart, and a scarce amount of Orange for the beaks—running out of space is a constant threat. If you fill your tray with the wrong colors while the dispenser is hovering over a critical area, you will face a deadlock that forces a restart.
The Composition: Split Backgrounds
The canvas is divided horizontally, creating two distinct zones that require different handling. The top 40% is the sky (Cyan), and the bottom 60% is the lake (Deep Blue). The transition between these two is not a straight line but a checkered "sand trap" pattern. This jagged edge means that if you are pouring when the dispenser crosses the horizon, you risk contaminating the sky with lake water or vice versa. Understanding this vertical split is crucial for planning your order of operations.
The Color Palette Breakdown
To succeed, you must understand the hierarchy of colors required for this level.
- White (High Volume): This is your workhorse. The swans and clouds consume approximately 45% of the total sand volume. You will need constant access to White cups.
- Deep Blue (Medium Volume): The lake is deep and requires significant filling, accounting for about 30% of the level.
- Cyan (Medium Volume): The sky is less dense than the water but still requires steady attention, making up roughly 15% of the total.
- Red (Low Density, High Priority): The heart is small but dense. It requires focused pouring.
- Orange (Critical Rare Resource): This is the rarest color in the level, required only for the beaks. Missing a pour here can ruin a "Perfect" score immediately.
The Primary Obstacle: Roped Dependencies
The central mechanic of Level 415 is the "Roped" cups located in the center of your tray. You will see pairs of cups tied together vertically: a Red cup on top of a Blue cup. This creates a strict dependency. You cannot access the Blue sand needed for the lake until you have completely emptied the Red sand into the heart. Many players make the mistake of filling the background first, only to find they cannot finish the heart because the necessary Red cups are buried under unused Blue cups, clogging the conveyor belt.
The Question Mark Trap
Scattered on the left and right edges of the tray are "Question Mark" cups. These add an element of RNG (Random Number Generation) to the level. While they usually contain extra White or Cyan sand, they can sometimes clog your limited slots with colors you don't immediately need. Tapping these too early can fill your tray, preventing you from grabbing the essential Red or Orange cups when they appear. Strategic timing of when to reveal these cups is key to maintaining a smooth flow.
Why This Level Fails Most Players
The failure rate in Level 415 is highest during the middle 50% of the game. Players successfully clear the sky but get stuck when the dispenser hits the water. They realize their tray is full of Cyan and White, but the dispenser is over the Blue water zone, and the Blue cups are locked behind the unused Red heart cups. This guide focuses on preventing that specific bottleneck by enforcing a rigid processing order.
Clear Objectives: Your Mission Goals
Before you even tap the first cup, you need a clear mental model of what needs to be done. Random tapping will lead to failure. Your mission is divided into three distinct phases: The Unlock, The Foundation, and The Details.
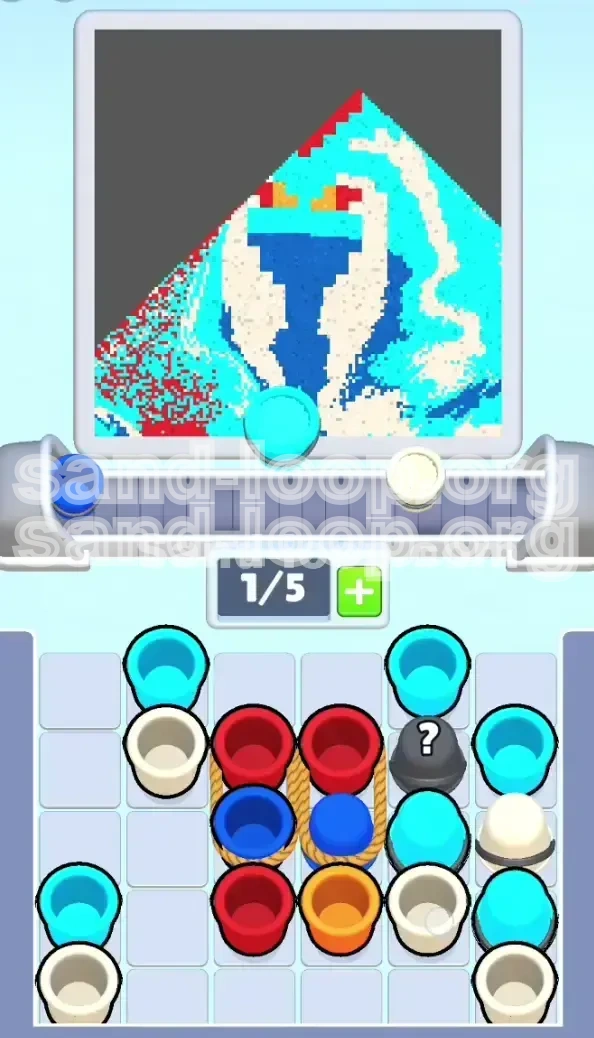
Phase 1: The Unlock (Clearing Ropes)
Your immediate priority is not to fill the canvas, but to clear the tray. Specifically, you must empty the two Roped Red Cups. This is the gateway to the rest of the level. If the Red sand is not deployed, the Blue sand remains inaccessible. By clearing the Red cups first, you free up the slots and unlock the Blue cups underneath, ensuring you have the tools ready for when the dispenser inevitably moves to the water zone.
Phase 2: The Foundation (Sky and Swans)
Once the ropes are cleared, your goal shifts to filling the large White and Cyan areas. The logic here is simple: White and Cyan cups are abundant. They act as "filler" to keep your tray moving while you wait for the specific Orange or Deep Blue cups to cycle in. You should aim to have the swans' bodies and the sky at 80% completion before you worry about perfecting the water line.
Phase 3: The Detailing (Beaks and Water)
This is the precision phase. With the bulk of the sand deposited, you must manage the scarce resources. The Orange beaks require micro-tapping—releasing the sand for only a fraction of a second. The Deep Blue water requires navigating the checkered horizon line without spilling over. This phase is about patience and timing rather than speed.
Managing Slot Capacity (The 5-Slot Rule)
Never let your tray reach 5/5 capacity unless you are 100% sure of the next three moves. A full tray means you have zero flexibility. Ideally, keep your capacity between 2/5 and 4/5. This "buffer zone" allows you to pick up a critical cup (like an Orange one) the moment it appears without having to waste a move dumping a different color.
Achieving the "Perfect" Rating
To get a Perfect score, you must avoid "overflow" (spilling sand outside the lines). The most common overflow points are the beaks (overflowing into the white head) and the water line (overflowing into the sky). A Perfect run requires you to stop pouring exactly when the pixel is full, even if it means releasing the tap a split second early. It is better to under-fill and touch up later than to overflow and lose the rating.
Step-by-Step Walkthrough: The Action Plan
Follow this sequence exactly. It is designed to minimize backtracking and keep your conveyor belt flowing smoothly.
Step 1: Execute the Red Heart Protocol
Action: As soon as the level starts, locate the two vertical pairs of Roped Cups in the center of your tray. You will see Red on top of Blue.
Move: Tap both Red cups immediately to send them to the conveyor belt.
Execution: Watch the dispenser nozzle. Wait until it is directly over the red heart in the center of the canvas. Release the sand.
Result: This empties the Red cups, removing them from the tray and immediately unlocking the Blue cups underneath. You have now secured the ability to fill the lake later.
Step 2: Reveal and Manage Mystery Cups
Action: While the Red cups are traveling on the belt, look at the Question Mark cups on the far left and right.
Move: Tap one Question Mark cup to reveal its color.
Warning: Do not tap all of them at once. You need to keep 2 slots open. If the revealed cup is White or Cyan, send it to the belt. If it is a color you don't need right now (like extra Red), leave it in the tray to act as a placeholder until you need to dump it. The goal here is simply to create space and knowledge.
Step 3: Fill the Sky (Cyan Zone)
Action: Now that the heart is started and the ropes are clear, look for Cyan cups.
Move: Tap Cyan cups as they appear.
Execution: When the dispenser is in the top half of the screen (the sky), pour the Cyan sand. Since the sky is a large, open area with few complex edges, you can use "continuous pours" here. Hold the tap until the section is full. This is a low-risk activity that clears your tray quickly.
Step 4: Construct the Swans (White Zone)
Action: Prioritize White cups.
Move: Keep White sand cycling on the belt.
Execution: Target the swan bodies. These are large, connected white shapes against the blue background. Be careful near the necks—the gap between the two swans is narrow. Do not overfill the neck or the heads will merge. Fill the body and the lower neck first. Leave the beak area (the very tip of the head) completely empty for now. We need Orange for that, and we don't want to accidentally cover the beak pixel with White.
Step 5: The Micro-Tap for Orange Beaks
Action: Watch the tray carefully for the Orange Cup. It is rare and might only appear once or twice.
Move: When the dispenser is over the swan's head/face, get ready.
Execution: This requires a "Micro-Tap." Do not hold the pour. Tap the screen (or click) as fast as possible, releasing immediately. You want a single "puff" of sand. The beak is tiny—perhaps 2x2 pixels. If you hold the tap for even half a second too long, the Orange will spill onto the White head or the Blue background, ruining the clean lines. If you miss it, don't panic; just wait for the dispenser to come back around on the next loop.
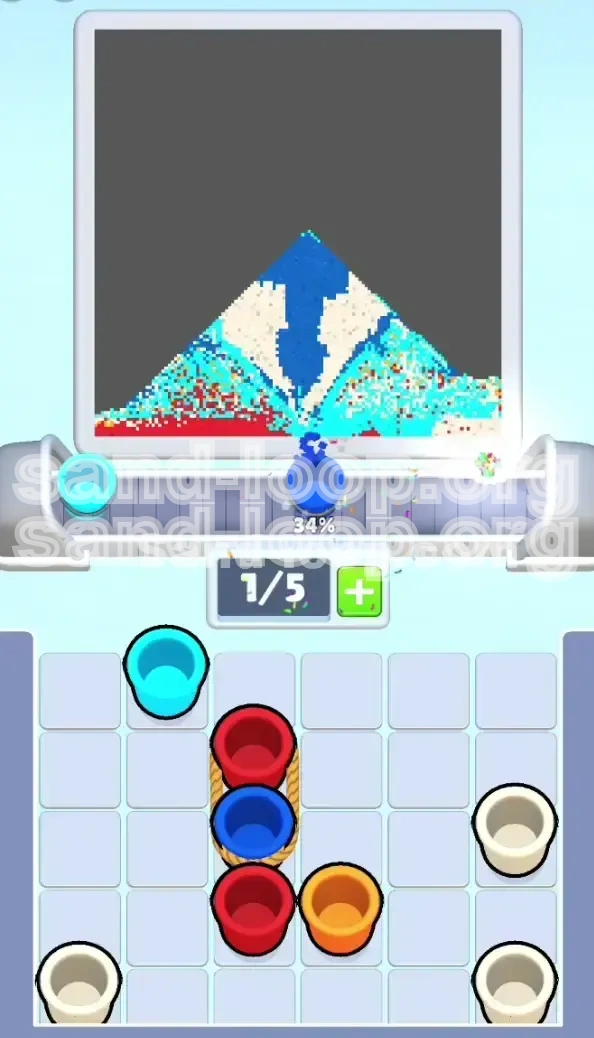
Step 6: The Lake and Horizon (Blue Zone)
Action: Now that the sky and swans are mostly done, focus on the Deep Blue cups you unlocked in Step 1.
Move: Tap the Blue cups.
Execution: The water line is the hardest part. The transition between Cyan (sky) and Deep Blue (water) is jagged. You cannot pour continuously here. You must use a "Pulse Pouring" technique. Tap, release, tap, release. Follow the jagged edge of the water pixels. If you simply hold the button, the Blue sand will climb up the sky pixels, creating a dirty, mixed color that is impossible to fix. Take your time with this section; it is the final hurdle.
Key Tips and Strategic Notes
These tips are collected from high-level players who have mastered the specific mechanics of Level 415. Applying these will transform your playstyle from chaotic to calculated.
Visualizing the "Ghost" Hitbox
In Sand Loop, there is a slight delay between when a cup enters the nozzle and when the sand actually hits the canvas. This is the "travel time." To compensate for this, you must look for the "ghost" highlight—a faint shimmer on the pixel indicating where the sand will land. You should tap the release button roughly 0.5 seconds before the nozzle is perfectly centered over the target. This pre-emptive timing ensures the sand lands exactly where you want it, especially crucial for the tiny beak targets.
The "Tray Rhythm" Technique
Don't watch the canvas exclusively. Watch your tray. Establish a rhythm of "Tap Tray -> Tap Canvas -> Tap Tray." If you stare only at the painting, you might miss that a critical Orange cup has arrived in your tray, or that your slots are full. Keeping one eye on the supply chain prevents the "Paused Conveyor" situation where the game stops because you have no open slots to accept new colors.
Understanding Belt Speed
In Level 415, the conveyor belt moves at a moderate speed. This is actually an advantage. The belt is slow enough that you can reliably predict which cup will be used next. If you see that the dispenser is moving towards the water, but your next three cups are all White (Sky color), you know you have a problem. Use the slower belt speed to plan ahead: if the wrong color is coming up, stop pouring and wait for the nozzle to move to a zone that matches that color, or use the time to clear Question Mark cups.
Using Question Marks as Buffers
Don't view Question Mark cups as just random elements; view them as "Wildcards" or "Buffers." If your tray is empty and the belt is moving fast, tap a Question Mark cup to fill a slot. This prevents you from having idle capacity. Even if you don't use the sand immediately, having a full tray keeps your options open and maintains the flow of the game. It is better to have a color you might not need than to have an empty slot that could have been used to store a critical color.
Prioritizing the Center
Always clear the center of the canvas (the Heart and the Swans' necks) before the edges. The center is where the dispenser passes most frequently and slowly. It is easier to "catch" the edges of the map with a quick pour as the nozzle whips by at the end of a line. Focus your precision efforts on the center column where you have the most control over timing.
The "Save" Strategy for Rare Colors
When you get a rare color like the Orange for the beaks, do not feel pressured to use it immediately if the dispenser is in a bad position (like the far left edge). It is better to let that Orange cup sit in your tray (occupying a slot) until the dispenser comes back to the center/top where the swans are. Using it while the dispenser is out of position is a guaranteed waste of a precious resource.
Common Mistakes to Avoid
Even experienced players can fall into these traps. Recognizing these behaviors is the first step to correcting them.
Mistake 1: Premature Background Filling
The most common error is filling the Blue water before filling the Red heart. Because the Blue cups are trapped under the Red cups in the roped section, tapping random background Blue cups first fills your tray with Blue while the Red cups remain locked. When you finally decide to do the heart, you have no Red sand available, and your tray is clogged with Blue sand that you can't dump. Rule of thumb: Always unlock the ropes (Red) before committing to the background (Blue).
Mistake 2: The "Full Tray" Deadlock
This happens when players tap every cup they see without thinking. Suddenly, the tray is full (5/5), and the dispenser is hovering over a White area, but your tray contains only Red and Blue. You are stuck. You have to waste time waiting for the dispenser to move to a Red or Blue zone just to dump one cup and free up a slot. Prevention: Always keep at least 1 slot open. If you have 4 cups, think twice before tapping the 5th unless it is exactly what you need right now.
Mistake 3: Ignoring the Horizon Line
Players often treat the water as one big bucket and pour continuously. This ignores the checkered pattern where the water meets the sky. Pouring Blue sand into the "steps" of the water line results in jagged, ugly edges that require White sand to fix later. This wastes sand and time. Correction: Treat the water line as a separate mini-game. Pause your pour at the horizon and tap rhythmically to fill the individual pixels.
Mistake 4: Overflowing the Beaks
The swan beaks are small. Many players treat them like the rest of the body and hold the tap. This causes Orange sand to flood the face. Because the background behind the swans is Blue and the head is White, cleaning up an Orange spill is extremely difficult and sand-inefficient. Advice: It is better to under-fill the beak by 10% and leave it slightly transparent than to overflow and ruin the aesthetic.
Mistake 5: Panicking at the Question Marks
When players see a Question Mark, they instinctively tap it to "see what they get." If you tap two Question Marks and they both turn out to be colors you don't need (e.g., two extra Reds when the heart is already done), you have now wasted 40% of your tray space on useless items. Strategy: Only tap a Question Mark if you have a surplus of slots (2 or more open) or if you are genuinely desperate for a specific color.
Mistake 6: Fighting the Conveyor Physics
Trying to "force" a pour by tapping repeatedly when the dispenser is slightly off-target. This just leads to a spray of sand that misses the target entirely. Accept that you have to wait for the nozzle to align. Fighting the physics of the game only leads to wasted sand and frustration. Patience is as important as speed in Level 415.
Solutions When You Get Stuck
Sometimes, despite your best planning, things go wrong. The board is locked, the colors are wrong, and the dispenser is in the wrong place. Here is how to recover.
Solution: Breaking a Tray Deadlock
The Situation: Your tray is full of Blue cups, but the dispenser is stuck over the Red Heart (already full) or the White Swan area. You cannot pour.
The Fix: You must sacrifice a cup. Identify the cup in your tray that is "least useful." If you have extra Blue cups and the water is 90% done, sacrifice a Blue cup. You do this by waiting for the dispenser to move over a Blue area (the water) and dumping the sand there, even if it doesn't need it much. The goal isn't to fill the canvas; the goal is to empty the tray slot so you can access the next color in the chain.
Solution: Correcting Color Contamination
The Situation: You accidentally poured Blue sand into the White Swan's neck. It looks grey and messy.
The Fix: Do not try to fix it immediately with Blue. Wait for the dispenser to move away, then wait for a White cup to cycle in. When the dispenser returns, pour the White sand on top of the mistake. White is usually a dominant color and can cover minor Blue spills. If the spill is huge, you may have to accept a "Good" rating instead of "Perfect." Focus on not making it worse.
Solution: The "Missing Beak" Problem
The Situation: You missed the Orange pour for the beak, and now the swan has a white face but no beak.
The Fix: Do not repaint the whole head. Leave the area empty. Continue playing the level, clearing your tray and finishing the water and sky. Eventually, another Orange cup will appear. When it does, stop everything else. Wait for the dispenser to align perfectly with that empty spot on the face, and then do the micro-tap. This is why keeping a slot open (buffer) is important—you need to be ready to grab that Orange cup the moment it appears.
Solution: Handling a "Frozen" Board
The Situation: The dispenser seems to be moving, but no sand is coming out, or the game feels unresponsive.
The Fix: This usually happens if you have a network lag spike or if you tapped too fast and the game is trying to catch up. Stop tapping for 2-3 seconds. Let the dispenser complete a full loop without input. This allows the game logic to resync. Once the movement looks smooth again, resume your tapping rhythm.
Solution: Running Out of Sand
The Situation: The tray is empty, and there are still unpainted pixels.
The Fix: This is rare in Level 415 but can happen if you over-poured (wasted sand). Look for any remaining Question Mark cups you might have ignored. Tap them to generate emergency sand. If there are no Question Marks left, you simply have to wait for the conveyor belt to recycle. The game usually provides enough sand if you are efficient, but if you aren't, you might be forced to restart the level.
Solution: The "Wrong Order" Recovery
The Situation: You realized you filled the background before unlocking the ropes, and now you can't finish the heart.
The Fix: You are in "Hard Mode." Your only hope is to dump sand as fast as possible to clear the background cups from the tray. You need to create enough space to tap the Roped Red cups. You might have to intentionally overflow the background (make a mess) just to get the Red sand flowing. Once the heart is done, you can come back and fix the background mess. It's not elegant, but it's the only way to salvage a run at this point.
Speed Run Tips and Shortcuts
For players looking to achieve the fastest time or three-star rating, efficiency is paramount. These tips cut out the wasted seconds.
Pre-Loading the Queue
While the "Start" animation is playing (before you have control), you can often tap the very first cup in the tray. Do this immediately. If it's a Roped Red cup, you've saved a second. If it's a Question Mark, you've revealed it early. Every millisecond counts in a speed run. Don't wait for the dispenser to start moving before you tap your first cup.
Batch Processing Colors
Instead of switching colors every time the dispenser changes zones, try to "batch" your work. If you have 3 White cups in the tray, commit to filling all the White areas you can reach in one pass of the dispenser. Don't do a little White, then a little Blue, then a little White. This constant switching wastes mental energy and tap time. Do all the White, clear the tray, then do all the Blue.
Using the "Edges" for Free Time
When the dispenser is at the far left or right edge of the screen, it is effectively out of bounds for filling the main picture. Use this "dead time" to manage your tray. Tap Question Marks, dump unwanted cups, or plan your next move. Don't stare at the screen while the dispenser is reversing direction; use that 1-second window to organize your inventory.
The "Continuous Pour" Sweet Spot
Level 415 has specific zones where you can use the "Continuous Pour" (holding the tap) without risk. The top-center of the sky (Cyan) and the very bottom-center of the lake (Deep Blue) are safe zones. Identify these safe zones early. When you have a cup of that color, hold the tap until it's empty. This is much faster than tapping repeatedly. Save your tapping energy for the complex zones (horizon, heart, beaks).
Memorizing the Rope Locations
The Roped Cups are always in the same place. You don't need to look for them. You can muscle-memory this level. Start your tap on the center column immediately every time you restart. Developing this muscle memory allows you to clear the ropes in the first 5 seconds of the level, giving you a massive time advantage over players who have to scan the board first.
Skip the "Perfect" Cleanup
If you are strictly Speed Running and not chasing the "Perfect" aesthetic score, skip the cleanup of minor pixels. If a pixel is 90% full, leave it. Focusing on getting the pixel from 90% to 100% often takes as much time as filling a 0% pixel. In a speed run, volume > precision. Fill the big shapes, clear the ropes, finish the beaks, and let the small background pixels fill themselves if there is spare sand at the end.