
Level 429
HARDHow to solve Sand Loop level 429? Get instant solution for Sand Loop 429 with our step by step solution & video walkthrough. Sand Loop 429 tips and guide.
Play Sand Loop Now
Experience the puzzle challenge firsthand
Game Screenshots
Sand Loop Level Guides
Sand Loop Level 429: The Ultimate Strategy Guide
Level Overview
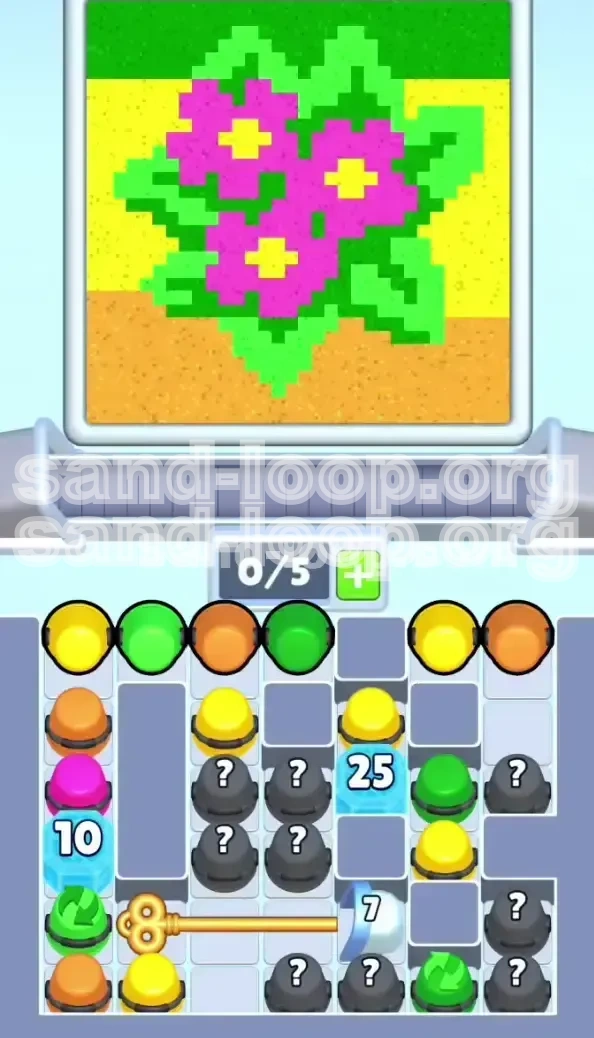
Welcome to Level 429, commonly known as the "Pink Flowers" challenge. This level is a brutal test of your inventory management skills rather than your reflexes. The screen presents a pixel-art image of three pink flowers with yellow cross centers, set against a background of orange dirt and green grass. The primary difficulty arises from a supply tray that starts completely full (0/5 slots available), choked by ice and locks. To win, you must execute a precise opening sequence to create space without causing a deadlock, followed by a strict color-layering strategy.
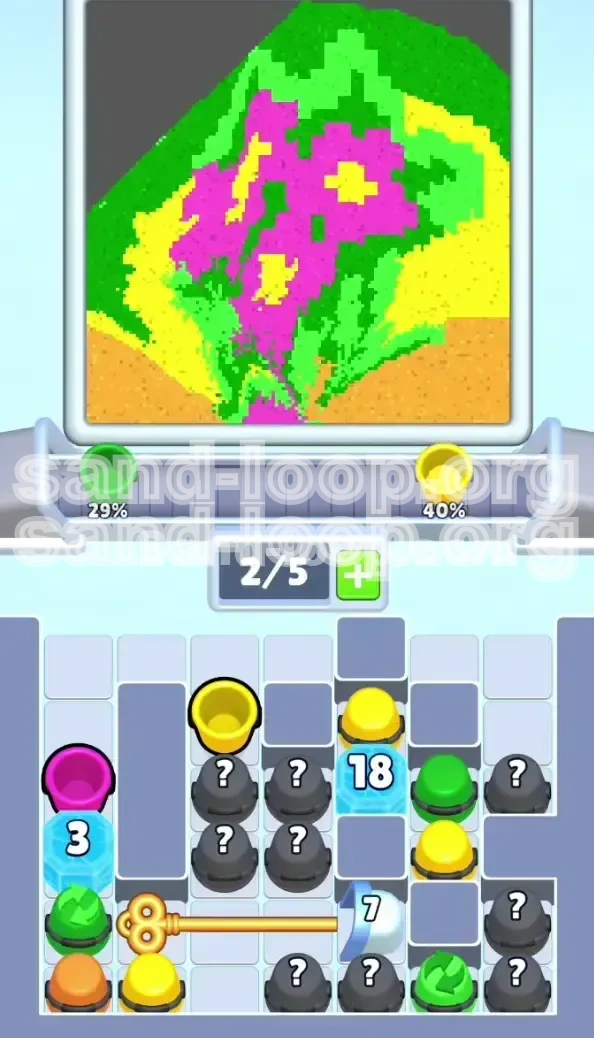
Victory Conditions
Victory is achieved by filling the canvas to 100% completion. However, this level adds a strict layering constraint. You must construct the image in a specific order: Dirt -> Leaves -> Petals -> Cross Centers. If you pour colors out of this order, the smaller shapes will be contaminated by larger layers of sand, forcing a restart. The game ends if the timer runs out or if the conveyor belt becomes gridlocked with unprocessable cups.
Primary Hazards
The most dangerous elements on this board are the "spill zones." The yellow crosses in the center of the flowers are tiny. If you pour yellow sand before the pink petals have created a physical barrier, the yellow will bleed into the grass and petals, making 100% completion impossible. Additionally, the 0/5 slot start means you have zero margin for error; tapping the wrong cup instantly freezes your ability to process new cups.
The Golden Key Problem
A massive Golden Key on the left side of the board points to a 7-Hit Keyhole Block on the right. This block guards a critical cache of resource cups. Many players waste time trying to clear the 25-Hit Ice Block above the keyhole. This is a trap. The efficient path requires undercutting the ice to trigger the key mechanism, saving your precious hits for the actual puzzle cups.
Understanding the Palette
You have four colors to manage: Hot Pink (Petals), Green (Leaves/Grass), Orange (Dirt), and Yellow (Crosses). The volume requirements are not equal. The Pink and Orange colors require the highest volume, while Yellow is used sparingly. Misjudging the volume queue will leave you with excess cups clogging your belt when you need space the most.
Difficulty Analysis
This level ranks as an 8/10 in difficulty due to the "Inventory Logic" requirement. Most levels allow you to clear cups as they appear. In Level 429, clearing the wrong cup early (like a Yellow cup) creates a "Soft Lock" where you have the right colors to win, but no physical space on the belt to process them. Patience is more valuable than speed here.
Strategic Objectives: How to Win
Unlock the Supply Tray
Before you can paint, you must clear the gridlock. The immediate objective is to bypass the 25-Hit Ice Block that is clogging the right side of the screen. By targeting the specific column supporting the lock mechanism, you can collapse the structure and free up the necessary inventory slots to begin the painting phase.
Establish the Foundation Layers
The canvas is multi-layered. The bottom layer is the Orange Dirt, followed by the Green Leaves. You must clear these specific colors first. Attempting to work on the flowers before the leaves are done will result in color bleeding. Your objective is to clear the Orange and Green cups from the tray in the first phase of the level.
Construct the Pink Dam
This is the most critical strategic objective. You must use the Hot Pink sand to build walls. Once the pink petals are poured, they act as a dam or container for the Yellow crosses. Do not proceed to the final step until the pink sand has fully settled and formed these barriers on the canvas.
The Precision Yellow Pour
The final objective is a surgical strike. You must hold all Yellow cups until the very end. Once the Pink and Green are solidified, you release the Yellow cups in short, controlled bursts to fill the tiny centers and the background without spilling over into the other zones.
Inventory Slot Management
Throughout the entire level, you must maintain at least 2-3 open slots on your conveyor belt. If you let the belt fill up (5/5), the game stops. You must rhythmically tap cups, let them process, and tap again. Never treat the cup tapping as a continuous action; always treat it as a cycle of "Load -> Wait -> Process."
Timer Management
While the timer is generous, panic-tapping is the enemy. Your objective is to keep the sand flowing at a steady 60% speed. If you rush and clog the belt, you lose more time unclogging it than you would have spent waiting. Aim for a rhythm of one tap every 2-3 seconds during the complex mid-game.
The Optimal Color Processing Order
Phase 1: The Orange Base
Priority: High. Start by identifying all Orange cups in the accessible areas (initially the top left). These must be sent to the belt immediately. The Orange dirt forms the absolute bottom of the image and has the largest surface area. Getting this flowing first clears the maximum number of cups from your tray.
Phase 2: The Green Structural Layer
Priority: Medium. Once the dirt is flowing, shift to Green cups. However, be careful: do not use the Green cups marked with the Refresh Symbol yet. Use the standard Green cups to fill the leaves and the grass strip at the top. This layer sits "behind" the flowers, so it must be done before the petals.
Phase 3: The Pink Containment Field
Priority: Critical. This is the make-or-break phase. You must flood the belt with every Pink cup available. Do not worry about having too many pink cups; the volume is necessary. You need the sand to pile up visually on the canvas to create the "dam" walls for the next step.
Phase 4: The Yellow Precision Filling
Priority: Last. Do not tap a single Yellow cup until the Pink sand has stopped moving and solidified on the screen. The Yellow crosses are small and require very little sand. Tapping these too early is the number one reason players fail this level.
Phase 5: The Refresh Cycle
Priority: Endgame. Save the Green cups with the Refresh symbol for the very end. These are used to clear any lingering backlog and speed up the belt for the final few seconds of the level, ensuring the last bits of sand process before the timer runs out.
The "?" Cup Protocol
When the Golden Key unlocks the right side, you will encounter "?" cups. Treat these as wildcards. If the belt has space, tap them. If they reveal a color you have already finished (like late-game Orange), leave them on the board. Do not clog your belt with finished colors.
Step-by-Step Walkthrough
Step 1: Initial Assessment and Belt Prep
As the level starts, do not touch anything for 3 seconds. Watch the conveyor belt. Identify that you have 0/5 slots. Locate the top-left column. You will see a Yellow cup, then an Orange cup. Your first move is dictated by these two. Do not touch the right side of the board yet; it is blocked by ice.
Step 2: Unlocking the Left Column
Tap the Yellow Cup at the top of the far-left column. Immediately tap the Orange Cup below it. Then tap the Pink Cup below that. This sequence sends three cups to the belt. The Pink cup will fall onto the 10-Hit Ice Block. Wait. Do not tap more. Let the belt process these three cups. As they clear, the Pink cup will chip away the ice, revealing a Green Refresh Cup.
Step 3: The Keyhole Maneuver (Right Side)
Now look at the right side, specifically the column directly above the 7-Hit Keyhole Block. You will see a Green Cup. It is likely blocked by a Yellow or Grey cup above it. Tap the blocking cup to clear the path. Then, tap the Green Cup that sits on top of the Keyhole Block. This sends the Green cup crashing into the block.
Step 4: Clearing the Resource Cache
Hitting the Keyhole Block with the Green cup turns the Golden Key. The lock vanishes. Gravity takes over, and the massive cluster of "?" cups at the bottom right will shift or become accessible. Warning: Do not tap all the "?" cups at once. Tap them one by one. If a "?" cup reveals itself as Orange or Green, send it immediately. If it is Pink or Yellow, hold it for now.
Step 5: Executing the Color Sequence
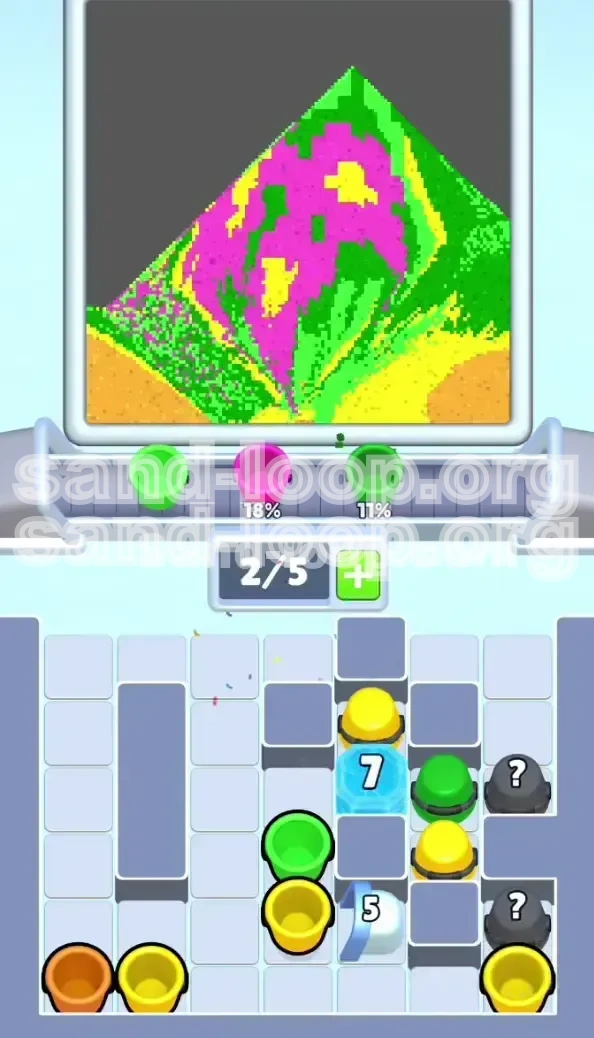
Now that the board is open, follow the color order. Finish any remaining Orange cups to complete the dirt. Move to Green for the leaves. Once the leaves are visually full, flood Pink. Watch the canvas carefully. When the pink petals touch each other and form a solid shape, you are ready for the finale.
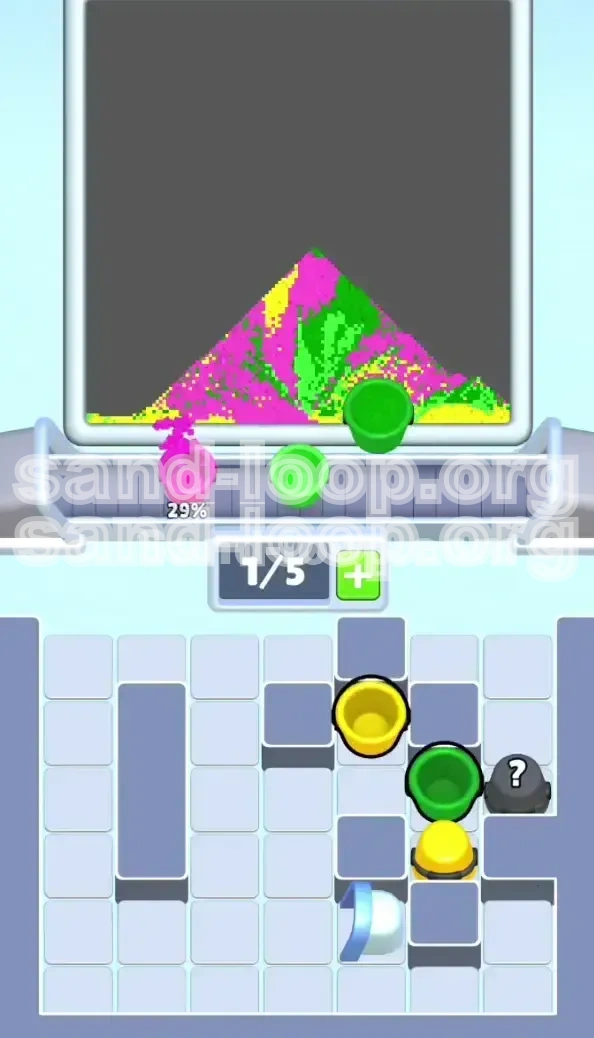
Step 6: The Final Touch
With the petals set, tap the Yellow Cups you saved from the beginning. The sand will flow into the cross centers. Finally, tap the Green Refresh Cups you uncovered in Step 2. This will speed up the final flow and ensure the top grass bar fills to 100%.
Key Tips and Tricks for Success
The "Watch and Wait" Method
After every 2-3 taps, stop touching the screen. Watch the cups move on the conveyor belt. Only tap again when you see a cup disappear into the pouring mechanism. This "rhythmic tapping" prevents the 5/5 slot deadlock that ruins 90% of attempts on this level.
Visualizing the "Dam"
Think of the Pink sand not as a color to fill, but as a wall to build. If you imagine the canvas as a bucket, the Pink sand is what builds the sides of the bucket. If you try to fill the bucket (with Yellow sand) before the sides are built, the water will spill. Visualizing this physics helps resist the urge to tap Yellow early.
Ignore the Big Ice Block
The 25-Hit Ice Block in the center-right is a psychological trap. It looks like it needs to be broken. It does not. It is blocking nothing that you can't reach by undercutting. Ignore it completely until the end of the game. It will naturally fall or become irrelevant once you clear the cups beneath it.
The Refresh Symbol Utility
Don't waste the Green cups with the Refresh loop symbol. These are powerful tools for clearing a clogged belt. Using them early in the level when the belt is already moving fast is a waste. Save them for the final 10% of the level when you need to push the last stubborn bits of sand over the line.
Handling the "?" Cups
When the Keyhole opens and the "?" cups are exposed, treat them with caution. They are random. If you get unlucky and reveal three "?" cups that are Yellow, you might be tempted to tap them. Don't. If your Pink layer isn't done, Yellow cups are a liability. Leave them on the board if necessary to clear space for other colors.
The "Soft Lock" Recovery
If you accidentally fill your belt (5/5), look for a Refresh cup. If one is on the board, tap it. If not, you have to wait. Do not panic-tap. Watch for the first cup to process (pour out). Once you have 4/5, assess if the next cup in line is a color you need. If not, see if you can tap a "?" cup to swap the queue.
Common Mistakes to Avoid
Blind Tapping Syndrome
The most common error is tapping cups as fast as possible to "clear the board." In Level 429, clearing the board physically without clearing it logically leads to failure. You will fill the belt, have no space to process the specific color you need (like the final Pink), and the timer will run out while your screen is full of unusable cups.
The Early Yellow Spill
Players often see the Yellow cups available at the start (top left) and tap them early to "get them out of the way." This creates the "Yellow Spill" disaster. The yellow sand flows everywhere because the Pink dams aren't there. It contaminates the Green leaves and Orange dirt, making it impossible to reach 100% accuracy.
The Refresh Waste
Using a Green Refresh cup when the belt is empty is fine, but using one when the belt is half-full of random colors is chaotic. The Refresh ability speeds up the belt, which can actually make it *harder* to time your taps if you aren't expecting the sudden speed increase. Only use Refresh when you have a clear, empty belt ahead.
Misjudging the Green Volume
The Green leaves are large, but the Green grass bar at the top is thin. Players often focus too much on the leaves and forget the top bar, or vice versa. Ensure your Green sand distribution is covering both the bottom leaves and the top background strip evenly.
Ignoring the Keyhole
Some players get fixated on the left side of the board and ignore the Golden Key mechanism on the right. This results in a stalemate where you run out of accessible colors on the left while the right side remains locked. Always prioritize the Keyhole block as soon as you have a Green cup available.
Over-Filling the Pink Dam
While Pink needs high volume, pouring *too much* Pink can actually bury the slots where the Yellow crosses need to go. If you over-pour Pink, you might not have enough depth left in the canvas to insert the Yellow crosses without them touching the Green grass. Stop Pink pouring when the petal shapes look visually "plump."
What to Do If You Get Stuck
Board is Full, Belt is Full (Soft Lock)
If you have tapped too many cups and your belt is stuck at 5/5 full, stop tapping immediately. Watch the belt cycle. One cup will process. As soon as a slot opens, assess your board. Do not fill that slot. Wait for a second slot to open. You need to create "breathing room" for the logic to reset.
Wrong Color Revealed
If you tap a "?" cup hoping for Pink and get Orange, and your Orange layer is already 100% done, you have a problem. Do not pour that Orange. Leave the cup on the board. It is better to have a static cup taking up a slot than to ruin your canvas by spilling a color that is already complete. You can work around it later.
Ice Won't Break
If you are hitting the 25-Hit Ice Block and it feels like it is taking forever, you are making a mistake. Stop attacking the ice. Look for the cups *supporting* the ice or the locks near it. The solution to Level 429 is almost never "hit it harder," but rather "unhook the mechanism holding it up."
Canvas Contamination
If you accidentally spill a color and see it bleeding where it shouldn't, you have a few seconds to decide. If it is a tiny bleed, sometimes you can cover it with the correct color (e.g., spilling a tiny bit of Pink on the Green leaves can sometimes be corrected by pouring more Green on top). However, if Yellow spills on Pink, it is usually unrecoverable. Restart immediately to save time.
Timer Panic at 90%
If you are at 90% completion with only 10 seconds left, and you still have a mixed belt, look for the Refresh cup. If it's already used, prioritize the color that covers the most area (usually Pink or Green). Ignore the small details (Yellow crosses). A 95% completion is better than a failed attempt, and sometimes the game's physics will "snap" the final pixels into place if you are close enough.
Stuck on the Left Column
If the left column isn't clearing, you might have missed the initial 3-cup combo (Yellow-Orange-Pink). Restart the level and try to get that rhythm perfect immediately. If the Pink cup doesn't break the 10-Hit Ice, you won't get the Green Refresh cup needed to clear the late game.
Speed Run Tips
The "Queue While Pouring" Technique
Advanced players don't wait for the belt to empty. While a cup is currently pouring (the sand animation is playing), you can tap the next cup on the board. This queues it up. As soon as the current cup finishes, the next one enters instantly. This saves precious seconds between every pour.
Pre-Loading the Left Column
At the very start of the level, before the game fully initializes the physics, you can sometimes spam-tap the Yellow-Orange-Pink sequence on the left. If timed perfectly, you can clear the left column and the first ice block before the belt even starts moving, giving you a 5-second lead.
Bulk Processing "?" Cups
Once the Keyhole is open, if you have 4 open slots on the belt and there are 4 "?" cups, tap them all in a millisecond sweep. Then quickly look at the belt input. If they are all Pink/Green/Orange (the colors you need), you save massive time. If one is Yellow, be ready to pause or deal with it, but the risk usually pays off for speed runners.
Skip the "Perfect Dam" Strategy
For a speed run, you don't need the Pink petals to be 100% perfect walls. You just need to be "close enough." If you are confident, you can start tapping Yellow cups while the Pink sand is *mostly* settled but still moving. This requires pixel-perfect prediction but shaves off a good 5-10 seconds from the final phase.
Immediate Keyhole Targeting
Ignore the left column's initial ice entirely. As soon as the level loads, look for a path to the Green cup on the right side. If you can free the Green cup and hit the Keyhole Block within the first 10 seconds, you unlock the "?" cache much earlier, allowing for a faster bulk clear of the board.
The "Refresh" Finish Line
Save the Green Refresh cup until you have exactly 3 cups left on the belt that you want to process. Tap the Refresh cup just as the second-to-last cup starts pouring. The speed boost will force the final cups through the machine in record time, often finishing the level with 2-3 seconds to spare on the clock.