
Level 440
HARDHow to solve Sand Loop level 440? Get instant solution for Sand Loop 440 with our step by step solution & video walkthrough. Sand Loop 440 tips and guide.
Play Sand Loop Now
Experience the puzzle challenge firsthand
Game Screenshots
Sand Loop Level Guides
Level Overview: The Green Frog Challenge
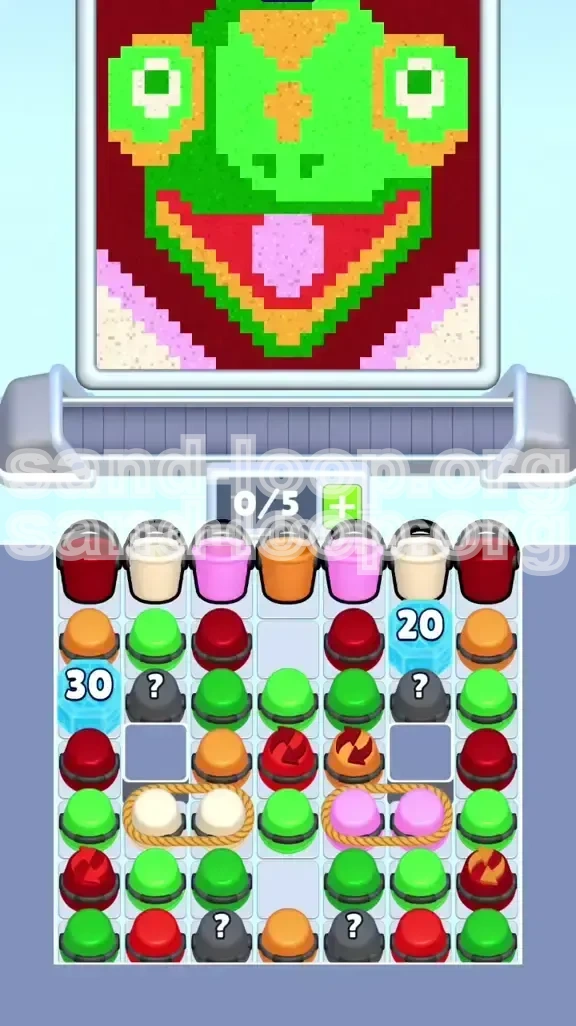
Sand Loop Level 440 is widely regarded as one of the most complex logic puzzles in the game, often referred to by the community as the "Green Frog" gauntlet. This level is not merely a test of matching speed; it is a rigorous examination of spatial reasoning, resource management, and foresight. The primary difficulty stems from the severe restriction on available slots (0/5 start) and the intricate layering required to paint the frog's features without contaminating the color palette. The board is cluttered with obstacles, including massive Ice Blocks and Rope Ties, which artificially gate your progress and force a specific sequence of operations. To succeed, you must abandon the "tap everything" mentality used in easier levels and adopt a surgical, methodical approach to clearing the board.
The 0/5 Slot Economy
The most defining feature of Level 440 is the brutal slot economy. You begin with zero free slots, meaning the conveyor belt is effectively jammed from the very first second. In this state, random tapping is fatal. Every single move must be calculated to ensure that a cup is cleared and removed from the board immediately after being tapped. If you tap a cup that cannot be matched instantly, you will enter a "Soft Lock" state where the game stops functioning because there is no room for new cups to enter the conveyor. You must constantly maintain a buffer of at least one empty slot to maneuver the Mystery Cups that inevitably appear.
The Anatomy of the Frog Canvas
Your target is a vibrant Green Frog, but understanding the geometry of this canvas is critical for success. The image consists of large, forgiving basins (the Green Head and Red Mouth) and narrow, high-precision targets (the Orange Eye Rings and White Pupils). The physics engine in Sand Loop treats sand as a fluid; if you attempt to fill the narrow eye details before the large green face is established, the sand will bounce off the empty canvas and scatter into adjacent zones. This scattering causes "color bleeding," where White sand mixes with Green to create an ugly, unfixable muddy brown. You must visualize the canvas as a series of containers that must be filled in a specific order to ensure the sand stays within its intended boundaries.
Obstacle Layout: Ice and Rope
The board is vertically divided by two major obstacles: a "30-strength" Ice Block on the left column and a "20-strength" Ice Block on the right. These act as progress gates. Beneath the Ice Blocks lie "Rope Ties"—mechanics that chain two cups together. You cannot access the resources trapped under the ropes until the ice above them is completely shattered. Furthermore, the ropes connect pairs of cups, meaning clearing one Cup A automatically triggers Cup B. This can be dangerous if Cup B is a color you aren't ready for, as it forces a new cup onto the conveyor belt whether you have room for it or not.
The Mystery Cup RNG Factor
Scattered across the board are Gray Mystery Cups. These cups act as wildcards, containing a random color determined by the RNG (Random Number Generator). In Level 440, Mystery Cups are a double-edged sword. Ideally, they yield the specific color you need to break an Ice Block. However, if they yield a color you aren't ready to pour (like White at the start), they take up valuable slot space and clog your conveyor. Managing the risk associated with these cups is a key part of the high-level strategy for this stage.
Why Logic Beats Speed
Attempting to speed-run Level 440 usually results in a 50% increase in your total completion time due to frequent restarts caused by soft locks. The level rewards a "sniper" playstyle—pausing to analyze the board and making single, decisive taps—over a "machine gun" playstyle of rapid tapping. The Sand Loop mechanic means sand flows continuously; if you pour into a zone that isn't structurally ready, that sand is wasted, and you will run out of resources before the painting is complete. Patience and strict adherence to the color hierarchy are your best tools here.
Step-by-Step Walkthrough Guide
This walkthrough is divided into specific phases based on the board's layout. Follow these steps in order to maximize your efficiency and minimize the risk of getting stuck.
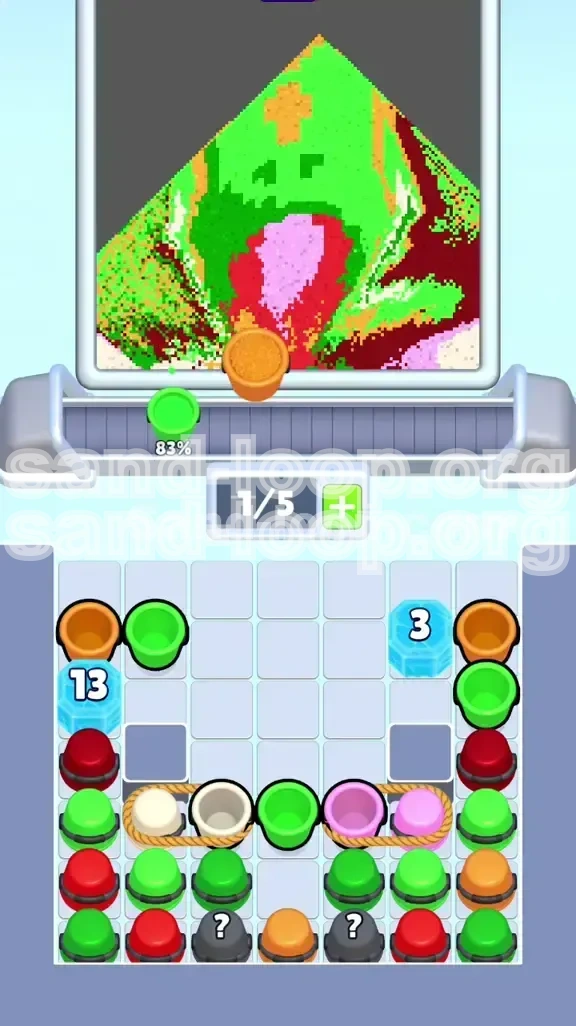
Phase 1: Initial Assessment and Right-Side Focus
Do not tap anything immediately upon starting the level. Take five seconds to scan the board. You will notice that the right side has the 20-Ice Block, which is weaker than the left side's 30-Ice Block. Your goal in Phase 1 is to clear the right side first to free up movement options. Look for Red and Pink cups in the upper right quadrant. These are your priority targets. Avoid tapping the Green cups on the left or the Mystery Cups in the center until you have established a flow on the right.
Phase 2: Melting the Right Ice Block
Begin tapping the Red and Pink cups located above the right Ice Block. As you match these colors, the sand will pour into the frog's mouth, and the Ice Block counter will decrease. Since the mouth is a large cavity, it acts as a "safe zone" for these initial pours. Don't worry about perfect precision here; the goal is to reduce the 20-Ice Block to zero. Keep a close eye on your slot count; if you have 4/5 slots full, stop tapping and wait for the conveyor to clear. You want to shatter this block to reveal the Rope Ties underneath.
Phase 3: Managing the Rope Ties
Once the right ice shatters, you will see two Pink cups chained together with a Rope Tie. You must clear the debris sitting on top of them to access them. Here, you need to be careful. Tapping a Rope Tie pair sends both cups to the conveyor. Only do this when you have at least 3 empty slots. If you tap them with only 1 slot open, the second cup will jam your belt. Clear the Pink cups to finish the frog's tongue, which sits safely inside the Red mouth you filled earlier.
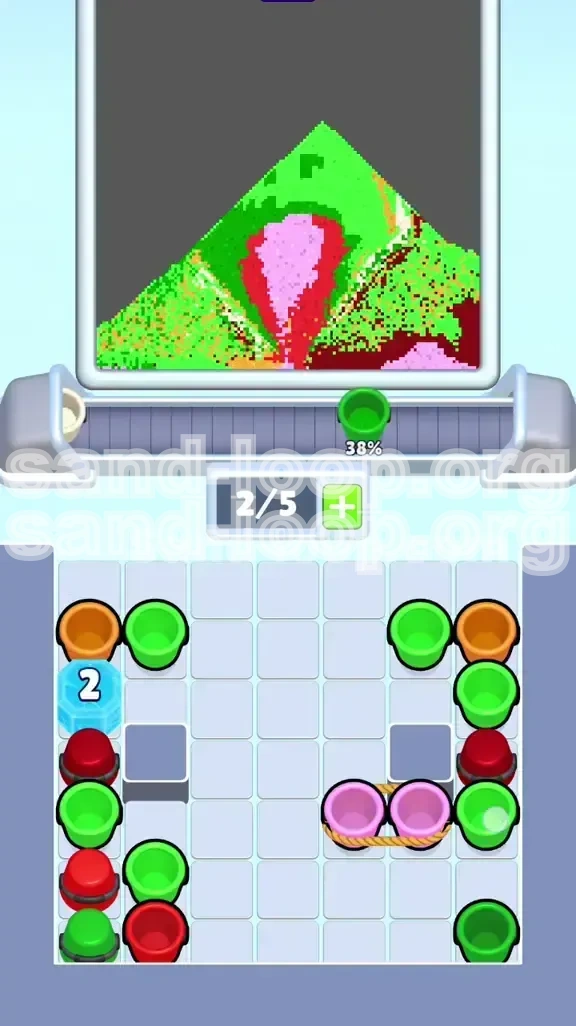
Phase 4: The Left-Side Offensive
With the right side cleared, shift your attention to the left. The massive 30-Ice Block is guarding the bulk of your Green resources. Start tapping Green cups aggressively. You need to generate a lot of Green sand to build the face. As you tap these, the Ice Block will melt. By the time it breaks, you should have a healthy pile of Green sand on the canvas. This Green sand serves as the foundation for the rest of the level, acting as a backstop to prevent other colors from scattering.
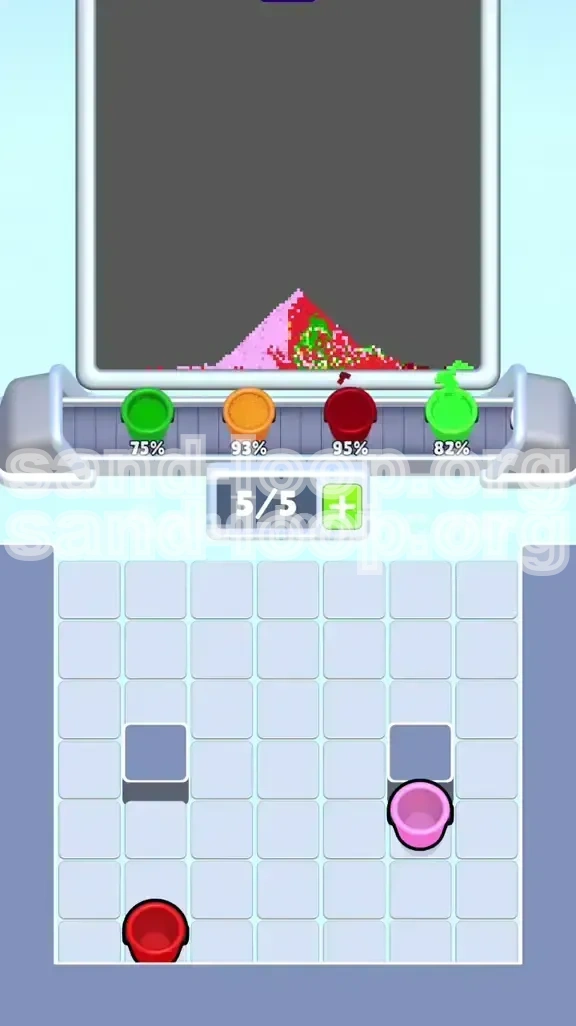
Phase 5: Executing the Final Details
After the left ice breaks, you will access the White and Orange cups needed for the eyes. This is the most dangerous part of the level. Do not tap the White cups until the Green face is at least 90% full. If you pour White too early, it will slide down the empty green canvas and ruin the level. Wait until the Green face forms a steep wall, then release the White and Orange cups. The steep slope will guide the White sand perfectly into the eye pupils and the bottom corner stripes.
Phase 6: Cleanup and Victory
Once the major colors are down, you will likely have a few straggler cups left on the board—perhaps some mismatched Greens or Oranges that didn't get used. Clear these systematically. Ensure the conveyor belt is completely empty. If the frog's eyes are not perfectly filled, use any remaining small batches of color to touch up the pixels. Once the image is complete and the "Level Complete" animation triggers, your work is done.
The Strict Color Hierarchy
The order in which you process colors is the single most important factor in beating Level 440. Deviating from this order is the primary cause of failure. Think of the painting as a 3D structure being built from the ground up.
1. Neon Green: The Foundation
Green is always first. It occupies the largest area of the canvas (the head and background). Filling Green first creates the "topography" of the level. It creates the slopes and valleys that will catch and hold the smaller, more precise colors later. Trying to add details to a flat, empty canvas is futile because the sand will not stick; it will simply slide off into the wrong zones. Aim to have the Green face 80-90% complete before moving to the next color.
2. Deep Red: The Basin
Red is second because it defines the mouth, which is a deep, central hole. By filling Red second, you create a "bucket" in the center of the image. This bucket is crucial because it catches the Pink sand for the tongue. If you fill the Pink tongue before the Red mouth is ready, the Pink sand will spill out onto the Green face. The Red mouth acts as a container for the smaller Pink element.
3. Pastel Pink: The Nested Detail
Pink is third. It is a "nested" color, meaning it sits inside another color (the Red mouth). Because it is contained, it is safe to pour relatively early, provided the Red basin is already there to catch it. You don't need to be perfectly precise with Pink; as long as the Red mouth is reasonably full, the Pink sand will land correctly.
4. Bright Orange: The Middle Ring
Orange is fourth. It is used for the eye rings. These are narrow targets that sit on top of the Green face. You cannot pour Orange until the Green face is partially built. If you pour Orange onto an empty canvas, it will scatter. Wait until the Green provides a backdrop for the Orange rings to rest against.
5. White: The Final Polish
White is last. It is the "contamination risk" color. White is used for the smallest details (the pupils and small background stripes). Because these details are tiny and surrounded by other colors, any spillage is immediately visible and ruinous. You must save White for the very end when the rest of the canvas is saturated and can act as a barrier.
Handling Gray Mystery Cups
Where do Mystery Cups fit in? They don't. Treat Mystery Cups as "wildcards" that interrupt your flow. Only tap a Mystery Cup when you have ample free slots (3+) and can afford to take a risk. If a Mystery Cup gives you a color you aren't ready for (e.g., it gives you White when you are still working on Green), try to leave it on the board or match it immediately to get rid of it without pouring if possible.
Common Mistakes to Avoid
Understanding what not to do is just as important as knowing what to do. These are the pitfalls that trap most players on Level 440.
The "Early White" Error
This is the number one cause of restarts. Players get impatient and tap the White cups as soon as they are accessible to "get them out of the way." This is fatal. White sand poured on an empty Green canvas spreads out like a thin liquid, creating a permanent, ugly stain that cannot be covered up by Green later without looking muddy. You must suppress the urge to clear White until the very end of the level.
The "Slot Full" Panic
When players see their conveyor belt filling up, they often panic and tap Mystery Cups randomly to free up space. This is gambling, not strategy. Randomly tapping a Mystery Cup often results in a color you can't use, further clogging the belt. If you are in a "Death Spiral" (0 slots, clogged belt), look for a match on the board itself rather than relying on a Mystery Cup to save you.
Ignoring Rope Ties
Sometimes players focus so hard on the Ice Blocks that they forget about the Rope Ties underneath. If you break an Ice Block and immediately tap the Rope Tie cups without checking your slot count, you will trigger a double-cup deploy that jams your machine. Always check your slot buffer before breaking a Rope Tie.
Misidentifying Colors
On some screens, the Deep Red (mouth) and Bright Orange (eyes) look very similar. Pouring Orange into the Red mouth creates a color clash that is difficult to fix later. Ensure your screen brightness is high enough to distinguish between these two hues. A good rule of thumb is: if it's for the face, it's Green; if it's for the hole, it's Red; if it's for the ring, it's Orange.
Over-pouring the Mouth
While filling the Red mouth is important, overfilling it to 100% before the Green face is ready can be problematic. If the Red mound is too high, it might block the flow of Green sand into the lower corners of the face. Aim to fill the Red mouth to about 70-80% capacity, then pause to build up the Green face before topping it off.
Wasting High-Value Colors
Every cup counts in Level 440. Wasting a Green cup because you weren't paying attention or letting a Pink cup expire because the belt was full is a loss of resources that you cannot afford. There are no "extra" cups in this level; you must use every single drop of sand efficiently to reach the 100% completion threshold.
Stuck Solutions and Speed Run Tips
If you are struggling to get 3 stars or are just stuck in a loop of failures, these advanced tips will help you optimize your gameplay and troubleshoot specific scenarios.
Diagnosing the "Soft Lock"
If you are stuck with 0 slots and no moves: Stop. Do not tap randomly. Look at the board. Is there a match available that you missed? If yes, tap it. If no, look at the conveyor belt. Is the very last cup on the belt a match for anything on the board? If the answer is still no, check if any Ice Blocks have 1 or 2 hits left. If you are truly in a state with 0 slots, 0 matches, and no accessible ice, your only option is to restart. Recognizing this state early saves time.
The "Pre-Loading" Technique
This is the key to speed-running Level 440. The game allows you to queue up taps while an animation (like sand pouring) is playing. Do not watch the sand fall! While the sand is pouring from a previous cup, immediately look at the board and tap the next cup you need. This "pre-loading" shaves seconds off every move, cumulatively saving minutes over the course of the level.
Mystery Cup Probability Management
Statistically, Mystery Cups in Sand Loop are not truly random; they tend to favor colors you currently need unless you are in the final 10% of the level, at which point they often turn into "junk" colors like Gray or extra Red. Use this to your advantage: tap Mystery Cups in the early/mid game to get helpful colors (like Green), but avoid them in the late game when you are hunting for specific White or Orange touches.
Utilizing the Conveyor Shuffle
Sometimes, the cup you need is buried at the back of the conveyor belt. Instead of waiting for the belt to cycle naturally, you can force a "shuffle" by rapidly tapping and matching cups at the front of the line. This moves the belt faster, bringing the rear cups forward quicker. Be careful not to match so fast that you lose track of your slot count, though.
Physics Exploits: The "Bounce" Trick
Sometimes sand lands imperfectly—e.g., a pixel of White lands on the Green edge. Instead of restarting, try tapping a different color cup immediately. The physics engine sometimes "resets" or jostles the settled sand, causing the misplaced pixel to slide down into its correct hole. It's a glitch, but a useful one to know about if you are on the verge of victory.
Calculated Restarting
Knowing when to quit is a skill. If you mess up the White pour and it smears across the Green face, restart immediately. Do not try to "fix" it by pouring more Green; it will just look muddy. Similarly, if you break both Ice Blocks but have less than 2 empty slots, restart. The math of the remaining cups vs. slot space will not work out, and you will soft lock before the end. A quick restart is faster than a slow, inevitable failure.