
Level 451
HARDHow to solve Sand Loop level 451? Get instant solution for Sand Loop 451 with our step by step solution & video walkthrough. Sand Loop 451 tips and guide.
Play Sand Loop Now
Experience the puzzle challenge firsthand
Game Screenshots
Sand Loop Level Guides
Level Overview: The Summer Peach Challenge
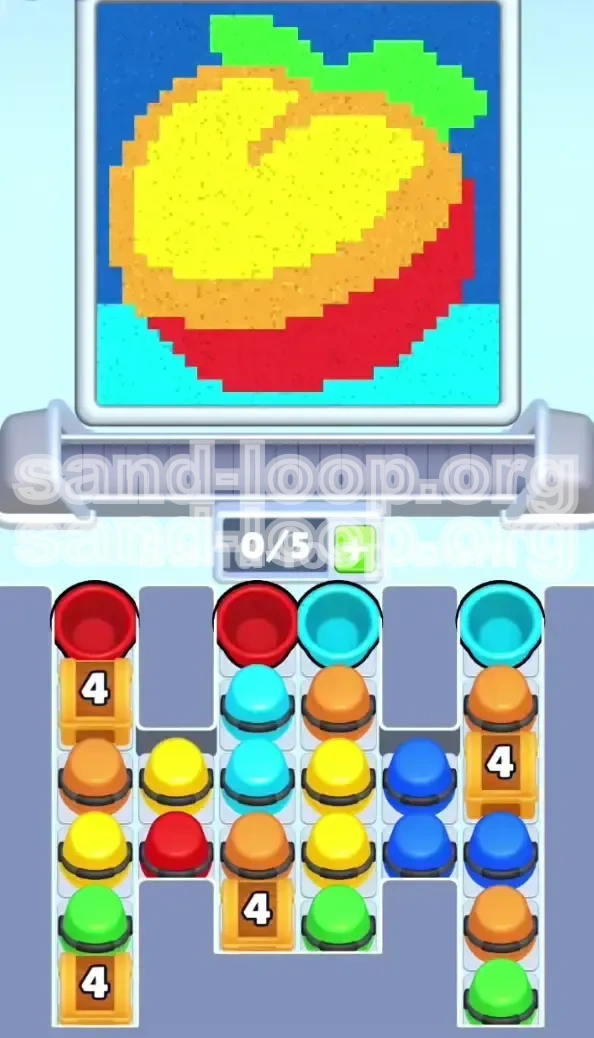
Welcome to the most logic-intensive puzzle you’ve faced in a while. Level 451, "The Summer Peach," is not a stage where you can rely on fast reflexes or random tapping. It is a strict resource management puzzle disguised as a cute fruit painting. The canvas features a large pixel-art peach (or apple) occupying the center, set against a split blue background.
The primary difficulty here lies in the "Numbered Chest" mechanic. You are presented with specific columns blocked by chests that require exactly four pours of a specific color to unlock. This creates a bottleneck. You cannot simply access the sand you need; you must earn it by satisfying the chest's requirements. The level demands that you maintain a delicate balance between filling the art canvas and managing your limited tray space to avoid a deadlock.
Visual Analysis
The canvas is dominated by the fruit shape, which requires a precise gradient. You have a large area of Red at the bottom, transitioning to Orange, and capped with a Yellow highlight. The background is split horizontally, with Cyan on the bottom and Dark Blue on the top. Finally, there are small Green accents for the leaves.
The Core Mechanic
This level revolves around the "Chest (4)" mechanic. These are not obstacles you can ignore; they are gates that hold the majority of your Red and Yellow cups. You must prioritize pouring from these specific columns to unlock the rest of the board.
Difficulty Spike
Considered a high-difficulty logic stage. The challenge isn't finding the colors, but rather having the slots available to pick them up when they finally unlock. A full tray means an automatic game over.
Success Metrics
To clear this level with a three-star rating, you generally need to finish with less than 10% sand wasted. This means avoiding overfilling areas and ensuring every drop counts toward the pixel art.
Time vs. Strategy
Speed is irrelevant here. Taking 5 seconds to think about your next move is better than rushing and filling your tray with unusable colors. Treat this like a game of chess, not a race.
Clear Objectives: Your Mission Goals
Before you tap a single cup, understand what you need to achieve. The path to victory is narrow, and deviating from these objectives usually results in a stuck tray and a failed level.
Primary Goal: Break the Chests
Your main focus for the first 50% of the game is breaking the three Numbered Chests located in Columns 1, 3, and 5. These are blocking your access to the bulk of the Yellow and Orange sand required for the fruit.
Secondary Goal: Fill the Fruit Core
While breaking chests, you must simultaneously fill the large Red and Yellow areas of the peach. If you ignore the canvas to focus only on chests, you will run out of time or space.
Tertiary Goal: The Green Stem
The Green leaves are small but dangerous. Leave them for the very end. If you pour Green too early, you risk spilling it into the Yellow body of the fruit, which is difficult to fix.
Resource Management
Never fill all 5 slots on your conveyor belt. Always leave at least one empty slot (4/5 full) to allow for new cups to cycle in. If you go to 5/5, you lose the ability to maneuver.
Background Cleanup
The Cyan and Dark Blue backgrounds should be treated as "dump" zones for when you have no other moves, but prioritize them only after the fruit is mostly done.
Avoid Waste
Keep your waste percentage below 5%. This means stopping your pours exactly when the pixel meter hits 100%. Overfilling eats into your capacity to generate future moves.
Step-by-Step Instructions: The Action Plan
This is the critical walkthrough section. Follow these steps in order. Do not skip ahead, and do not improvise heavily until you are comfortable with the logic.
Phase 1: The Initial Break
- Start: You will see a setup with a Red Cup in Column 1 and Column 3, and a Cyan Cup in Column 5. Ignore the Cyan for now.
- Move 1: Tap the Red Cup in Column 1. Pour it into the Red bottom of the peach.
- Move 2: Tap the Red Cup in Column 3. Pour it into the Red bottom.
- Observation: Watch the Chest in Column 1. The number "4" should drop to "3" (or "2" depending on cup size). This is your key indicator of progress.
- Move 3: Look for a Yellow Cup. It usually spawns in the middle columns. Take it and fill the very top highlight of the peach.
- Immediate Goal: Cycle your pours specifically targeting the Chests. If a cup is NOT on a chest, think twice before taking it unless you are desperate for that specific color.
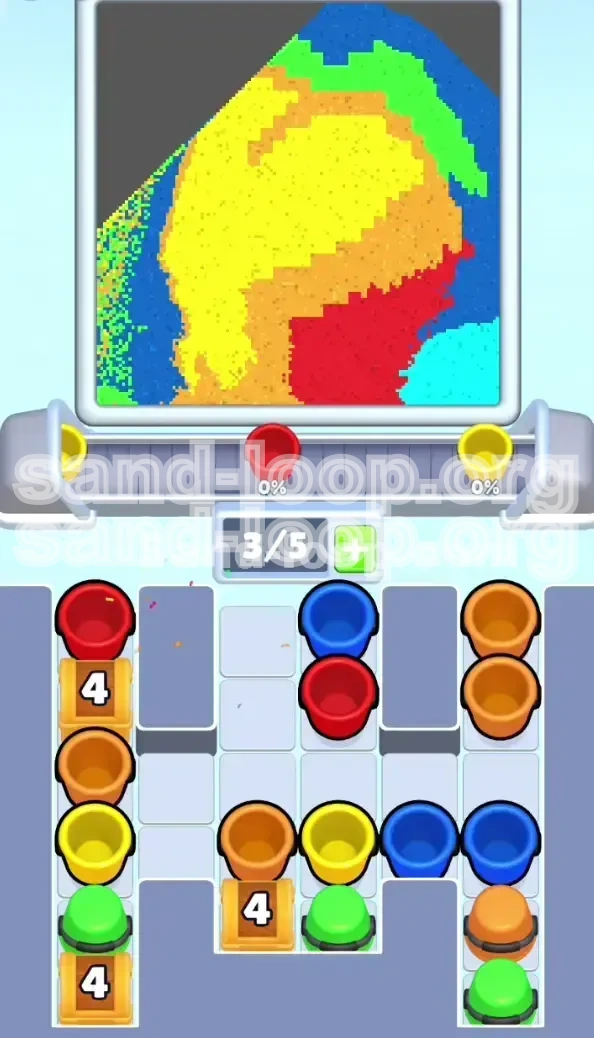
Phase 2: Managing the Chest Bottleneck
- The Trap: As you break the first chest, new cups will drop. You will likely see an influx of Orange Cups.
- Move: Do not take every Orange Cup. Only take Orange if the Fruit Body requires it (the transition zone between Red and Yellow).
- Column 5 Focus: You will likely need to break the chest in Column 5 (Cyan/Blue) to clear space on the tray. Use a Cyan cup to fill the bottom background corners.
- Slot Check: Ensure you never have more than 2 "useless" cups on your tray. A useless cup is one for a color that is already 100% full.
- Prioritization: If Column 1 has a Red Cup on a Chest, and Column 2 has a Red Cup on an open slot, ALWAYS pick the Column 1 cup. You need to clear that chest.
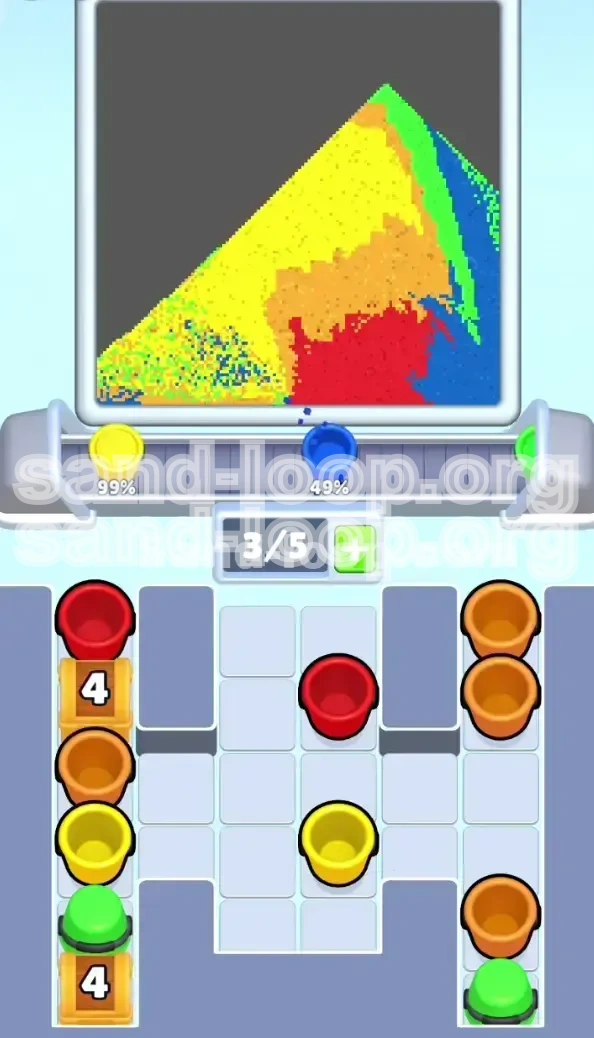
Phase 3: The Orange Transition
- Timing: Once the main Red/Yellow chests are open, the game shifts to precision filling.
- The Zone: The Orange band is narrow. It sits between the Red base and Yellow top.
- Technique: Use small taps or quick releases. If you pour a full Orange cup, you will likely overflow into the Yellow or Red zones, causing pixelation errors that lower your score.
- Green Strategy: At this stage, you might see Green cups. If the leaves are not accessible yet (covered by other colors), DO NOT pick up the Green cup. It will just clog your tray.
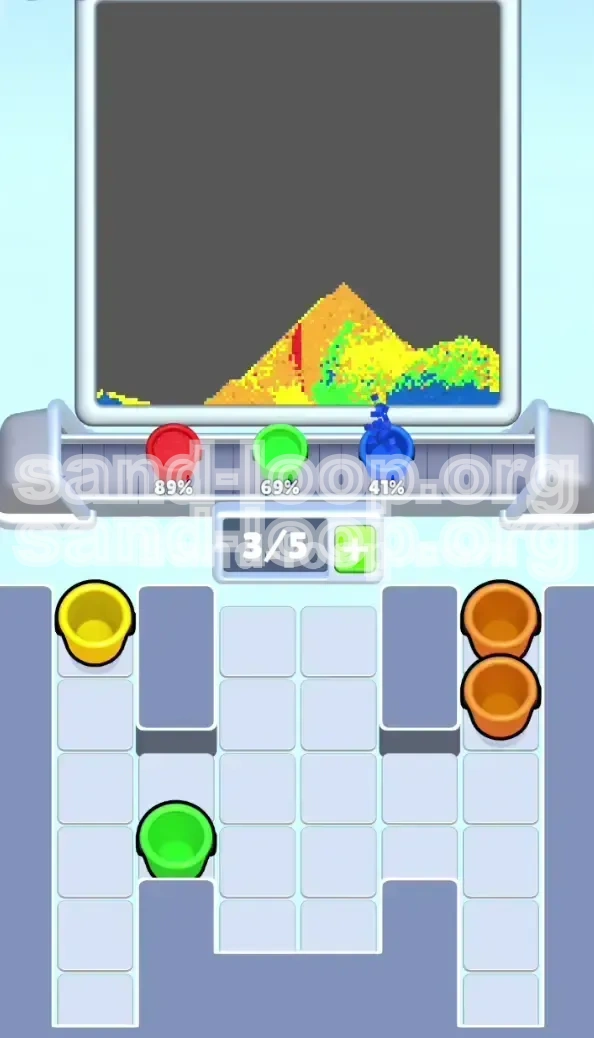
Phase 4: The Final Stretch
- Status Check: Your fruit should be 90% done. The background should have large holes.
- Cleanup: Now you can pick up the Cyan and Dark Blue cups. Fill the bottom half (Cyan) and top half (Blue) aggressively.
- The Leaves: Now that the tray is emptying out, grab the Green cups. The leaves are small, so these pours will be quick.
- Final Pixels: If you are stuck at 99%, look for "micro-pixels" usually hidden at the border between Orange and Yellow.
- Empty the Tray: In the last 10 seconds, just pour whatever you have. Prioritize largest remaining areas first.
Color Order: The Priority Hierarchy
Understanding the hierarchy of colors is vital for decision making. When you have to choose between two cups, consult this list.
Tier 1: Red (The Foundation)
Priority: Highest. Red has the largest surface area on the canvas (the bottom of the peach). Furthermore, Red is frequently the key required to break the initial chests in Columns 1 and 3. If you see a Red cup, especially on a Chest slot, take it immediately.
Tier 2: Yellow (The Highlight)
Priority: High. Yellow covers the top dome of the peach. It is a large area, but often harder to access because it's locked behind the chests. Once the chests are open, Yellow becomes your primary target.
Tier 3: Orange (The Bridge)
Priority: Medium. Orange is tricky. It is a transition color. It is important, but the area is smaller and harder to hit without spilling. Only take Orange when Red and Yellow options are exhausted or inaccessible.
Tier 4: Cyan (Background Base)
Priority: Low. Cyan is useful for clearing the bottom chest and filling the bottom background. It is a "safe" color because the area is large and rectangular, making it hard to mess up. Use Cyan to buy time if your tray is jammed.
Tier 5: Dark Blue (Sky)
Priority: Low. Similar to Cyan, but located at the top. Often requires you to wait for the conveyor to move to the top of the screen. Good for late-game cleanup.
Tier 6: Green (The Detail)
Priority: Lowest. The area is tiny. Taking a Green cup too early is a waste of a valuable slot. Keep these for the very last seconds of the game.
Key Tips: Expert Advice
These tips will help you navigate the edge cases. Level 451 is designed to punish players who don't pay attention to the UI details.
The "4" is a Limit, Not a Goal
The number on the chest indicates how many pours are needed to clear it. However, these pours do not need to be "full" cups to count towards the break. A quick tap counts as a pour. If you are running low on a specific color, use small taps to chip away at the chest number rather than dumping the whole cup.
Keep One Slot Open
This is the Golden Rule of Sand Loop. Never let your belt fill up completely. If you have 5 cups and you need a specific color to break a chest, but that color is behind the 5 cups, you lose. Always try to operate with 3 or 4 cups max.
The 99% Bug
In this level, players often get stuck at 99% completion. The missing pixel is almost always located at the border where the Orange fruit meets the Blue background, or inside the tiny curve of the Green leaf. Use your zoom function (if available) or look for the "sparkle" indicator showing where sand is needed.
Ignore the Timer
Panic is your enemy. The timer in this level is generous. If you rush, you will accidentally pour Green into your Yellow highlight. Take a breath after every chest break.
Watch the Chest Contents
When a chest breaks, the cups inside drop onto the belt. Sometimes this pushes good cups further back. Anticipate this shuffle. If you need a cup that is currently at the front, tap it before you break the chest, or the shuffle might bury it behind new cups.
Use "Trash" Colors Wisely
If you accidentally pick up a color you don't need (like Green early on), and you can't use it, don't let it clog your belt. If you absolutely must, pour it into a corner that *already* has that color, even if it's 100% full. It's better to waste 5% sand than to get a deadlock.
Common Mistakes: What to Avoid
Learn from the failures of others. Most players lose Level 451 because of these specific errors.
The "All You Can Eat" Trap
The most common mistake is grabbing every cup you see. Just because a Yellow cup appears in Column 2 doesn't mean you should take it if you already have a full belt and a Red chest waiting to be broken. Restraint is a skill.
Early Green Pickup
Picking up the Green Leaf cups before the main fruit body is finished. This clutters your tray with a color you can't use yet. When you are down to your last few slots, that Green cup becomes a block of concrete in your assembly line.
Ignoring the Split Background
Some players try to fill the whole background with one Blue color. The background is split into Cyan (bottom) and Dark Blue (top). Pouring Dark Blue on the bottom Cyan area (or vice versa) counts as a mistake/partial fill and hurts your percentage efficiency.
Misjudging the Orange Border
Pouring Orange too aggressively. Because the Orange zone is a thin strip, it is very easy to accidentally pour into the Yellow or Red zones. This creates "mixed pixels" which are hard to clean up and reduce your accuracy rating.
Breaking the Wrong Chest
Sometimes you have a choice between breaking the Cyan chest (Col 5) or the Red chest (Col 1). Players often pick the "easiest" one (Cyan) first. This is wrong. You need Red much more than Cyan. Prioritize the chests that hold the colors with the highest demand (Red/Yellow).
Not Utilizing the "Tap"
Holding down the pour button is for filling large areas. Tapping is for precision. Trying to fill the small Green leaves by holding the button will result in overflow. Tap, don't hold, for the small details.
Stuck Solutions: Troubleshooting
If you find yourself in a seemingly impossible situation, use these strategies to reset your board state.
Deadlock: Full Tray, No Matches
Situation: You have 5 cups. None match the available pixels. You need a Red cup to break a chest, but the Red cup is buried behind the others.
Solution: You must sacrifice a cup. Pick the color that you have the *least* remaining to fill on the canvas. Pour it into an area that is *mostly* full, even if it wastes a little bit. This frees up a slot to cycle the belt and hopefully bring the needed Red cup to the front.
The "Invisible" Pixel
Situation: You are at 99% complete, and the game says you have Red pixels left, but the peach looks totally red.
Solution: The pixel is likely a single dot hidden at the very bottom edge of the fruit, or in the curve where the leaf meets the fruit. Don't look for a "spot," look for a lack of color. Pour a tiny bit of Red in the center of the base; the liquid will flow to the missing pixel.
Tray Shuffle Failure
Situation: You broke a chest, but the new cup that dropped is useless, and it pushed a useful cup out of reach.
Solution: This is bad luck. You have to burn the useless cup fast. Pour it immediately into a 100% full zone just to get rid of it. Don't try to "save" it for later. Get it off the belt to get the belt moving again.
Accidental Wrong Color Pour
Situation: You poured Green into the Yellow highlight.
Solution: Don't panic. You cannot "undue" it in this game. You must cover it up. Immediately pour the correct color (Yellow) over the mistake. It will take more sand to fix the mistake than it did to make it. Accept the loss in percentage and move on. Focus on not making it worse.
Speed Run Tips: Optimizing for Time
If you are trying to top the leaderboards, speed matters, but it must be calculated speed.
Pre-Loading
As you are pouring the last bit of a cup, look at the incoming belt. If the cup you *will* need next is currently at the back of the line, try to finish your current pour quickly so you can tap it as soon as it arrives at the dispenser.
Chest Chaining
Try to time your chest breaks so that they happen when your tray is relatively empty. If you break a chest when you have 4/5 cups full, the new cup has nowhere to go and stalls the shuffle. Break chests when you have 2 or 3 open slots.
Bulk Pouring
For the bottom Red background and the Cyan corners, you don't need to be precise. Slam these pours. Hold the button down. Use the time you save here to be extra careful on the Orange border and Green leaves.
Memorization
The level layout is static. The chests are always in the same columns. Memorize that Column 1 is Red, Column 5 is Cyan. You don't need to read the text every time. Just recognizing the color of the chest cover saves you seconds.