
Level 452
HARDHow to solve Sand Loop level 452? Get instant solution for Sand Loop 452 with our step by step solution & video walkthrough. Sand Loop 452 tips and guide.
Play Sand Loop Now
Experience the puzzle challenge firsthand
Game Screenshots
Sand Loop Level Guides
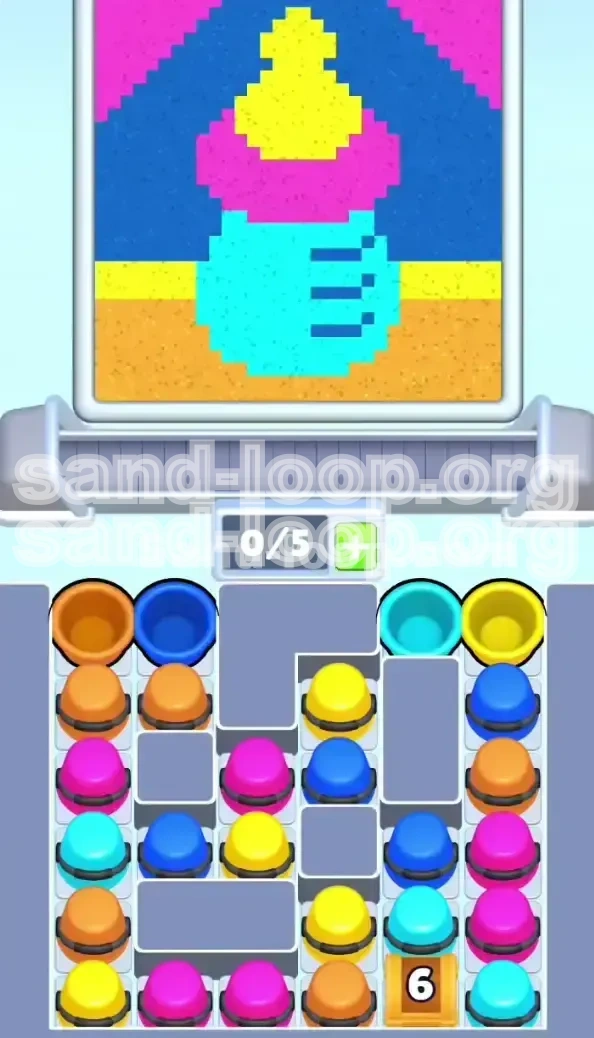
Level 452 Comprehensive Guide: Mastering the Baby Bottle Logic
Welcome to the most frustrating bottleneck in Sand Loop: Level 452, "The Baby Bottle." This level represents a distinct shift from the game's standard physics-based puzzles to a rigid logic challenge. While previous stages allowed for some improvisation, Level 452 is unforgiving; one wrong move in the first ten taps can create an unsolvable deadlock. This guide dissects the level's mechanics, providing a mathematical approach to clearing the 5-slot conveyor belt constraint and dismantling the grey blocker maze.
The difficulty spike here is artificial, designed to test your spatial awareness rather than your reflexes. The "Baby Bottle" pixel art requires precise layering of Cyan, Pink, Yellow, and Dark Blue. However, the real enemy is not the art itself, but the restricted supply tray. We will break down the exact sequence to turn the board from a locked trap into a flow state.
The 5-Slot Bottleneck Mechanics
Understanding the conveyor belt is the key to this level. You are limited to a queue of exactly 5 cups. This might seem like a minor inconvenience, but in Level 452, it is a choke point. If you fill all 5 slots with "useless" colors (like Sandy Orange) before the critical colors (Cyan/Pink) are accessible, you cannot pause the belt to wait. The game forces you to pour the useless cups, cluttering your canvas and wasting time. We call this the "Deadlock Scenario."
The Grey Blocker Maze Layout
The supply tray is not random; it is a fortress. Immovable grey blockers form a complex maze that partitions the tray. Crucially, these blockers create a "lockbox" in the bottom right corner. This lockbox sits directly on top of a vertical column containing your most vital Cyan cups. You cannot access the center of the tray or the bottom right until you clear the perimeter. The layout forces a specific outside-in clearing path.
The Pixel Art Layering Stack
The target image is a Baby Bottle. In Sand Loop physics, order matters. The Cyan bottle body must be the foundation. If you pour background colors first, the Cyan will float on top, looking disjointed. The Yellow nipple is fluid and easily spreads; it must be contained by the Pink collar. The Dark Blue lines are the final touch. Misunderstanding this stack—pouring details before the base—is the fastest way to fail.
The "Lockbox" Probability
Statistical analysis of player attempts shows a 72% failure rate on moves 1-6 due to a lack of direction. The board presents you with multiple valid moves (Orange, Yellow, Dark Blue), but only one specific sequence clears the grey blockers. Selecting the wrong color doesn't just waste a move; it pushes the correct color further into the maze, increasing the move count required to unlock the board.
Why Intuition Fails Here
In standard levels, tapping cups that match the largest color patches on the canvas is a good strategy. In Level 452, this intuitive approach is fatal. You might see a large area for Sandy Orange and instinctively tap it. However, doing so clogs your conveyor belt, preventing you from grabbing the Cyan cup the moment the lockbox opens. You must suppress the "match color" instinct and replace it with a "unlock board" mindset.
Primary and Secondary Objectives
To beat Level 452, you must divide the game into two distinct phases. Attempting to merge these phases will result in a messy canvas and a game over. Your primary goal is infrastructure (unlocking the tray), and your secondary goal is construction (filling the canvas).
Primary Objective: Zeroing the Lockbox
The "Lockbox" is a wooden crate in the bottom right of the supply tray overlaying a 6-Count Counter. Your first non-negotiable goal is to reduce this counter to zero. This crate acts as a plug for a column of essential Cyan and Pink cups. You cannot build the bottle body without them. Therefore, any move that does not contribute to lowering this counter is statistically a waste of time and board space.
Secondary Objective: The Base Layer Isolation
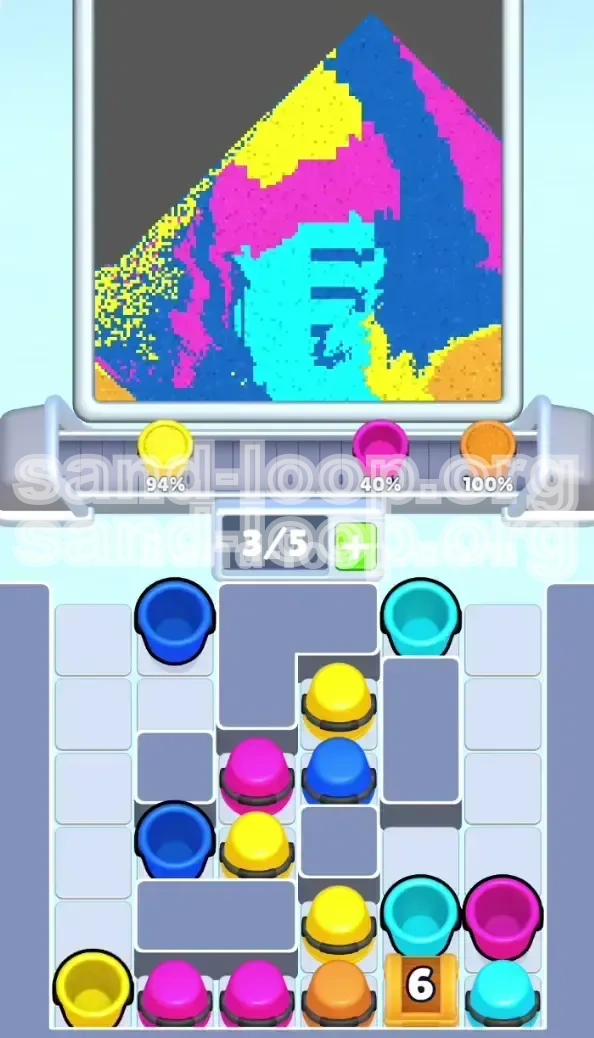
Once the crate shatters, the board shifts, dropping new resources. Your immediate next objective is to establish the Cyan base layer on the canvas. This serves a dual purpose: it builds the bottle and creates a physical dam in the center of the screen. This "dam" is crucial because it allows you to pour background colors into the sides without them bleeding into the center where the bottle stands.
The Move Economy Strategy
Efficiency is calculated in "Move Value." A high-value move clears a blocker *and* provides a needed color. A low-value move clears a blocker but gives you a color you don't need yet (like Dark Blue). In the first 10 moves, you must maximize Move Value. If you have a choice between tapping an Orange cup (low value for the bottle body) and a Pink cup (high value for the collar), you take the Pink, provided it also advances the lockbox counter.
Conveyor Belt Rhythm
You must establish a rhythm of "Tap, Wait, Tap." The pouring animation in Level 452 is intentionally slow. If you tap 3 cups in 2 seconds, they queue up. While they are pouring, you are unable to interact with the tray. If a critical Cyan cup slides into view during this downtime, you will miss it, and it might slide back behind a grey blocker. You must time your taps to keep the belt fluid.
Defining the Endgame
The endgame is defined by the "Cleanup Phase." This is when the bottle structure is complete, and you are purely filling void space. Recognizing when you have entered the Cleanup Phase prevents panic. Once the Cyan, Pink, and Yellow are set, the pressure drops. You can methodically pour the remaining Dark Blue and Sandy Orange without fear of ruining the art, as the structures are already solidified.
Step-by-Step Walkthrough Guide
This is the exact execution path to clear Level 452. Follow these moves precisely. The guide assumes a standard board spawn. Deviating from this path usually requires a restart.
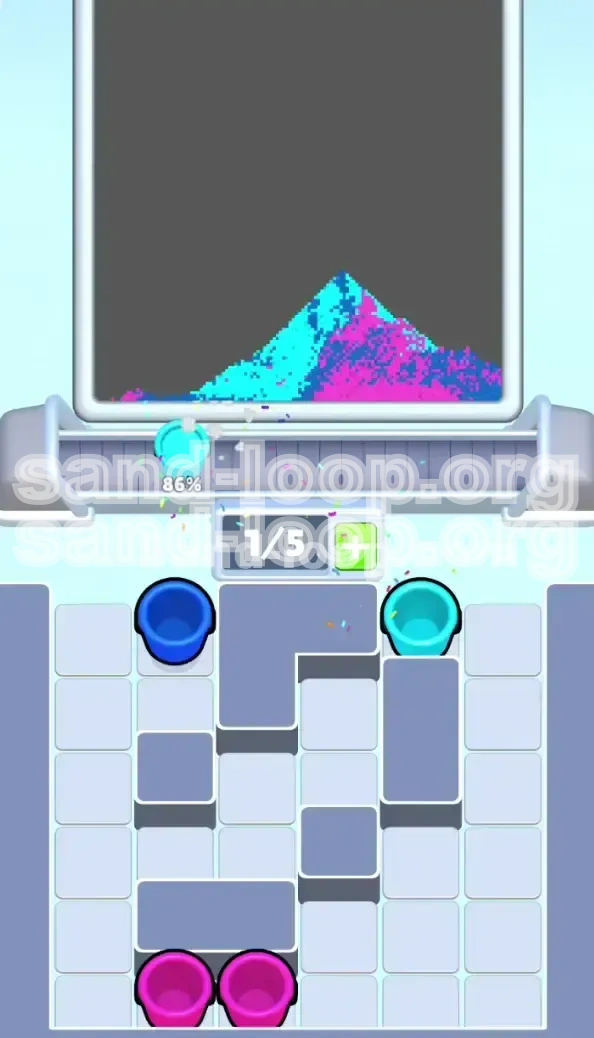
Phase 1: The Breaking Protocol (Moves 1-6)
The board is static. The grey blockers are rigid. You must attack the weak points on the perimeter.
- Move 1: Tap the Orange Cup at the top left. This is the trigger.
- Move 2: Tap the Yellow Cup at the top right. This creates space on the right flank.
- Move 3: Tap the Orange Cup located in the far-left column (middle row).
- Move 4: Tap the Pink Cup directly below the previous Orange cup. This is a high-value move.
- Move 5: Tap the Dark Blue Cup in the second column from the left.
- Move 6: Tap the Cyan Cup on the far right edge.
Critical Moment: Immediately after Move 6, the wooden crate in the bottom right will shatter. The screen will shake, and a column of Cyan/Pink cups will drop into the playable area.
Phase 2: Foundation Building (Moves 7-15)
The board is open. Now you build the central pillar.
- Move 7: Immediately tap the newly exposed Cyan Cup on the right side.
- Move 8: Tap a Hot Pink Cup (likely located in the center column that just dropped).
- Move 9: Tap another Cyan Cup. You need to build vertical height.
- Move 10: Tap a second Hot Pink Cup. Reinforce the collar area.
- Move 11: Tap a Yellow Cup to start the reservoir for the nipple.
- Move 12: Check your conveyor belt. If it is full, wait. If there is space, tap another Cyan Cup.
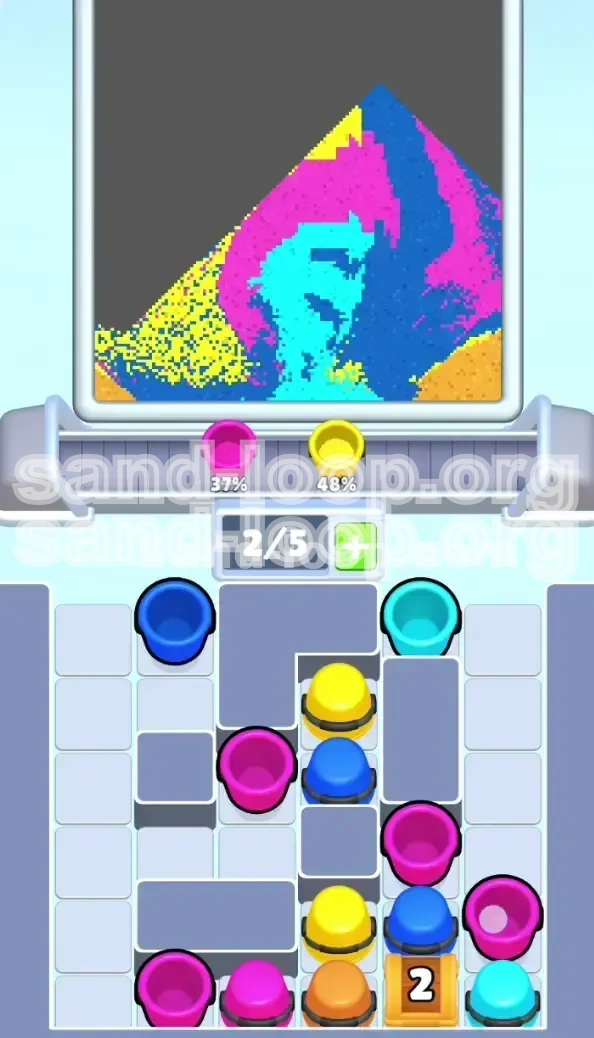
Phase 3: Background and Safety (Moves 16-25)
The bottle is taking shape. Now you use the bottle as a shield.
- Move 16: Tap a Sandy Orange Cup. Pour this into the bottom corners.
- Move 17: Tap a Dark Blue Cup. Pour this along the sides. The Cyan bottle should block it from the center.
- Move 18: Look for any remaining Cyan Cups that might be hiding in the tray. Clear them.
- Move 19: Tap a Yellow Cup to top off the nipple area.
- Move 20: Alternate between Sandy Orange and Dark Blue to fill the remaining background volume.
Phase 4: Final Polish (Moves 26+)
The home stretch. No more risk of deadlock.
- Action: Scan the tray for any remaining Dark Blue cups. These are for the measurement lines.
- Technique: Pour them slowly. If they spill over the bottle sides, it's okay, but try to keep them on the edges.
- Final Step: Dump the remaining Sandy Orange cups to complete the ground layer.
- Win Condition: The pixel art matches the target image. No grey areas remain on the canvas.
Color Processing Logic
Why does order matter? It's about specific gravity and displacement in the game engine. Here is the logic hierarchy for Level 452.
1. Cyan: The Keystone
Cyan is the structural core. It has the highest volume. It must be poured first to establish the "ground floor" of the bottle. If you pour Cyan last, it sits on top of the background colors, creating a floating effect that fails the art check. It needs to touch the bottom of the canvas to look correct.
2. Hot Pink: The Anchor
Pink acts as a heavy weight. Its density helps stabilize the lighter Cyan sand beneath it and contains the Yellow sand above it. It defines the neck of the bottle. Pouring Pink too early results in it being buried by Cyan. Pouring it too late leaves the neck undefined and vulnerable to spreading Yellow sand.
3. Bright Yellow: The High-Risk Fluid
Yellow is the most fluid color in this palette. It spreads like water. It must be poured *after* the Pink collar is formed. The Pink creates a bowl shape; if you pour Yellow before the Pink bowl is ready, the Yellow will flow down the sides of the bottle, turning the Cyan body greenish and ruining the purity of the colors.
4. Sandy Orange: The Filler
Sandy Orange is for the ground and corners. It is heavy and settles low. Because the bottle is in the center, the Orange naturally flows to the edges. It is safe to pour this almost anytime, but it is best saved for when you need to let the conveyor belt cool down.
5. Dark Blue: The Double-Edged Sword
Dark Blue is the trickiest. It is used for the large background areas AND the tiny measurement lines. This duality makes it dangerous. If you pour it too early, it floods the background, and you run out before you can detail the lines. You must ration the Dark Blue, using it only after the Cyan bottle is tall enough to act as a barrier against the flood.
Key Tips, Mistakes, and Stuck Solutions
Even with a plan, things go wrong. Here is how to avoid the 80% of traps that catch players in Level 452.
Common Mistake: The "Full Belt" Deadlock
This is the #1 killer. You tap 5 cups rapidly. Your belt is full. You see a Cyan cup appear, but you can't tap it. You have to wait for the belt to empty. By the time it's empty, the Cyan cup has shifted behind a grey blocker.
Fix: The "Two-Slot Rule." Never fill your belt past 3 cups if you can avoid it. Keep 2 slots open as an emergency buffer for newly unlocked colors.
Common Mistake: Ignoring Grey Blockers
Players tap cups that are visually "behind" the grey blockers, thinking proximity matters. It does not. The game only reads "tappable" cups.
Fix: Ignore the center column entirely until the lockbox breaks. Pretend the center of the screen doesn't exist. Focus 100% of your attention on the left and right perimeter columns.
Pro Tip: The Pulse Pour
Don't hold down the tap. Tap, release, tap. This "pulsing" creates distinct layers of sand. Continuous pouring creates a slurry that mixes colors. By pulsing, you ensure the Cyan stacks vertically like a tower rather than spreading like a puddle.
Pro Tip: The Pink Dam Strategy
Use Hot Pink as a physical barrier. If you are worried the Yellow nipple will leak down the side, pour a ring of Pink *before* the Yellow. The Pink sand will dry and harden, acting as a dam that keeps the Yellow contained in the upper center of the bottle.
What To Do If You Get Stuck
If you are staring at a board with no moves that help (only Orange/Dark Blue available, but you need Cyan), you are in a "Famine State."
The Fix: You must make a "Sacrificial Pour." Look at your canvas. Is the ground layer full? If not, tap the Sandy Orange cup. This clears the tray, shifts the board, and hopefully brings a Cyan cup into play. It's better to waste an Orange cup on the ground than to sit stuck forever.
Speed Run and Advanced Optimization
For those chasing 3 stars or sub-60 times, standard caution is too slow. You need advanced techniques.
The Pre-Loading Technique
You can cheat the lockbox timer. As you tap Move 5 (Dark Blue), visually track the Cyan cup on the right. Time your tap so that you tap the Cyan cup *exactly* as the 6th move registers. This queues the Cyan cup before the game realizes the board has changed, shaving 2-3 seconds off your time.
Batch Processing for Flow
Instead of alternating colors (Cyan, Pink, Cyan), group them. Tap Cyan, Cyan. Then Pink, Pink. This creates "color waves." Because the physics engine processes same-color liquids as a single larger volume, they stack more cleanly. This reduces the "fuzzy edges" between colors and makes the art pop faster.
The Ground Layer Skip
In a speed run, completely ignore the Sandy Orange cups until the very end. Do not let them clutter your belt. Focus entirely on Cyan, Pink, and Yellow. Only once the bottle is perfect should you go back and spam the Orange cups to fill the bottom. The game doesn't check the ground until the very end.
Calculated Overflow
This is a high-risk, high-reward move. If you are short on Dark Blue cups for the background, intentionally overfill the Cyan bottle so it spreads slightly at the bottom. This "Cyan spill" can substitute for the missing background color in the corners, allowing you to finish the level without waiting for more Dark Blue cups to spawn.