
Level 458
HARDHow to solve Sand Loop level 458? Get instant solution for Sand Loop 458 with our step by step solution & video walkthrough. Sand Loop 458 tips and guide.
Play Sand Loop Now
Experience the puzzle challenge firsthand
Game Screenshots


Sand Loop Level Guides
Sand Loop Level 458 Walkthrough: Mastering the Watermelon Logic Puzzle
Welcome to the definitive guide for Sand Loop Level 458. This stage is a significant difficulty spike, transforming the game from a casual pouring simulation into a strict logic puzzle. You are not just filling a container; you are managing a chaotic conveyor belt system while trying to paint a pixel-art watermelon slice. The core challenge lies in the "Conveyor Deadlock"—you have a maximum capacity of 5 slots on your belt, but the board is cluttered with obstacles and hidden cups. If you pull cups randomly, you will fill your belt with colors you don't need yet, causing a jam that makes the level impossible to finish. This guide will break down the exact logic required to conquer the Pink Seed Watermelon challenge.
Level Overview and Core Mechanics
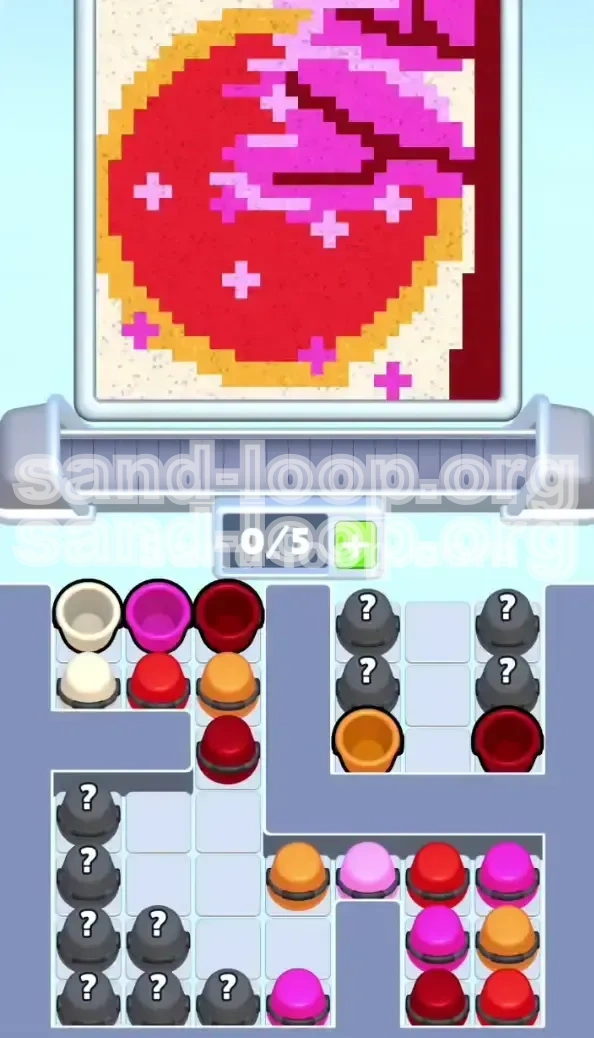
Level 458 features a unique visual target: a triangular watermelon slice on a cream background. The sand pours from a single top-center source, creating a pyramid pile at the bottom. This physics mechanic means that colors dropped later will cascade over colors dropped earlier. Your biggest enemy is not the timer, but the limited space on your conveyor belt. The level introduces "Mystery Cup" grids that block access to necessary colors, forcing you to make strategic pulls rather than clearing the screen.
Primary Objectives for Victory
To complete this level, you must achieve three specific goals. First, you need to construct the watermelon's structure by layering the orange rind and dark red border in the correct sequence. Second, you must place the bright pink "+" seeds without contaminating the red core, which requires precise timing. Finally, you must fill the vast cream background using the white cups, which acts as the final step to round out the canvas. Failing any one of these steps usually results in a belt jam or color contamination.
The Conveyor Belt Management Rule
The most critical rule in this level is to never let your belt slots exceed 3/5 capacity during the first half of the game. You start with zero slots filled. If you pull cups blindly to uncover hidden ones, you will end up with 5 full slots of useless colors. When the belt is full, the sand dispensers stop working, and you lose. You must keep 2 empty slots at all times to serve as an emergency buffer for when you uncover a crucial color behind a wall.
Understanding the Color Palette
The watermelon image requires six distinct colors, but they are not all equal in volume. The Bright Red and Dark Red make up the heavy core. The Orange forms the thin rind. The Cream (White) is the background filler. The various Pink shades (Bright Pink, Light Pink) are for the tiny seed details. The challenge is that the seed colors are mixed in with the core colors on the board, forcing you to carefully sort them before pouring.
Why "Speed Running" Fails Here
Unlike previous levels, tapping cups as fast as possible will cause you to fail instantly in Level 458. The game uses "L-Shaped Gray Walls" to hide essential supplies. These walls force you to clear a specific "front-line" cup before you can see what is behind it. If you clear a front-line cup that you don't need, you waste a belt slot. Patience is more valuable than speed here.
The Mystery Cup Grid System
Scattered across the bottom of the screen are 14 "Mystery Cups" marked with a question mark. You cannot see their color until the cup blocking them is removed. This creates a gambling mechanic. To succeed, you must predict the color based on the board's needs. Generally, the hidden cups in the bottom-left grid are mostly White/Cream, while the top-right grid holds your vital Pinks and Oranges.
Phase 1: Establishing the Base and Belt Rhythm
The opening moves are the most dangerous. If you start incorrectly, the level is over before it begins. The goal of Phase 1 is to secure the base of the watermelon (the rind and core) while keeping your conveyor belt empty enough to handle surprises. Do not touch the right side of the board yet.
The Top-Left Cluster Strategy
Start by focusing exclusively on the top-left quadrant. You will see a column of exposed cups. Tap the single White Cup and the Bright Pink Cup located here. Immediately stop tapping. Let these two cups travel down the conveyor belt and pour out. This initial pour will begin the pile at the bottom of the canvas. By starting with White, you secure the background edges early, and the Pink gives you a tiny taste of the seed color without overwhelming the canvas.
Securing the Vertical Column
After the initial drop, look directly below the cups you just moved. You will see a Bright Red Cup. Tap this now. Since the bottom pile has already started with White and Pink, the Red will land on top, creating the base of the watermelon flesh. Immediately following the Red, tap the Cream Cup in the same vertical column. This alternates your pours, preventing the conveyor from clogging with a single color type and ensures the canvas gets a layered foundation.
Monitoring the 3/5 Slot Limit
As you tap these initial cups, watch your conveyor belt UI at the bottom of the screen. Never let it fill up past 3 lights. If you have 3 cups waiting to be poured, do not tap another cup until one has poured. Keeping this buffer is vital. It allows you to grab an "emergency" color if you accidentally uncover a Mystery Cup that is critical right now.
Ignoring the Right Side Temptation
You will see accessible cups on the top right. Ignore them completely. They are guarded by L-walls that lead to Mystery Cups. If you start pulling from the right side now, you will pull a blocker cup, reveal a Mystery Cup you don't need, and clog your belt. The right side is a trap for the unprepared. Discipline yourself to clear the left side first.
Initial Pyramid Physics
Notice how the sand piles up at the bottom center. The first colors you pour (White, Pink, Red) will form the tip of the pyramid. This is intentional. You want the Red and White to form the underlying structure because the Orange rind and Dark Red border need to sit *on top* or *around* this core. If you pour Orange first, the Red will cover it later, wasting your effort.
Resetting the Board State
Once the top-left column is cleared and pouring, take a moment to assess the board. The left side should now be open, revealing more layers of cups. The right side remains blocked. Your belt should be cycling through the initial colors. This calm moment is the perfect time to plan your mid-game attack on the Mystery Grids.
Phase 2: Decoding the Mystery Grids and Walls
Now that the belt is moving and the base is pouring, you must tackle the obstacles. The board is divided by gray walls that hide the majority of your color supply. This phase is about information gathering and resource management without causing a deadlock.
Trading Space for Information
Understand the fundamental trade-off of this level: you are trading conveyor belt space for information about the Mystery Cups. When you pull a "Blocker" cup (a cup sitting in front of a Mystery Cup), you gain the ability to see the Mystery Cup's color, but you lose a slot on your belt. Only make this trade when you are desperate for a specific color or when you have ample empty belt space.
Identifying the Danger Zones
The "Danger Zones" are the clusters of Mystery Cups in the bottom-left and top-right. The bottom-left cluster is generally safe to unlock late in the game as it contains mostly White/Cream filler. The top-right cluster is high-risk because it contains the Light Pink and Orange cups needed for the rind and seeds. Do not unlock the top-right cluster until your canvas is ready for those specific colors.
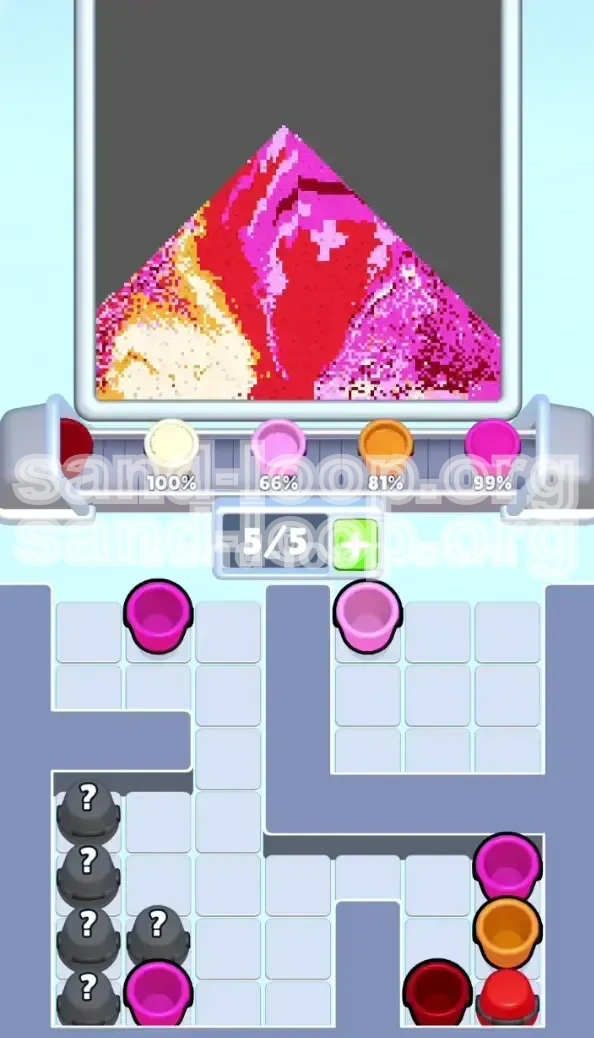
The 81% Rule for Orange Cups
This is a pro-tip for high-level completion. Watch the percentage meter of your current pour on the conveyor belt. When your active pour meter hits exactly 81%, the game physics are most stable for a color switch. This is the optimal moment to pull a new cup from the grid. If you pull a cup while the meter is at 10% or 20%, you risk the new cup arriving at the dispenser too early, causing a mix-up in the sand pile.
Calculated Blocker Removal
When you need to unlock a specific section, look at the "Blocker" cup. If the Blocker is a color you need (e.g., Bright Red), tap it immediately. It serves double duty: it clears the path and adds necessary sand to the belt. If the Blocker is a color you don't need (e.g., White when the core is full), you must decide if you have the belt space to spare. If your belt is full, wait.
Unveiling the Top-Right L-Block
Focus on the top-right corner. You will see a visible Dark Red Cup or Orange Cup blocking a Mystery Cup. If your canvas still needs the Red/Orange core, tap these Blockers now. This clears the wall and reveals the hidden Light Pink or Bright Pink cups behind them. By timing this with the "81% Rule," you ensure the new Pink cups arrive exactly when the Red pour finishes.
Managing the Flood of Options
As you clear walls, you will suddenly see 5 or 6 new cups appear. This is the "Flood." Do not panic and tap them all. Look at the canvas. Is the rind (Orange) done? Is the core (Red) done? Only tap the new cups that correspond to the empty sections of the watermelon. Treat the newly revealed cups as a menu, not a checklist.
Phase 3: The Precision Color Sequence
With the board open and the belt moving, you must now execute the specific color order required to paint the watermelon. This is the "Logic" portion of the level. The order is non-negotiable due to the sand pile physics.
Step 1: The Orange Rind Foundation
Your first priority in the active pouring phase is the Orange sand. This forms the outer rind. Because the sand pours in a triangle, the edges of the pile are the lowest point. You need the Orange to bank against the sides first. Pull all available Orange cups from the top-right grid now. Pour them until the percentage meter for the "Rind" section of the canvas is full.
Step 2: The Dark Red Border
Immediately after the Orange is flowing, you must switch to Dark Red. The Dark Red forms the thin inner border between the rind and the bright core. If you pour Dark Red too early, it gets covered by the core. If you pour it too late, it sits on top of the core looking messy. The timing is critical: the Dark Red must pour *while* the Orange is settling but *before* the Bright Red core expands.
Step 3: The Bright Red Core Expansion
Once the border is established, flood the belt with Bright Red. This is your highest volume color. It will fill the center of the watermelon. Since the center is the peak of the sand pile, this sand will naturally cover the inner edges of the Dark Red border you just poured, creating a perfect blending effect. Do not stop pouring Bright Red until the center is a solid block of color.
Step 4: The Surgical Pink Seeds
This is the hardest step. The Pink seeds are tiny details. You cannot pour a continuous stream of Pink, or it will blob out and ruin the Red core. You must use the "Burst Method." Tap a Pink cup, let it pour for 1 second, then tap a Red cup to cut the flow. This creates small, distinct piles of pink sand that look like seeds. Do not chain multiple Pink cups in a row.
Step 5: The Cream Background Filler
Leave the Cream/White cups for the very end. These fill the stark white background on the left and right edges of the canvas. Since the watermelon is in the center, the white sand needs to cascade *over* the rind to reach the edges. If you do this too early, the Red core will bury the white sand. Only start pulling White/Cream cups when the watermelon center is 90% full.
Visualizing the Layers
Think of the canvas as a 3D layer cake. Bottom layer: Orange Rind. Middle layer: Dark Red Border. Top layer: Bright Red Core. Sprinkles: Pink Seeds. Frosting: Cream Background. If you try to put the frosting (Background) on before the cake (Core), the result is a mess. Stick to this strict vertical hierarchy.
Key Tips for Avoiding Common Mistakes
Even with a strategy, small errors can compound in Level 458. Here are specific warnings and tips to prevent the most common failure points.
Tip 1: The "Spill" Danger
Be extremely careful with the Pink cups. Pink sand has different physics than Red; it tends to spread wider at the base. If you pour Pink onto a steep Red pyramid, it will slide down and contaminate the Orange rind at the bottom, turning it into a muddy purple-brown. Always flatten the pile with Red or White before introducing Pink.
Tip 2: Mystery Cup Probability
If you are unsure what is behind a Mystery Cup, look at the surrounding cups. The game clusters colors by type. If you see a row of Orange cups, the Mystery Cup behind them is highly likely to be Orange or Red. If you see White cups, the hidden one is likely White. Use this context to guess if you should risk the belt slot to uncover it.
Tip 3: The Jam Recovery
If you mess up and your belt jams (5/5 slots full), you have one desperate move: look for a color on the canvas that is at 99% completion. If you have a cup of that color on the belt, it might pour fast enough to free a slot before the next cup arrives. If not, you are better off restarting the level immediately rather than waiting for a timer.
Tip 4: Don't Clear "Just In Case"
A common mistake is pulling a cup "just in case" you need it later. In Level 458, never pull a cup unless you need it *right now* or in the next 10 seconds. Hoarding cups on the belt is the fastest way to a Game Over screen. Keep the belt flowing like a river, not a stagnant pond.
Tip 5: Using the Pause Button
Sand Loop allows you to pause the game (usually by tapping the background or a menu icon, depending on your platform settings). Use this! When the game unpauses, the sand physics continue. Pause the game right after you pull a blocker cup to see what the Mystery Cup is without losing time. If it's a bad color, you can plan your next move without the pressure of the moving belt.
Tip 6: The Final 5% Rush
The last 5% of the level—filling the final corners of the cream background—can take deceptively long. You will need a lot of White cups. Ensure you have saved enough White/Cream cups from the bottom-left grid. Do not use your last White cups to fix a mistake in the Red core; save them strictly for the end-game background fill.
Speed Run and Efficiency Strategies
Once you have beaten the level, you might want to improve your time or score. These strategies are for advanced players who are comfortable with the belt management mechanics and want to optimize their play.
Pre-loading the Belt
Advanced players can "pre-load" the belt. During the "Phase 1" opening, you can slightly exceed the 3/5 limit *if* you know the next three pours are rapid-fire colors that the canvas needs. This is risky but saves seconds. For example, if you have Red, Orange, and Red ready, and the canvas needs them in that order, you can stack them to pour instantly.
Chain Reaction Tapping
In the final phase (The Cream Background), you can "Chain Tap." Once the watermelon core is solid, tap every single White Cup on the screen simultaneously. Since the background just needs volume, the order doesn't matter. This floods the belt and finishes the level in seconds rather than tapping one by one.
Ignoring Perfection
Perfectionists fail this level because they try to keep the Pink seeds perfectly separated. For a speed run, a little bit of Pink bleeding into Red is acceptable. Don't waste time alternating Red and Pink cups to keep the seeds perfect. Just dump the Pink and move on. The game's collision detection is lenient enough to allow slight overlaps.
The "Belt Flush" Maneuver
If you have excess cups of a color you no longer need (e.g., extra Orange cups once the rind is done), you can use them to "flush" the belt. Tap them to force them onto the belt, pushing the desired cups closer to the dispenser faster. It wastes a bit of sand, but it keeps the flow moving if you are hunting for a specific hidden cup.
Memorizing the Grid Layout
The Mystery Cup grid is the same every time you play Level 458. After a few runs, you will memorize that the top-right Mystery Cup is always Light Pink and the bottom-left is always White. Once memorized, you don't need to wait for visual confirmation. You can tap the Blocker and immediately queue up the next cup, shaving seconds off your time.
Optimizing the 81% Switch
Master the "81% Rule" mentioned earlier. Don't just wait for a cup to finish; tap your next cup the millisecond the meter hits 80-82%. This rhythm allows you to have a continuous, unbroken stream of sand pouring, which is visually satisfying and maximizes your point multiplier for "Flow."
Advanced Stuck Solutions
If you are stuck at 98% completion with a tiny spot left, look for a cup of the *opposite* color to the spot. Pouring the opposite color (e.g., White on a Red spot) can sometimes displace the existing sand enough to fill the crack, or force the game's physics engine to register the area as "filled" due to pixel overlap. It's a glitch exploit, but it works in a bind!