
Level 468
HARDHow to solve Sand Loop level 468? Get instant solution for Sand Loop 468 with our step by step solution & video walkthrough. Sand Loop 468 tips and guide.
Play Sand Loop Now
Experience the puzzle challenge firsthand
Game Screenshots

Sand Loop Level Guides
Level Overview: The Night Mountain Challenge
The "Bottom-Up" Puzzle Concept
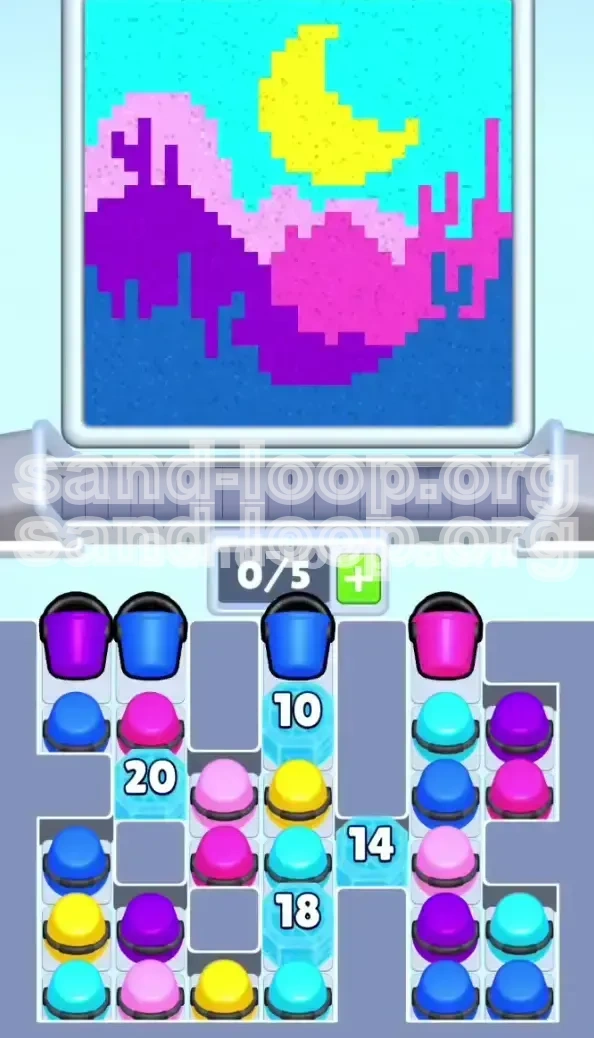
Sand Loop Level 468, "Night Mountain," is a deceptive puzzle that prioritizes inventory management over reflexes. While the vaporwave aesthetic—featuring a pixelated crescent moon and jagged, multi-colored peaks—looks artistic, the level is actually a strict logic test. The playing field is divided into two distinct zones: the massive Cyan sky (45% of the board) and the complex, multi-layered mountain range sitting atop a Dark Blue foundation. The central difficulty stems from the "Ice Block Fortress," a mechanic that locks essential colors behind unbreakable barriers until specific conditions are met.
The 0/5 Slot Economy Constraint
You are forced to play with a constrained 0/5 Slot Economy. This means every click must be calculated; one stray tap fills your conveyor belt, leading to an inevitable deadlock. Unlike other levels where you can spam taps, Level 468 requires you to maintain a "2-Slot Buffer" at all times. Keeping two slots empty ensures you have the flexibility to react when high-priority colors (like Purple or Dark Blue) spawn, preventing the game-over state of a full belt.
Zone Analysis: Sky vs. Foundation
The level is split horizontally. The top 50% is the "Sky Zone," dominated by Cyan and Yellow pixels. The bottom 50% is the "Mountain Zone," a complex lattice of Purple, Hot Pink, Light Pink, and Dark Blue. The primary challenge is that the spawn point is fixed at the top. If you work on the sky first, you will pollute the mountain foundation below with falling sand dust. The guide focuses on navigating this inverted construction order.
The Ice Block Bottleneck
Four Ice Blocks (10, 14, 18, and 20 HP) guard your color palette. You cannot access the full spectrum immediately. Ice Block 20, in particular, is the primary bottleneck, guarding the supply of Dark Blue and Light Pink required for the mountain base. Breaking these blocks requires using "disposable" colors as ammunition, a process that consumes valuable conveyor belt space.
Why This Level Is Hard
The difficulty spike comes from the conflict between space management and the need to break ice. To break ice, you need to send buckets to the conveyor. But sending buckets fills the belt. If you fill the belt to break ice, you have no room for the colors that spawn *after* the ice breaks. Mastering this balance is the key to the three-star rating.
Visual and Aesthetic Layout
The level features a "Night Mountain" theme. You will be constructing a dark blue ocean base, jagged purple and pink peaks, a cyan sky, and a distinct yellow moon. The aesthetic is clean lines and high contrast. Any "muddy" mixing of colors (e.g., pink sand falling into the blue water) will ruin the visual score and prevent 100% completion.
Strategic Objectives and Color Priorities
The Golden Rule: Foundation First
The single most important objective is to clear the four Ice Blocks efficiently to unlock the mid-game color palette, specifically Dark Blue. You must construct the image from the bottom up—starting with the Dark Blue base, then the mountains, and finishing with the sky. This prevents lighter sands from being contaminated by heavier falling sands.
Color Tier List
Not all colors are created equal in Level 468. Here is the priority hierarchy:
- S-Tier (Critical): Dark Blue. Forms the foundation. Unlocks late via Ice Blocks but is critical for stability.
- A-Tier (High Priority): Light Pink. Highlights the center peaks. Often locked behind the toughest ice blocks.
- B-Tier (Mid Priority): Purple & Hot Pink. These make up the jagged peaks. They have complex hitboxes and require precision tapping.
- C-Tier (Low Priority): Yellow. Reserved for the crescent moon. It is distinct and isolated, making it safe to fill late.
- D-Tier (Filler): Cyan. Accounts for ~45% of the canvas. The "filler" color and should be your lowest priority until the endgame.
Maintaining the 2-Slot Buffer
Your tray has a capacity of 5. This is your most precious resource. The Golden Rule: Always keep 2 slots empty. This allows you to grab a high-value spawn (like a Dark Blue bucket) without having to wait for a previous pour to finish. If your belt is full (5/5), you are at the mercy of the game's timer. A 3/5 or 4/5 load is the sweet spot, allowing for continuous motion while preventing gridlock.
Understanding Sand Physics
Sand Loop physics dictate that sand seeks the lowest point. In Level 468, the mountain peaks are jagged and have steep slopes. If you pour Hot Pink before the Dark Blue base is filled, the Pink sand will slide down the slopes and settle in the "water" area at the bottom, contaminating the Dark Blue zone. To avoid this, you must create a "floor" by filling the Dark Blue section first. This traps the Pink and Purple sands in the upper ridges where they belong.
The "Contamination" Risk
Top-down filling is the most common error. Because the spawn point is fixed, pouring Cyan sand early fills the bottom pixels of the screen with blue dust. When you inevitably unlock the Dark Blue and Purple sands later, they will fall on top of this Cyan layer, creating a muddy, visually indistinct boundary. Furthermore, the Cyan sky consumes such a vast amount of sand that early tapping will flood your conveyor belt, leaving no room for the Ice-breaking tools you need. You must resist the urge to clear the easy sections first.
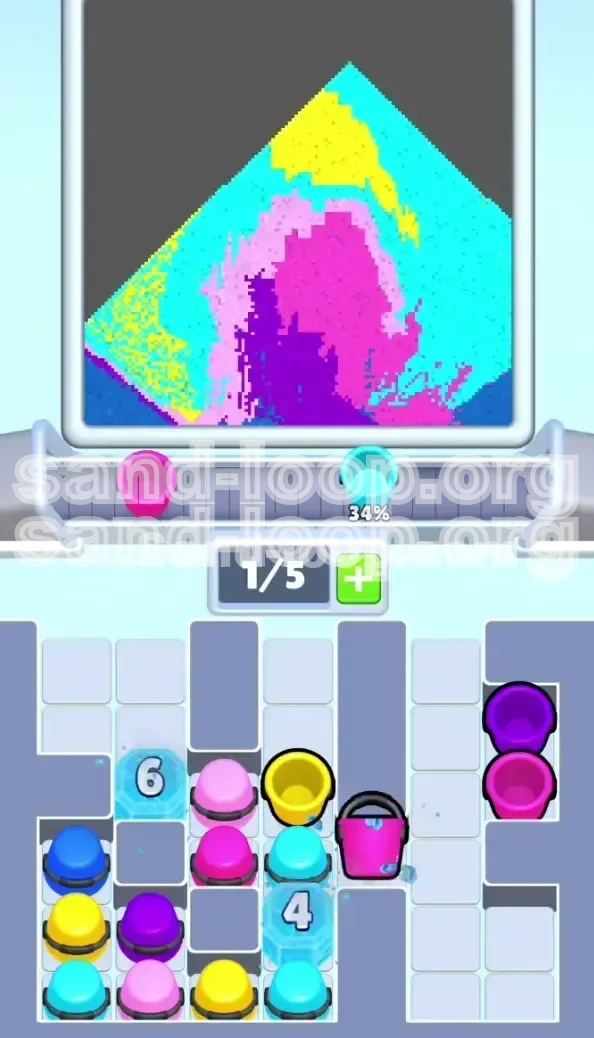
Phase 1: The Ice Breaking Start (0% - 30% Progress)
Targeting Ice Block 10 First
As soon as the level loads, assess your starting tray. You will likely have a mix of Purple and Cyan. Do not touch the Cyan. Step 1: Tap the Purple bucket on the far left. Step 2: Tap the Hot Pink bucket on the far right. These are your "ammo." Your target is Ice Block 10 in the top-center. Time your taps so the bucket pours when the spout is directly aligned with this block. Because Ice Block 10 only has 10 HP, it is the quickest to clear. Breaking it opens up the vertical column for the center mountain peaks.
Dealing with the Stalemate
After the initial taps, your tray will shift. You might encounter a situation where you have only Cyan buckets available, but you still need to break Ice Block 20. The Solution: You must use the Cyan to fill a small, irrelevant corner of the sky just to clear it from the belt, but stop the pour immediately. Alternatively, if you have a Purple bucket, use it to attack Ice Block 14 on the right side. Do not spread your damage evenly. Focusing all damage on Ice Block 14 until it breaks is better than dealing 1 damage to four different blocks. Breaking one block releases new spawns faster than chipping four.
Unlocking the Bottom Row
Once Ice Block 10 and 14 are shattered, the layout changes. The path to Ice Block 20 becomes clearer. This block has 20 HP and is the tank of the level. It blocks the Dark Blue and Light Pink supply. Strategy: You need to accumulate Purple buckets. Use every Purple bucket that spawns to attack Ice Block 20. Ignore the Hot Pink mountains for now; they can wait. If you run out of Purple buckets and the belt is clogged with Cyan, you must bite the bullet and pour the Cyan into the sky to free up the slots, even though it goes against the "Bottom-Up" strategy. A clogged belt is a death sentence.
Preparing the Foundation
When Ice Block 20 is roughly 50% destroyed (10 HP remaining), you will see Dark Blue buckets start to trickle into the spawn queue. Do not tap them yet. If you send a Dark Blue bucket to the conveyor while the ice is still blocking the pour path, you risk wasting it on a mountain peak. Wait for the *crash*—the moment the ice breaks. Once Ice Block 20 is gone, immediately prioritize the Dark Blue buckets.
Managing the Early Game Belt
At this stage, your belt management should be aggressive. If you see a Purple bucket, tap it. If you see Cyan, ignore it unless you are completely stuck. The goal is to keep the flow moving towards the ice blocks. Don't worry about perfect placement yet; the priority is simply unlocking the full color palette.
Phase 2: Base Construction and Mountain Form (30% - 75% Progress)
Establishing the Dark Blue "Floor"
With the Ice Block 20 destroyed, the bottom of the screen is accessible. Step 1: Send two Dark Blue buckets to the belt. Step 2: Pour them steadily into the bottom reservoir. Do not rush; the sand needs to settle evenly. You are aiming for a 100% fill rate on the Dark Blue section. This creates a solid platform. Once this is done, the "spillage" risk for subsequent colors is eliminated. Any Pink or Purple sand that slides down the mountain will now hit the Dark Blue and stop, rather than sliding into the void.
Sculpting the Purple and Pink Peaks
Now shift your focus to the jagged horizons. The left side requires Purple, and the right side requires Hot Pink. The Precision Tap Technique: These mountain peaks are narrow. If you hold the pour too long, the sand will overflow into the Cyan sky zones. Tap and release. Tap and release. You want short bursts of sand to build the height without the width. Keep an eye on the Light Pink (highlight color)—this is usually the trickiest to place because it sits between the two larger mountain blocks. Save Light Pink for when the Purple and Hot Pink are at 80% completion.
The Danger of the "Single Pixel" Columns
On the far right and left edges of the mountains, there are single-pixel columns that act as strainers. If you pour a full bucket of Hot Pink at these columns, 90% of the sand will slip through the cracks and contaminate the bottom area. The Fix: Move your pouring nozzle slightly off-center. Aim for the bulk of the mountain slope, not the extreme edge. Let the sand pile up naturally; it will eventually fill the single pixels via gravity, but attempting to force-fill them is inefficient and messy.
Managing the Mid-Game Belt Traffic
By now, you have Cyan, Yellow, Purple, Dark Blue, and Pink all potentially spawning. The belt will be chaotic. Priority List: 1. Dark Blue (to fix foundation errors). 2. Light Pink (hardest to place). 3. Purple/Hot Pink. 4. Cyan. 5. Yellow. If a Cyan bucket appears and your belt is at 4/5 capacity, let it sit in the tray. Do not tap it. If a Light Pink bucket appears, tap it immediately, even if you have to wait a second for the belt to clear. You cannot afford to miss the Light Pink spawn window, or you will be stuck waiting for a refresh later.
The 50% Progress Check
At the halfway point, stop and assess. Your Dark Blue base should be complete. The Purple and Hot Pink mountains should be roughly 60% filled. If you have been pouring correctly, the Cyan sky should be 0% filled. If you have any Cyan in the sky, you are moving too fast. Slow down and focus on the mountains. The sky is a "trap" that opens up too early and tempts you into an easy, but strategically unsound, fill.
Layering the Highlights
The Light Pink is your "highlight" color. It is the final touch on the mountains. Because it is the lightest color, it is the most susceptible to "slippage" down the mountain slopes. Only start pouring Light Pink when the main body of the mountains (Purple and Hot Pink) is almost at its final height. This ensures the Light Pink sits on top, crisp and clean, rather than sliding down to blend with the Dark Blue base.
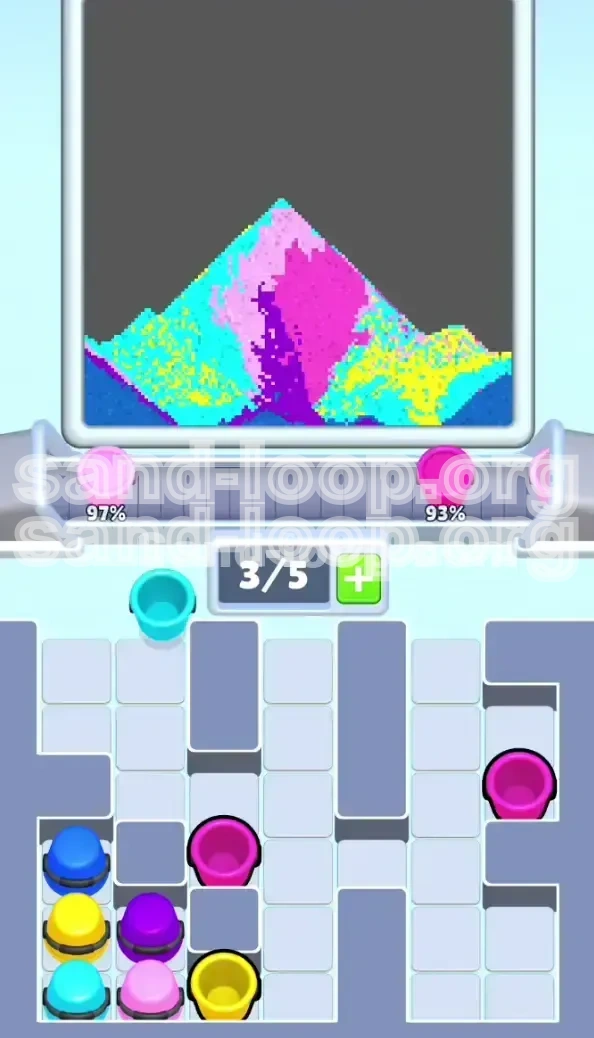
Phase 3: The Sky and Moon Finale (75% - 100% Progress)
The Cyan Sky Flood
With the mountains and base complete, the only remaining area is the massive Cyan sky. This is the "Zen Mode" of the level, but it still has risks. You can now tap all remaining Cyan buckets. Tip: Since Cyan makes up the background, you can be aggressive with your pouring. You can hold the spout open to speed up the process. However, be careful near the top of the Yellow Moon. If you pour Cyan *over* the Moon, it will blur the sharp crescent shape.
The Yellow Moon Strategy
The Yellow Moon is suspended in the center of the Cyan sky. The "Cup" Method: Ideally, you want to fill the Cyan sky *around* the moon first. By filling the Cyan pixels to the left and right of the moon, you create a "cup" or barrier. Once this barrier is in place, you can pour the Yellow sand rapidly. The Cyan walls will prevent the Yellow sand from spilling sideways, ensuring a perfect, sharp crescent shape. If you pour the Yellow first, it spreads out flat and looks messy when the Cyan covers the edges.
The 98% Trap and Final Tweaks
As you approach 100% completion, you will likely have small gaps (1-2 pixels) remaining in various colors. This is where most players get stuck at "99%." The Solution: Do not use a full bucket for a 2-pixel gap. If you tap a bucket, it will pour for 3-5 seconds. Instead, wait for a specific bucket to align, or use a "jiggle" motion if the game allows partial pours. If not, you must use a color that has a large area left to fill (usually Cyan) to cycle the belt until the specific color you need to fix the 1-pixel gap spawns. Patience here is key; forcing a pour will overfill the adjacent area and change the color, forcing you to re-do that section.
Final Checklist Before Completion
- Verify the bottom Dark Blue is 100% flat.
- Check the "cup" of the moon—no Cyan bleeding into Yellow.
- Ensure the Hot Pink peaks are sharp and not rounded off by overflow.
- Confirm the belt is emptying naturally as the level completes.
Finishing Strong
The final 2% is a test of patience. Do not rush. If you have a full belt and only one pixel left, you must wait. Let the belt cycle. Wait for the exact color you need. A single mistaken tap at 99% can knock you down to 95% and add minutes to your time. Trust your preparation and let the game come to you.
Speed Run Tips and Advanced Tricks
Pre-Loading the Tray
Speed running Level 468 relies on minimizing the "wait" time for new buckets. At the very start of the level (while the "Go" animation is fading), you can spam-tap the first two Purple buckets. By the time the animation finishes, those buckets will already be halfway to the pour point. This saves roughly 2-3 seconds, which is crucial for a top-100 time.
The "Double Tap" Ice Breaker
If you have two identical buckets on the tray (e.g., two Purples) and an Ice Block is directly under the spout, you can double-tap the second bucket the moment the first one starts pouring. This queues the second bucket immediately. If the ice breaks during the first pour, the second bucket will instantly start filling the newly opened area without a gap. This fluidity is the difference between a good run and a great run.
Color Banking
Sometimes, it is faster to "bank" a color by leaving it in the tray (untapped) while you cycle through other colors. If you have a Yellow bucket but don't need it yet, leave it there. It reduces the spawn pool for other, more useful colors (like Dark Blue). By leaving a "useless" bucket in the tray, you manipulate the RNG (Random Number Generator) of the spawner to give you the colors you actually need for the current phase.
Identifying Soft Locks Early
If you break Ice Block 20 but no Dark Blue spawns within the next 3 bucket cycles, you are in a "Soft Lock." This means the RNG has buried your needed colors. The Fix: Immediately stop tapping. Watch the belt cycle. You may need to dump a Cyan bucket into a corner just to force the game to refresh the spawn queue. Do not keep tapping randomly; you will fill the belt and lose. Control the rhythm of the spawns.
Avoiding the "Spill" Penalty
In a speed run, accuracy is everything. Spilling sand into the wrong area (e.g., Purple into the Cyan sky) forces you to overwrite it later, costing double the time (once to clean, once to refill). It is faster to wait 2 seconds for the nozzle to align perfectly than to pour early and spend 20 seconds fixing a mess. Respect the physics; the sand falls fast, but the correction is slow.
Advanced Belt Manipulation
Learn to recognize the spawn pattern. The game typically spawns colors in clusters. If you see two Cyan buckets spawn back-to-back, you can safely assume that the next cluster will contain mountain colors. Use this knowledge to hold off on tapping the Cyan, preserving your belt space for the incoming Purple or Pink. Predictive management is faster than reactive management.