
Level 469
HARDHow to solve Sand Loop level 469? Get instant solution for Sand Loop 469 with our step by step solution & video walkthrough. Sand Loop 469 tips and guide.
Play Sand Loop Now
Experience the puzzle challenge firsthand
Game Screenshots
Sand Loop Level Guides
Level Overview: "The Cherry Paradox"
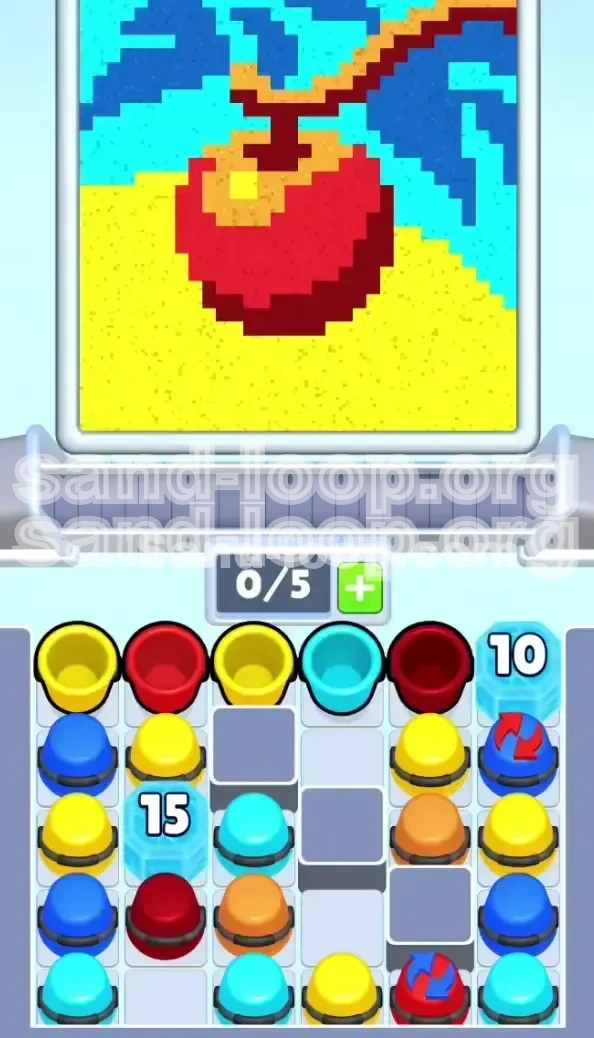
Welcome to Level 469, commonly known as "Cherry on the Beach." This stage represents a significant difficulty spike in Sand Loop, primarily due to a restrictive "0/5 Slot" mechanic and complex grid obstructions. The visual goal is simple: a pixel art scene featuring a large red cherry on yellow sand against a blue sky. However, the game board is rigged against you. The level is less about reflexes and more about strict spatial logic and queue management. You will face heavy Ice Blocks that seal away essential colors and Cycle Cups that alternate states, threatening to contaminate your inventory. To succeed, you must execute a rigid drop order that prioritizes breaking the grid lock before filling in artistic details.
The 0/5 Slot Economy
The most critical constraint in this level is your tray size. You are limited to holding only five cups at any given time. If your tray is full and the next available cup is not a color you need, you are effectively soft-locked. This mechanic forces a "Just-in-Time" playstyle. You cannot hoard colors for later; you must tap, pour, and clear with extreme precision. Understanding which colors act as "blockers" in your tray is essential for survival.
Ice Block Mechanics
Two massive Ice Blocks dictate the flow of the game. A "15 HP" block sits on the left-center column, and a "10 HP" block guards the top right. These are not just obstacles; they are keys to the level. The left Ice Block buries the Cyan cups required for the sky, while the right block protects Cycle Cups essential for the cherry. You must damage these blocks by clearing adjacent cups, meaning you cannot ignore the edges of the board.
Cycle Cup Instability
Scattered across the board are Cycle Cups marked with recycling arrows. These toggle between Red and Blue states every few seconds. Since the Cherry requires massive amounts of Red early on, these cups are high-risk, high-reward resources. Tapping them at the wrong moment pollutes your tray with Blue sand you cannot use yet, wasting valuable slots. Mastering the timing of these taps is the core skill tested in Level 469.
The Color Contamination Risk
Unlike standard levels where "close enough" works, Level 469 punishes color bleeding. The boundaries between the Yellow sand, the Red cherry, and the Blue sky are rigid. Pouring a Blue cup while the Cherry is only half-full will result in wasted sand that overflows into the Red zone, creating permanent visual defects that lower your score. You must adhere to a strict color sequence to maintain purity.
Grid Gravity Anomalies
The level features immovable gray blocks in the center columns that disrupt gravity. When you clear a cup, the stack above won't always drop straight down; it may shift laterally. This can isolate needed cups behind walls of gray stone. You must account for these shifts when planning your path to the Ice Blocks, ensuring you don't accidentally lock a necessary Red cup behind a barrier.
Step-by-Step Walkthrough
To achieve a 100% clear rate, we have broken the run into four distinct phases. Follow this order strictly. Deviating from the sequence is the primary cause of failure.
Phase 1: The "Yellow & Ice" Opener
As the level loads, your immediate goal is to secure the bottom foundation and begin damaging the Ice Blocks.
- Step 1: Immediately tap the top-left Yellow Cup. The yellow sand base is large and forgiving. Filling this first clears the bottom-left stack and provides immediate visual progress.
- Step 2: Identify the 10 Ice Block on the top right. Do not attempt to clear the cups under it yet. Instead, tap the Yellow or Dark Red cups adjacent to it to start chipping away at its HP.
- Step 3: Establish a "Tap -> Pour -> Tap" rhythm. Send a Yellow cup to the conveyor, let it pour fully, and then tap the next. Do not queue multiple cups at once.
- Step 4: Monitor your slot count. If you have two empty slots, you are safe. If you have three or fewer, stop tapping and let the conveyor clear.
Phase 2: The Red Cycle Harvest
Once the top layer is stabilized, you must exploit the Cycle Cups to fuel the Cherry body without clogging your tray with Blue.
- Step 1: Locate the Cycle Cup under the 10 Ice Block. Watch the animation loop closely. It follows a roughly 2-second beat.
- Step 2: Tap the cup the exact moment it flashes Bright Red. If you miss the window and tap Blue, keep that Blue cup in your tray as a placeholder for Phase 4, but do not pour it.
- Step 3: You need to extract roughly 3-4 Red cups from these cycles to fill the main body of the cherry. Ignore the stem and highlights for now.
- Step 4: If the tray gets clogged with unwanted colors, pour them onto the "Yellow" sand area if they match, or onto the conveyor belt to force them out of your inventory, accepting the score penalty to save the run.
Phase 3: The Left Grid Unlock
The mid-game crisis occurs when you run out of accessible Red cups. You must break the left side to survive.
- Step 1: Shift your focus to the 15 Ice Block on the left-center column.
- Step 2: Clear any Blue or Yellow cups hugging the left and right sides of this specific block. These adjacent clears deal the most damage.
- Step 3: Once the block shatters, the entire left column will collapse. This unlocks the Cyan cups buried at the bottom row.
- Step 4: CRITICAL: Do not tap the Cyan cups yet! Tapping them now will clog your tray while you are still trying to finish the Red Cherry. Just clear the block to open the board space and resume gathering Red.
Phase 4: The Sky & Stem Clean-up
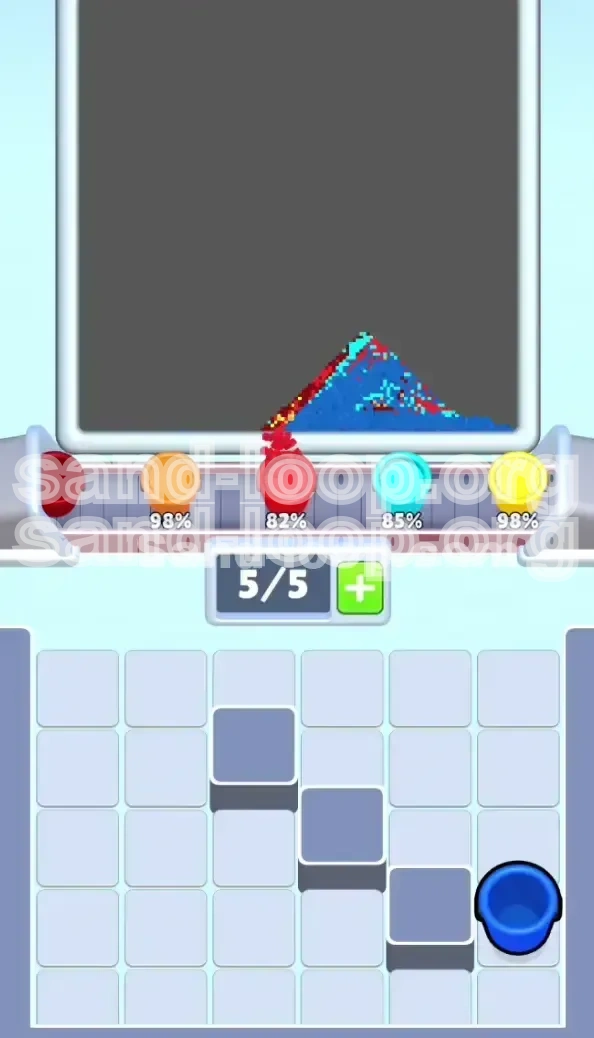
The endgame begins when the Cherry body is 90% full and the Sand is 100% full.
- Step 1: Pivot to the Cyan cups you unlocked in Phase 3. Pour these to start the sky background.
- Step 2: Locate Dark Blue cups in the far corners. Pour these to create the split-sky effect. Use the "Blue" placeholder cup in your tray if you saved one from Phase 2.
- Step 3: Finish the Stem. Use Dark Red cups now. Since the stem is a tiny area (less than 5% of the canvas), a single cup usually overflows it. Pour slowly and stop as soon as the stem pixels fill.
- Step 4: Use any remaining Orange or Red remnants to hit 100% completion. If you have a Power-Up left, use it on any stubborn single-pixel gaps.
Color Processing Order
The specific order in which you process colors is the logic key to this puzzle. Processing them out of order is the #1 cause of failure.
Priority Tier 1: Bright Red (The Cherry Body)
This is your primary resource. The Cherry occupies roughly 45% of the total canvas area. You must prioritize tapping Bright Red cups (including Cycle Cups when red) above all else. If you run out of Red on the board, you are forced to wait for Cycle Cups to flip, which wastes precious time. Keep a steady stream of Red flowing onto the conveyor belt from the very first tap until the body is visually full. Avoid the temptation to work on the stem or highlights during this phase.
Priority Tier 2: Yellow (The Sand Base)
The yellow sand base is distinct and separate from the sky. It covers about 25% of the canvas. You should process Yellow immediately after Red in the early game. Since the Yellow cups are often located on the top left, they are safe to tap early because they don't interfere with the Ice Block mechanics on the right. Filling the yellow base first also clears the bottom-left grid, giving you more visibility for the late game.
Priority Tier 3: Cyan & Dark Blue (The Sky)
These are "late-game" colors. The sky is deceptive because it looks large, but it is split into two colors. Cyan should be processed before Dark Blue. The Cyan cups are trapped under the 15 Ice Block on the left. You physically cannot access them until you break that block. Trying to force Blue or Red into the sky areas will only result in "overflow" penalties where you waste sand because the pixels aren't ready for it yet. Wait until the Cherry and Sand are 90% done before touching these.
Priority Tier 4: Dark Red & Orange (Details)
These are your "finisher" colors. The Dark Red is for the stem, and Orange is for subtle highlights. They represent less than 10% of the total volume. Never tap these early. They are small, precise amounts. If you pour a Dark Red cup while the main Cherry body is still empty, you will overfill the stem and waste the rest of the cup on the Red body (which is inefficient). Queue these only for the final 5% of the level.
Managing Color Contamination
One critical rule in Sand Loop is "Color Purity." If you pour a Cyan cup immediately after a Red cup without letting the Red finish, you risk leaving a trail of Red dots in your Blue sky. To avoid this, you must create a "Visual Gap" on the conveyor belt. If you switch from Red to Cyan, let the Red cup drain completely, wait 1 second for the belt to move forward, and then send the Cyan. This physical gap prevents color mixing.
Advanced Tips & Speed Run Strategies
Once you understand the logic, you can optimize your playstyle to achieve faster clear times and higher scores.
The "Tap-Hold" Technique for Cycle Cups
Dealing with Cycle Cups is stressful. A pro-tip is to hover your finger over the Cup before it changes color. Watch the rhythm of the arrow animation. Most Cycle Cups in Sand Loop follow a 2-second beat. Get used to this beat. Tap slightly before it hits Red if you have system lag, or exactly when it flashes Red if your connection is good. This minimizes the risk of grabbing the wrong color.
Speed Running the 15 Ice Block
Don't wait for the 15 Ice Block to break naturally. Aggressively target the cups adjacent to it. If you have a Power-Up (like a horizontal or vertical laser), save it for this specific block. Breaking the 15 Ice Block early releases the "flood" of Cyan cups at the bottom. If you can break this block 10 seconds faster, you can finish the Sky phase much smoother because you won't be starved for Cyan at the end of the level.
Slot Buffering
We mentioned keeping 2 slots open. Advanced players use the third slot as a "Trash Buffer." If you accidentally tap a Blue cup when you needed Red, don't immediately dump it off the board (which costs points/score). Instead, keep it in slot 5. Use the other 4 slots to cycle through the correct colors. At the very end of the level, if you still have that Blue cup, pour it into the sky. If the level ends and you still have it, you only lose a minor amount of points compared to a complete restart. This "Buffering" strategy saves runs that would otherwise be dead.
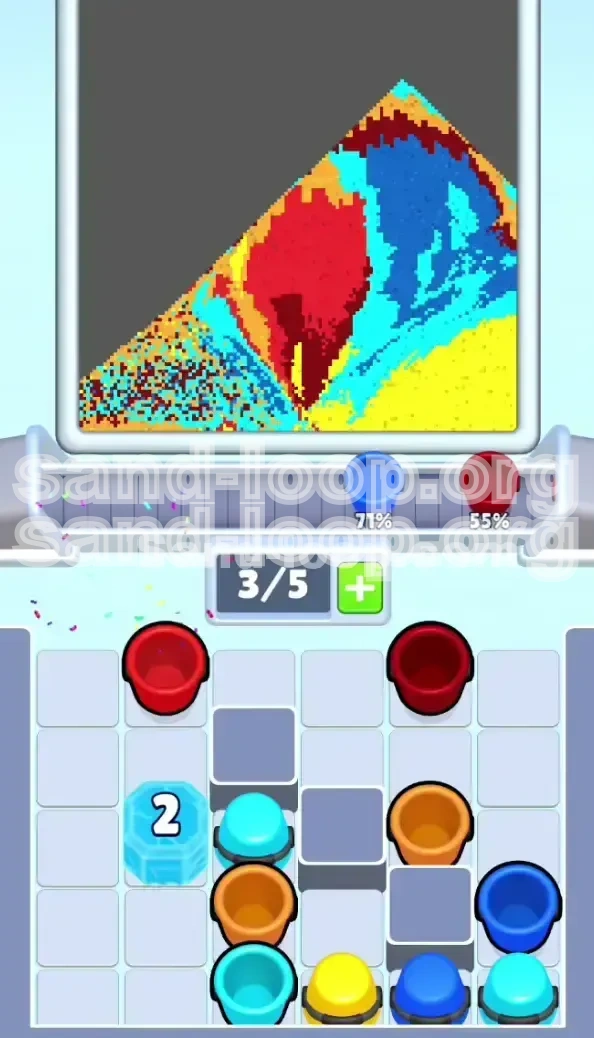
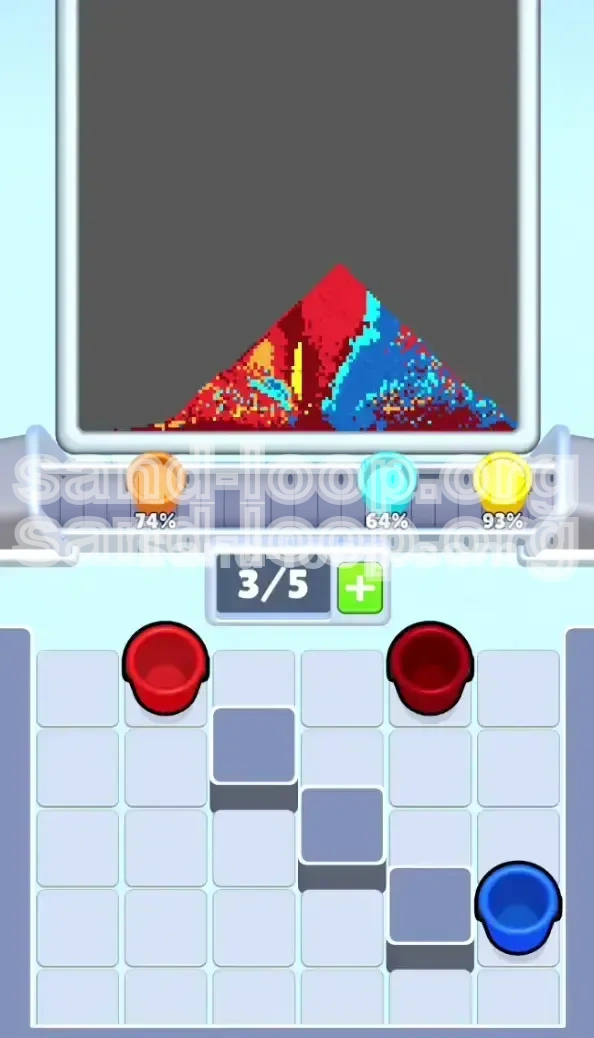
Recognizing the "Percentages"
Glance at your progress percentages in the UI. If Red is at 80% and Cyan is at 0%, but you are still tapping Red cups, you are wasting time. Pivot immediately. Once a color hits 85%, it is visually "full enough" to stop worrying about. Shift your focus to the next lowest percentage color. This dynamic adjustment prevents you from over-filling a section and running out of time for the background.
Troubleshooting: Common Mistakes & Solutions
Even with a guide, things can go wrong. Here is how to fix the most common issues players face in Level 469.
Mistake: The "Ice Block" Lock
Symptom: You are stuck at 40% completion. The board seems empty, but the sky won't fill.
Cause: You failed to break the 15 Ice Block on the left. The remaining Cyan cups are physically buried under the ice.
Fix: Look at the left-center column. Is there a frozen block? You need to look for adjacent Blue or Yellow cups that you might have ignored. Clearing those adjacent cups is the only way to damage the ice. There are no shortcuts; you must clear the neighbors to free the Cyan.
Mistake: Stem Contamination
Symptom: The cherry stem looks messy, or you ran out of Dark Red sand before the stem was finished.
Cause: You used Dark Red cups to fill the main cherry body earlier in the level. Dark Red is often treated as "Red" by the game logic, but it is a distinct resource needed for the thin stem lines.
Fix: In your next run, strictly avoid tapping Dark Red cups until the very end. Pretend they are a different color entirely. Only tap them when the main Red body is 100% done and you are ready to draw the thin line at the top.
Mistake: Conveyor Belt Traffic Jam
Symptom: Your 0/5 slots are full of Blue cups, but the Cherry on screen is still red/yellow. You can't tap anything else.
Cause: You tapped the Cycle Cup (or Blue cups) too early.
Fix: You have to burn the slots. Let the Blue cups pour onto the belt. Yes, this will mess up your Cherry art slightly. However, once they are on the belt, you can tap the Red cups you actually need. You will have to recover the score by filling the Sky (Blue areas) perfectly later to compensate for the color bleeding. It's a recovery strategy, not a perfect strategy.
Mistake: Overfilling the Yellow Sand
Symptom: You run out of Yellow sand, but the bottom still looks patchy.
Cause: You poured Yellow sand into the Red cherry areas or the Blue sky areas by mistake.
Fix: Precision is key. Yellow is usually isolated to the bottom strip. If you are running short, you may have accidentally poured Yellow into a corner that was meant for Sky Blue. There is no fix for the current run except to be hyper-precise with your remaining cups. In the next run, focus on the grid boundaries. Look at the pixel art on the canvas—stop pouring the moment the color hits the boundary line.