
Level 476
HARDHow to solve Sand Loop level 476? Get instant solution for Sand Loop 476 with our step by step solution & video walkthrough. Sand Loop 476 tips and guide.
Play Sand Loop Now
Experience the puzzle challenge firsthand
Game Screenshots

Sand Loop Level Guides
Sand Loop Level 476: Complete Walkthrough & Strategy Guide
Understanding the Level Architecture
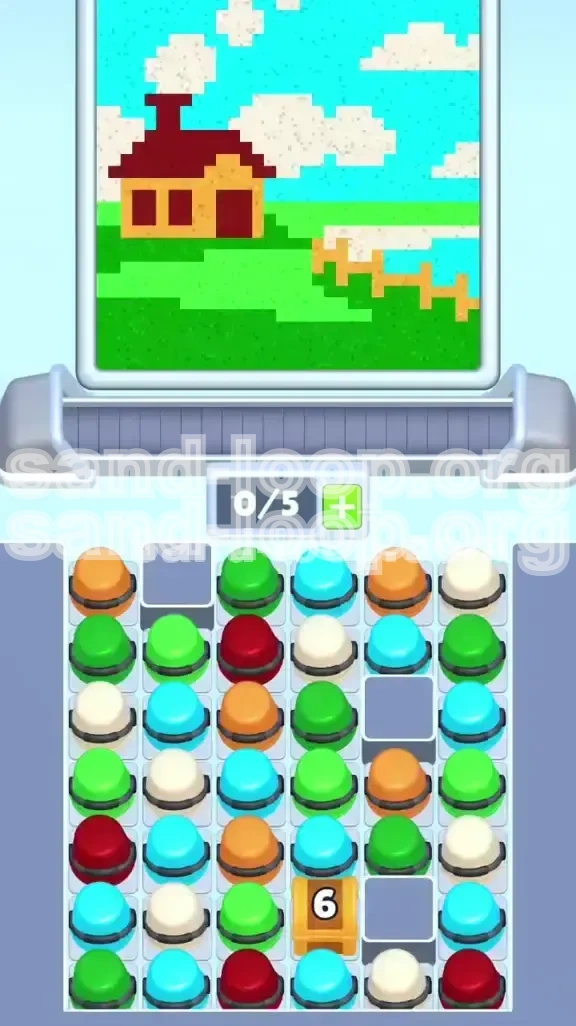
Sand Loop Level 476, titled "The Country House," is a complex logic puzzle that deviates from the standard speed-running levels. Unlike stages where rapid tapping wins, this level requires surgical precision and a strict adherence to build order. The grid is restricted by static Gray Blocks, and your objective is to construct a pixel-art house consisting of grass, walls, a roof, and a sky background. The primary difficulty arises from the sand physics; sand falls from top to bottom, meaning if you fill the sky before building the roof, the "sky" sand will simply fall inside the house, contaminating the lower layers. You are dealing with a 5-color palette: Dark Red (Roof), Orange (Walls/Fence), Light Blue (Sky), Green (Grass), and White (Clouds/Smoke).
Core Objectives and Win Conditions
To clear Level 476, you must achieve three main goals in a specific sequence. First, you must break the 6-Count Golden Chest located in the lower center of the board (Column 4). This chest blocks essential supplies and acts as a bottleneck. Second, you must construct the house from the ground up: Green Grass at the bottom, followed by Orange Walls, then Dark Red roofing. Finally, you must flood the upper background with Light Blue sky and place White cloud elements without polluting the structural colors. Failure to respect the "bottom-up" construction rule will result in color bleeding, making the level impossible to finish.
The Color Priority Hierarchy
Success in this stage depends entirely on the order in which you process colors. This hierarchy is not negotiable. Priority 1 is Green: You must lay a solid foundation of grass to catch any falling debris. Priority 2 is Orange: This forms the walls and the fence; it acts as the container for the roof. Priority 3 is Dark Red: This is the roof cap. Priority 4 is Light Blue: This is the sky and must be used last. Priority 5 is White: Used for details like smoke and clouds, White is volatile and should be handled with extreme caution to avoid clogging your supply queue early on.
The Supply Tray Constraint
You are limited to a 5-slot supply queue. In Level 476, this small space is your biggest enemy. The 6-Count Chest requires you to match 6 pairs of adjacent cups. If your queue is filled with unmatchable Light Blue or White cups while you are trying to find Green or Orange, you will suffer a deadlock. You must constantly cycle cups to ensure you always have active build colors available. Never let your queue fill up with "future" colors (Sky/Clouds) while you are working on "past" layers (Grass/Walls).
Phase 1: The 6-Count Chest Breakdown
Isolating the Target Zone
The level starts with a massive blocker: a 6-Count Golden Chest sitting at the bottom of Column 4. This column is the "spine" of your level. You cannot clear any cups sitting beneath it, and it forces cups above it to stack in dangerous ways. Your first 10-15 moves should be dedicated exclusively to clearing this obstacle. Do not touch cups in the outer columns (1, 2, 6, 7) unless they directly contribute to dropping cups into Column 3, 4, or 5. Focus your vision on the center of the screen.
Managing the "Top Row" Trap
At the start of the game, you will see tempting matches of Light Blue and White cups in the top rows. Ignore them completely. Matching these early serves no purpose other than to flood your queue with colors you cannot use yet. The sky cannot be painted until the house is built. If you match these early, you will fill your tray with Blue/White, and when the Chest spits out necessary Green/Orange cups, you will have no room to catch them, leading to a game over.
Sequential Matching Strategy
Because the Chest requires 6 matches, you cannot rely on luck. You must engineer the drops. Look for "Tower" formations—stacks of cups where matching the base drops the rest. Tap Green and Orange cups in Columns 2 and 3. This shifts the gravity, forcing new cups to slide into position next to the Chest. Every time you make a match adjacent to the Chest, pause and check the new board state. Do not chain reactions automatically; an auto-chain might drop a White cup into a spot where you needed a Red one.
Queue Discipline During the Chest Phase
Maintain a strict rule during this phase: keep 2 slots open at all times. If you have 3 colors in your queue that are not Green or Orange, you must stop matching and wait for the conveyor to refresh. If you fill the queue with useless colors (Blue/White) while the Chest is at 3/6 counts, you will likely fail. It is better to make a slow, calculated match than a fast, chaotic one that clogs your inventory.
Dealing with Blocker Interference
You will notice Gray Blocks on the top left and middle right. These do not affect the Chest directly yet, but they influence how cups fall. Avoid tapping columns directly beneath Gray Blocks unless you are sure the resulting fall will benefit the center columns. Cups often slide off Gray Blocks; use this physics quirk to slide Orange cups towards the center Chest zone if you run out of moves in the immediate area.
Phase 2: Foundation and Wall Construction
Laying the Green Foundation
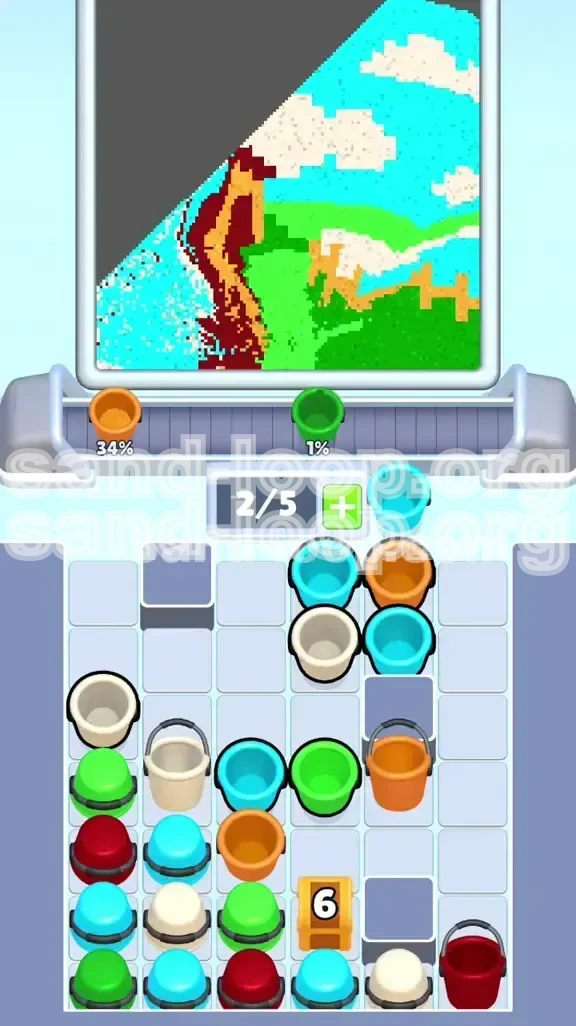
Once the Chest explodes (releasing its loot and clearing the bottom row), your immediate priority shifts to the Green Grass. The grass is the catch-all layer. Any overflow from the roof or chimney will land here. If the base is Orange or Red, a spill of Blue sky looks like a glitch. You must match Green cups aggressively to build a 2-to-3-layer deep floor at the very bottom of the canvas. Prioritize clearing Green from Columns 2 and 6 to create a "U" shape of grass.
Building the Orange Walls and Fence
With the grass laid, shift your focus to Orange. This color forms the main body of the house and the distinctive fence on the right side. The fence is tricky because it has gaps. You must build the Orange walls solidly from the ground up, roughly 4-5 layers high. Do not leave gaps in the walls. If there is a hole in the wall, the Blue sky sand will pour through it later and ruin the grass layer behind the house. Treat Orange as the "container" for the rest of the level.
Navigating the Gray Block Chokepoints
As you clear walls, the Gray Blocks become active obstacles. Specifically, the block in the middle-right can hang up cups, preventing them from dropping to the floor. Do not waste moves digging under these blocks unless you need a specific color. Instead, work on the columns that are unobstructed. Let the conveyor refresh the queue to give you better wall-building options rather than fighting the physics of the blocked zones.
The Rhythm Method
Adopt a rhythm of "Two Orange, One Red." Even though you aren't ready for the roof yet, you need to prepare Dark Red cups in your queue. Send two Orange cups to the belt to build the walls, then let a Dark Red cup sit in the tray. This ensures that when the walls are high enough, you have the roof material ready immediately. Stopping to hunt for Red after the walls are done wastes precious turns and risks filling the queue with Sky Blue.
Preventing the "Avalanche" Mistake
A common error in Phase 2 is creating a steep slope. If the left side of the house is 5 blocks high and the right side is 2 blocks high, sand will slide off. Ensure the top of your Orange walls is relatively flat. A flat platform ensures the Dark Red roof sits evenly and the subsequent sand falls straight down rather than sliding off into unwanted areas.
Phase 3: Roofing and Structural Integrity
Capping with Dark Red
The Dark Red Roof is the most critical structural element. It acts as the seal between the house and the sky. You must apply a solid layer of Dark Red across the top of the Orange walls. Do not be stingy with the Red cups. A single pixel gap in the roof is fatal. When the sky flood comes, even a 1-pixel hole will act as a sieve, pouring blue sand into your living room. Ensure the Red layer is at least 2 cups deep in the center to support the chimney.
Constructing the Chimney
The chimney is a narrow pillar of Dark Red that protrudes into the sky zone. It is vulnerable because it is surrounded by air. When building the chimney, be careful not to knock it over with aggressive tapping. Since it sits atop the roof, ensure the roof beneath it is solid. If the chimney is wobbly, the "smoke" (White sand) you add later might not trigger the correct pixel registration.
Final Checks Before the Sky
Before you touch a Light Blue cup, stop and inspect the board. Tap the "Pause" button mentally. Check every column. Is the grass green? Are the walls orange? Is the roof red and solid? Are there any holes? If you see a hole, fix it now. Once you introduce Light Blue, there is no going back. The Blue sand is heavy and voluminous; it will bury any mistakes you made, making them impossible to fix without restarting.
Queue Management for the Endgame
Transitioning to the sky requires a queue flush. You need to empty your tray of any remaining Green or Orange cups. Ideally, you want to enter Phase 4 with a queue full of Light Blue and White. If you have a stray Green cup left, it will sit in your tray taking up space while you try to flood the sky. Try to burn off remaining ground colors by matching them in non-critical areas or by creating small combos that don't affect the structure.
Stabilizing the Board State
Ensure the board is not "tilted." If the sand is piled higher on the left than the right, the gravity physics will cause the final sky layer to settle unevenly. You want the top of the roof to be a level baseline. If necessary, waste a few turns dropping cups onto the higher side to level it out. A level baseline ensures the sky looks like a flat horizon and not a messy slide.
Phase 4: The Sky Flood and Final Details
Triggering the Sky Flood
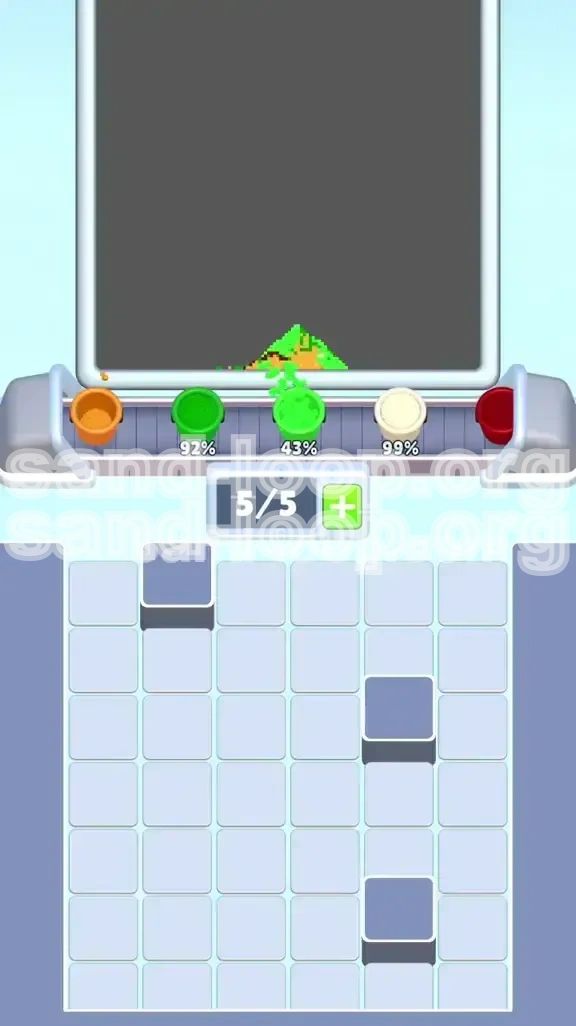
The endgame is a quantity game. The sky requires significantly more sand than the ground. Light Blue is now your best friend. You must flood the conveyor with Blue cups. Do not tap one by one; look for massive combos or clusters of Blue cups high up on the board. Dropping a high stack of Blue cups releases a torrent of sand that fills the sky volume in one go. This is faster and safer than tapping individual cups.
Placing the Clouds and Smoke
White cups are used for the clouds and the chimney smoke. These are delicate details. The chimney smoke is a vertical stack above the Dark Red pillar. The clouds are floating clusters in the blue sky. Do not dump White sand all at once. Pour it carefully. If you dump White too early, it might mix with the Blue on the conveyor belt, turning the sky a muddy light blue or creating pixel noise. Place the smoke first (as it is a narrow target), then flood the rest of the sky.
The Settling Delay
Sand physics involves a settling time. When you pour the final Blue cups, wait a second before tapping the next match. The game needs to calculate the falling pixels. If you tap too fast, you might accidentally clear a White cloud cup that was about to settle into place. Patience in the final 10% of the level prevents "missed pixel" errors that can cost you a star.
Clearing the Final Queue
In the last moments, your goal is simply to empty the board. You will likely have a mix of Blue and White left. Match them anywhere they fit, provided they don't fall into the house structure (which should be sealed by the roof anyway). If the roof was built correctly, the sky sand will harmlessly bounce off the roof and fill the air. Focus on clearing the supply tray completely to trigger the "Level Clear" validation.
Master Tips and Common Pitfalls
Speed Run Strategies
If you are aiming for a high score or fast time, do not wait for the chest to naturally drop good colors. aggressively manipulate the top rows. Create "matches of 3" or higher in the upper columns to force rapid queue cycling. The faster you cycle the queue in the first 30 seconds, the faster you will find the 6 matches for the chest. Do not admire your pixel art; build it fast. The bottleneck is always the chest; the faster you clear it, the faster you win.
Common Mistake: Color Bleeding
The number one reason players fail Level 476 is "Color Bleeding." This happens when you use Sky Blue too early. The blue sand falls behind the house walls, turning the "backyard" blue. This looks incorrect and often prevents the level from recognizing the "Green Grass" objective. Remember: Sky Blue is an *upper layer* only. It must never touch the ground layer until the house is fully constructed between them.
Common Mistake: Ignoring the Fence
On the right side of the board, there is a fence. Many players focus on the main house and forget the fence. The fence has gaps. If you fill the sky before the fence is complete, Blue sand will fill the fence gaps, making it look like a blue gate instead of an orange fence. Ensure the fence posts are filled with Orange before you start the sky phase.
What to Do If You Get Stuck
If you are stuck with no moves and a full queue, look for a "Sacrificial Match." This is a match that doesn't help your build but clears space. Is there a Gray block you can tap to drop a useless cup? Is there a column of useless colors you can match just to clear the tray? Sometimes you have to make a move that feels like a step backward (like removing a piece of wall) just to get the queue moving again. You can always rebuild the wall, but you can't recover from a full queue deadlock.
Understanding the "Dead Zone"
The Gray Blocks are permanent. Do not waste mental energy trying to clear them or wishing they were gone. Factor them into your geometry. If a Gray block is preventing a cup from dropping, that column is effectively "shorter" than the others. Build your wall or roof up to the height of the Gray block, then work around it. Treat the Gray blocks as the "ceiling" for certain parts of your structure.