
Level 477
HARDHow to solve Sand Loop level 477? Get instant solution for Sand Loop 477 with our step by step solution & video walkthrough. Sand Loop 477 tips and guide.
Play Sand Loop Now
Experience the puzzle challenge firsthand
Game Screenshots
Sand Loop Level Guides
Level 477: The Heart Sunset - Comprehensive Walkthrough Guide
Welcome to the ultimate guide for conquering Sand Loop Level 477, known as the "Heart Sunset" challenge. This level represents a significant difficulty spike, moving away from pure reaction speed and into the realm of rigorous logic and resource management. The level features a complex visual overlay—a mountain sunset contained within a heart shape—set against a deceptive green background. Below, you will find a breakdown designed to help you optimize every move, avoid common pitfalls, and secure that three-star victory.
1. Level Overview: The Logic Check
Level 477 is not a race; it is a puzzle. The core challenge lies in the strict limitation of your conveyor belt slots and the interdependency of the items on your supply tray. Unlike previous levels where you might spam taps to clear the board, this level requires a surgical approach.
The visual target is divided into two distinct zones: the massive Green Background and the detailed Heart Sunset. The Heart Sunset is composed of seven specific colors (Green, Purple, White, Pink, Blue, Red, Orange) arranged in vertical layers. The complexity arises because the colors required for the top of the heart (Purple, White) are buried behind obstacles that require colors meant for the bottom of the heart (Orange, Red) to unlock.
2. Strategic Priorities: What to Do First
Your primary objective is to clear the board without causing a "Deadlock"—a situation where your conveyor belt is full, and the only remaining moves are blocked by unprocessed sand or locked crates. To achieve this, you must follow a strict priority list:
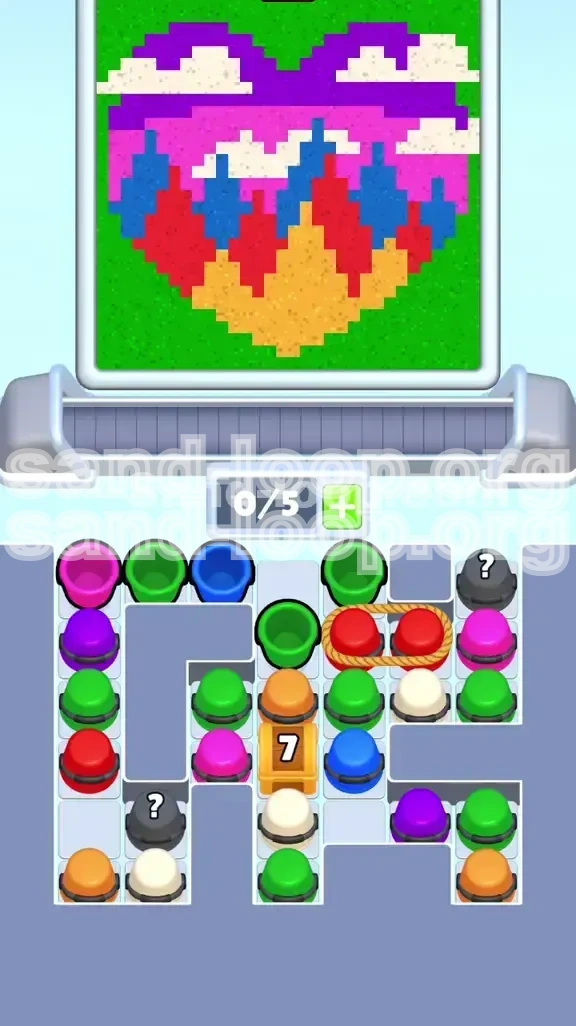
Priority 1: The "7" Crate. The Orange Crate in the center is the bottleneck of the entire level. Nothing else matters until this is destroyed. It blocks essential mid-game colors.
Priority 2: Slot Management. You only have 5 slots. You must never let the belt fill up completely. Always keep 1-2 slots open to handle the inevitable "Roped" cups, which take up double space.
Priority 3: Base Layer Stability. Do not work on the White clouds or Purple sky until the base layers (Orange/Red) and the Green background are partially established. Working top-down creates color bleeding risks.
3. The Supply Tray Analysis
Before you tap a single cup, analyze the board layout. The tray is a trap designed to lure you into making bad moves.
- Center Trap: The "7" Crate sits squarely in the middle. It hides an Orange cup and blocks access to a White cup and a Green cup below it.
- Right Side Risks: The upper right quadrant contains "Roped" Red cups. These are connected pairs. Tapping them consumes two conveyor slots instantly.
- Mystery Cups: There are three "?" cups. One in the lower left, one upper right, and one center-left. These are wildcards. Treat them as space-hazards until you know their contents.
- Green Overload: Green cups are scattered everywhere (top left, bottom right, middle snake). Do not tap them all at once or the belt will clog.
4. Understanding the Color Architecture
The "Heart Sunset" is built in a specific vertical order. Pouring colors out of order will result in layer contamination (e.g., pouring white clouds before the purple sky is ready will waste the white sand). Here is the layer stack from bottom to top:
- Background: Solid Green (fills everything outside the heart).
- Base Tip: Orange (the very bottom point of the heart).
- Mid-Layer: Red and Blue (form the jagged mountain peaks).
- Upper Atmosphere: Pink and Purple (the sunset sky).
- Top Layer: White (wispy clouds cutting through the sky).
Step-by-Step Walkthrough: The Execution Phase
This section breaks down the exact sequence of moves required to dismantle the level's logic. Follow these steps in order. Do not improvise until the crate is destroyed.
Phase 1: The Opening Salvo (Countdown 7 -> 4)
The start of the level is the most dangerous moment because you have zero margin for error. The goal here is to chip away at the "7" Crate counter without clogging your belt with useless colors.
Move 1: Tap the Top-Middle Blue Cup. This is a safe move that contributes to the mountain layer and reduces the crate count to 6.
Move 2: Tap the Top-Left Green Cup. This begins the lengthy process of filling the massive green background. Crate count drops to 5.
Move 3: Tap the Isolated Right Green Cup. Look for the single Green cup on the far right edge, detached from the main stacks. This is a high-efficiency move. Crate count drops to 4.
Analysis: You have now sent 3 cups to the conveyor. The belt is processing. You have exposed the Roped Red cups on the upper right, but you have not touched them yet.
Phase 2: Managing the Doubles (Countdown 4 -> 2)
Now that the crate counter is at 4, you are close to breaking the center block. However, you need to clear space for the next major move.
The Wait: Pause tapping. Watch the conveyor belt. Wait for the Blue and Green sand to pour. You need at least 2 empty slots before proceeding.
Move 4: Tap the Roped Red Cups (Upper Right). Because you waited for empty slots, the two connected Red cups will drop onto the belt safely. They will pour to create the jagged red mountain peaks. This is a critical layer for the heart structure. Crate count drops to 2.
Note: Do not touch the Mystery Cup in the upper right yet. It is a distraction.
Phase 3: The Crate Breaker (Countdown 2 -> 0)
You are two moves away from shattering the Orange Crate. These moves must be precise to ensure the flow continues.
Move 5: Tap the Top-Left Pink Cup. This reveals a Purple cup underneath it. This color is for the upper sky. Crate count drops to 1.
Move 6: Tap the Newly Exposed Purple Cup (formerly under the Pink cup). This is the final hit. The Orange Crate shatters.
Critical Moment: The crate is gone. The Orange cup inside is now free, and crucially, the White and Green cups trapped underneath the crate are now accessible. Do not tap them immediately!
Phase 4: Establishing the Base (Orange & Red)
With the crate gone, the board dynamics change. You must now focus on filling the bottom of the heart while maintaining the Green background.
The Flush: Let the belt clear the Pink and Purple sand. Wait for the conveyor to be completely empty.
Move 7: Tap the Center Orange Cup (from the broken crate). This fills the bottom tip of the heart.
Move 8: Clear the remaining Red Cup (buried in the middle or bottom left). You need to complete the mountain layer before moving to the clouds.
Tip: At this stage, the heart has a solid base (Orange) and mountains (Red/Blue). The background is starting to turn green. You are safe from a "Fail" state for now.
Phase 5: The Green Marathon & White Clouds
The endgame is a resource management test against the massive Green background.
Move 9: Tap the White Cup (formerly trapped under the crate). Since the mountains and sky are mostly done, the White sand will now correctly sit on top of the Blue/Purple layers as clouds.
Move 10+: The Green Grind. Now you tap the remaining Green cups in bursts.
- Clear the bottom-left column (mostly Green).
- Clear the bottom-right stack.
- Clear the center-left Green cup.
Mystery Cup Strategy: When you encounter the "?" cups, tap them only when you have ample space on the belt. If they reveal a color you've already finished (like extra Red), it's wasted space, but it won't kill your run if your slot management is good.
Pro Tips & Common Pitfalls
Even with a plan, things can go wrong. This section covers the finer points of strategy that prevent 90% of failed attempts.
1. The "Slot Economy" Rule
The most common reason players fail Level 477 is filling the 5-slot conveyor belt. When the belt is full, you are helpless. To maintain "Slot Economy," adopt the "Tap 2, Wait 1" rhythm. Tap two cups, then physically lift your finger and watch the belt process for 2-3 seconds. This visual confirmation ensures that you always have a buffer for the next cup.
2. Handling the Roped Reds
Do not tap the Roped Reds early. If you tap them while you have 3 occupied slots, they will take the 4th and 5th slot, instantly locking your board. If the very next cup you need is currently blocked by a full belt, you lose. Always ensure you have 2+ empty slots before cutting the ropes.
3. Avoiding Color Bleeding
Color bleeding happens when a lighter color (like White) is poured onto a belt that is currently processing a darker, contrasting color (like Purple) if the layers aren't ready. However, in this specific level, the issue is usually spatial. If you pour the White cloud cup before the Blue mountain cup has finished pouring, the White might land on the Green background instead of the mountain, looking like a smear. Always pour in vertical layers: Base -> Mountains -> Sky -> Clouds.
4. The "Mystery Cup" Gamble
The three "?" cups are dangerous. If you uncover them and they turn out to be a color you don't need (like a Pink cup when the sky is already full), they become "Junk" cups that waste space. Do not tap Mystery Cups when you have 4/5 slots full. Only tap them when you can afford to take a hit, or when they are the very last items on the board.
5. Dealing with the "Snake" Formation
The middle stack often curves like a snake. The cups here are interlocked. You cannot take the bottom Green cup without clearing the cup above it. Usually, this is a Red or Blue cup. This reinforces the strategy: you must clear the heart colors (Red/Blue) before you can finish the Green background. Do not try to force the Green issue early; you will just get blocked by the heart layers.
Speed Run & Optimization Strategies
Once you have beaten the level and understand the logic, you might want to aim for a faster completion time or a higher score. Here is how the pros do it.
1. Pre-Loading the Belt
Advanced players utilize the "travel time" of the cups. While the first cup is traveling from the tray to the pouring position (which takes about 1 second), you can already tap the next cup. You don't need to wait for the sand to hit the canvas before tapping the next supply item. You just need to ensure the cup has left the tray. This shaves seconds off your time.
2. Batch Processing the Greens
Since the Green background is the largest area by volume (occupying roughly 60% of the screen), you can afford to be aggressive with Green cups once the Heart layers are secure. In the final 20% of the level, stop waiting. Tap all remaining Green cups in rapid succession. The buffer you built up in the early game will absorb this flood.
3. The "Crate Focus" Path
The fastest path to completion focuses 100% on the crate. Ignore the Green cups entirely in the first 5 moves unless they are part of the crate countdown sequence. By strictly funneling your clicks into the center column, you can unlock the main board structure faster, leaving the tedious background filling for the end where it requires less thought.
4. Optimizing the "Roped" Animation
There is a brief animation when ropes are cut. You cannot speed this up. However, you can use this time to scan the rest of the board. While the Red cups are dropping, identify where your next Green cup is coming from. This keeps your mental rhythm flowing and prevents the "where do I look next?" hesitation that ruins speed runs.
Troubleshooting: What to Do When Stuck
Sometimes, despite following the guide, you might end up in a tricky spot. Here is how to diagnose and fix common "Stuck" states.
1. Scenario: The Board is Full, Belt is Full
Diagnosis: You have a Deadlock. The only remaining moves are blocked by cups on the belt.
Solution: There is no solution. You must restart the level. This usually happens because you tapped a Mystery Cup that turned into junk, or you tapped the Roped Reds too late. To prevent this, restart the level and focus on Move 3 (Isolated Right Green Cup) earlier to create more tray space.
2. Scenario: Orange Tip Not Filling
Diagnosis: You poured the Orange cup, but the bottom of the heart is still empty/white.
Solution: This happens if you pour the Orange cup while a Green background cup is pouring. The Orange sand mixes with the Green or lands behind it. You must ensure the belt is clear of Green when you pour the sensitive Orange base layer.
3. Scenario: Running Out of Colors
Diagnosis: The heart looks done, but the background is only 50% green and there are no cups left.
Solution: You likely missed the "Mystery" cups. Go back and check the lower left and upper right corners. Those "?" cups are almost certainly Green or White fillers that you skipped. Ensure you clear the cups blocking them (like the Pink cup in the upper right) to access them.
4. Scenario: The "7" Crate Won't Break
Diagnosis: You have tapped 7 cups, but the crate is still there.
Solution: This is often a visual perception error. The "7" counts the next 7 cups to enter the conveyor queue. If you tapped cups that were already on the belt (which isn't possible) or if the game didn't register a tap. Ensure you are tapping distinct, valid cups. If a cup is "Roped," it counts as two cups towards the counter. (One rope pair usually counts as 2 moves). If you are unsure, just tap the isolated cups again.
5. Scenario: Visual Confusion on Clouds
Diagnosis: The White clouds look like smears or blobs.
Solution: White clouds are the last layer. If you pour them before the Purple/Blue sky is fully rendered, they won't have a dark backdrop to contrast against, making them invisible or messy. Wait until the sky is dark purple/blue before deploying the White cup.