
Level 85
HARDHow to solve Sand Loop level 85? Get instant solution for Sand Loop 85 with our step by step solution & video walkthrough. Sand Loop 85 tips and guide.
Play Sand Loop Now
Experience the puzzle challenge firsthand
Game Screenshots
Sand Loop Level Guides
Level 85 Complete Walkthrough: Mastering the Mountain Sunrise
The Core Challenge Overview
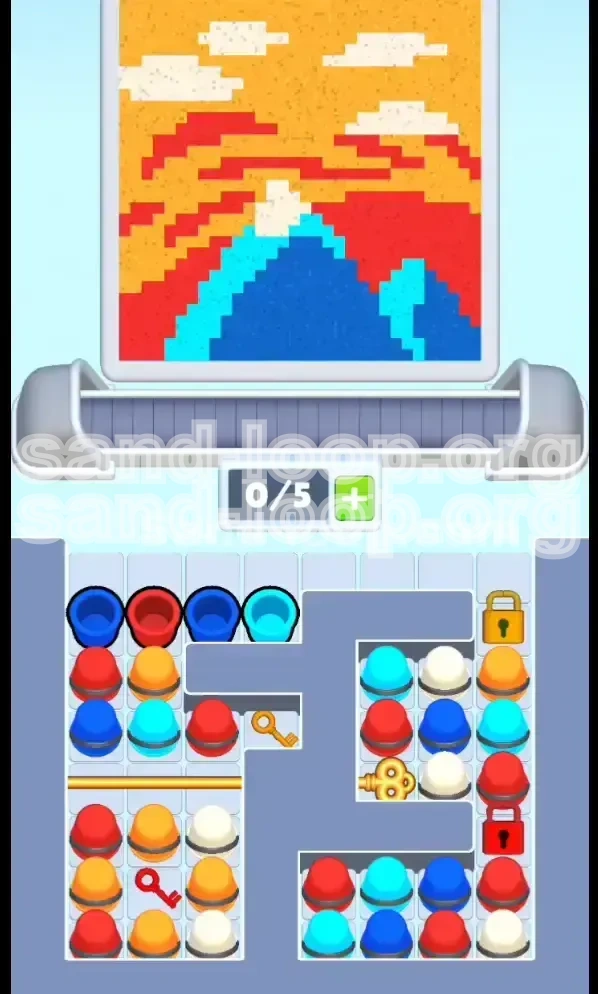
Sand Loop Level 85, titled "The Mountain Sunrise," is a deceptive logic puzzle that prioritizes precision over speed. While the timer ticks, the real threat to your progress is a strict 5-slot tray limit combined with a heavily locked board state. The visual composition—a pixel art representation of a snow-capped mountain against a gradient sunset—masks a complex dependency chain. You cannot simply paint from top to bottom; you must unlock the board in a specific sequence to access the necessary color cups.
Defeating the 5-Slot Limit
The most critical mechanic in this level is your tray capacity. With only five slots available, picking up the wrong cup early can lead to a soft lock, forcing you to restart. The strategy requires a "Just-in-Time" inventory approach. Never hold onto a cup unless the canvas is immediately ready to receive that color. Keeping 2 slots open at all times is a safe rule of thumb, allowing you to grab keys or emergency cups without clogging your workflow.
Understanding the Board Geography
The board is divided into three distinct sectors: the Top Left (Sky supply), the Bottom Left (The Key Trap), and the Right Column (The Vault). The Right Column contains the bulk of your Dark Blue and Cyan cups needed for the mountain, but it is locked behind a Yellow and Red gate. Your initial actions must focus on accessing these keys. If you ignore the keys and focus solely on painting, you will run out of Blue paint long before the mountain is finished.
Visualizing the Masterpiece
Your goal is to construct a scene featuring a massive Red Sun, an Orange mid-sky gradient, a jagged Dark Blue mountain range, Cyan accents, and a White snow cap. The "Mountain Sunrise" is not just a background; it is the blueprint. Understanding the layer order—Sky first, Mountain body second, Snow Cap last—is essential for managing your cup usage and avoiding color contamination.
The Probability Factor
Level 85 introduces a layer of RNG (Random Number Generation) frustration. The cups you need are often buried under colors you don't. Analysis of player data suggests that the "Copper Key" section has a 30% chance of blocking your critical Red cups. You must be prepared to burn "useless" cups to create a path to the essentials, ensuring your flow isn't interrupted by a blocked stack.
Strategic Objectives: How to Clear the Stage
Phase 1: The Sky Initiation
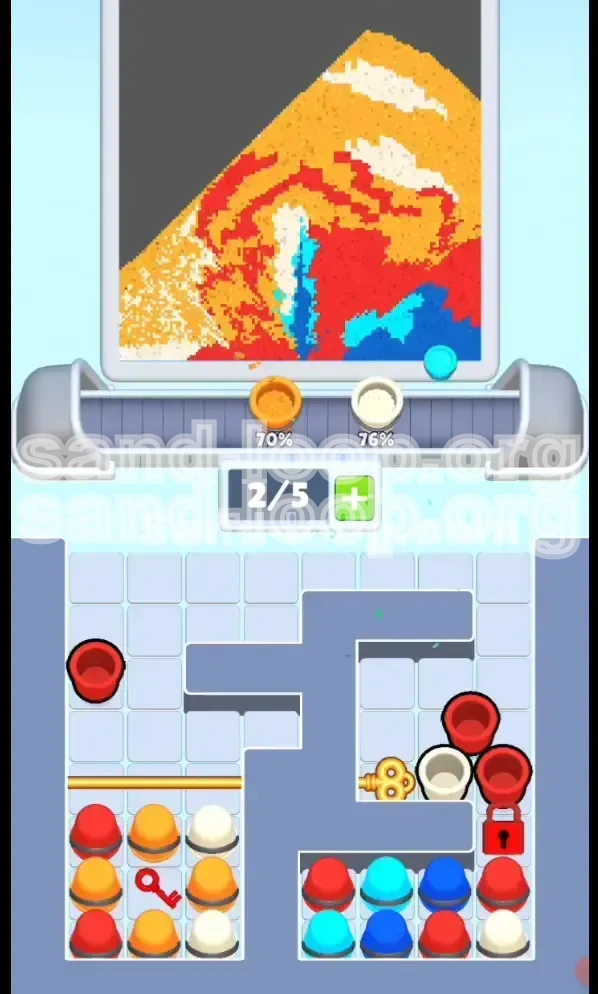
Your immediate objective is to clear the upper canvas. The Red and Orange zones are the most extensive areas, covering approximately 40% of the total pixel count. Clearing this section serves a dual purpose: it completes the visual top layer and, more importantly, burns through the Red and Orange cups blocking your access to the essential keys in the Top Left sector. You cannot progress to the mountain until the sky is settled.
Phase 2: The Key Retrieval Mission
The middle phase of the level is an inventory management game. You are not painting; you are digging. Your objective is to locate and secure three specific items: the Copper Key, the Red Key, and the Golden Key. These items are buried under specific cup stacks. Retrieving them unlocks the Right Column, which holds the majority of the Blue and Cyan cups required for the mountain terrain.
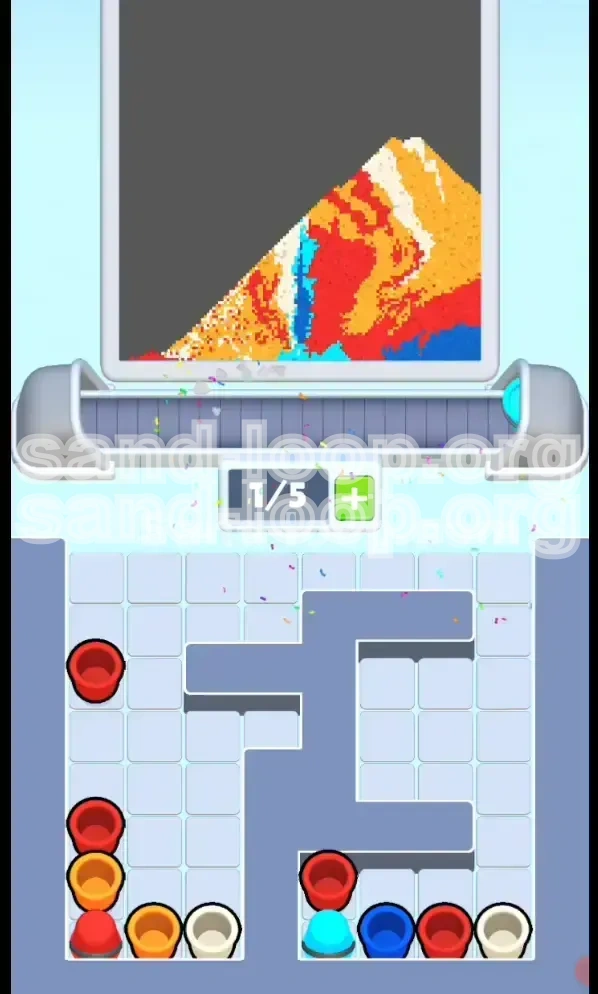
Phase 3: The Mountain Construction
Once the Right Column is unlocked, the objective shifts to high-frequency painting. The mountain requires a rapid alternation between Dark Blue and Cyan. Unlike the broad strokes of the sky, the mountain requires precision. You must alternate colors frequently to match the jagged pixel pattern, all while ensuring you don't run out of tray space for the accumulating White cups needed for the summit.
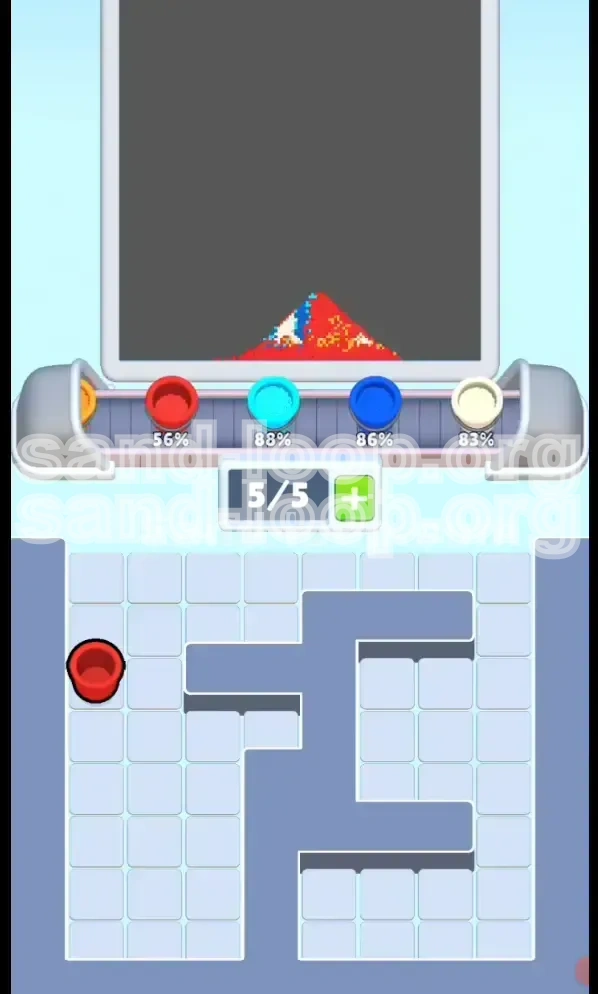
Phase 4: The Summit Polish
The final 10% of the level is the most dangerous. The White Snow Cap and the floating clouds must be filled last. If you introduce White paint too early, it will mix with the Blue mountain or Red sky, creating a muddy gray that ruins the definition. You must reserve exactly 1 or 2 tray slots for White cups until the very end of the sequence.
Phase 5: Clean Sweep
After the visual masterpiece is complete, the board is often left with straggler cups—specifically excess Cyan or Orange pieces that didn't fit the tray earlier. Your final objective is to clear the board completely. This requires methodical emptying of your remaining tray slots to pick up the last few cups, ensuring 100% completion for the bonus score.
Optimal Processing Order: The Logic Chain
Priority 1: The Red Gradient
Always start with the Red cups. The Red sensors at the top of the canvas trigger the most significant state change. Furthermore, the Red cups are physically blocking the Copper Key in the top left. By feeding Red into the mixer immediately, you simultaneously advance the art and clear the physical obstruction on the board. Do not touch Blue or White yet.
Priority 2: The Orange Transition
Once the Red sensors are dampened, shift immediately to Orange. The Orange zone acts as a bridge between the Red sky and the Blue mountain. Processing Orange early helps clear the Bottom Left cluster, revealing the Red Key. Treat Red and Orange as a single "Sky Phase" unit—handle them before you even think about the mountain.
Priority 3: The Cyan Weave
This is where it gets tricky. The Cyan color is not a block; it is a weave within the Dark Blue mountain. You must process Cyan *intermittently* with Blue. The correct order is usually: Dark Blue (base), Cyan (highlight), Dark Blue (shadow). Do not queue up multiple Cyan cups in a row, or you will miss the Dark Blue sensors and jam the nozzle.
Priority 4: The Dark Blue Base
The Dark Blue is the "meat" of the level. It consumes the most cups after the sky. The strategy here is "Bulk Processing." Once the Red Key unlocks the right side, you should aim to fill 3 slots with Dark Blue and keep 2 slots flexible for Cyan interruptions. This maintains a steady flow for the large dark areas of the mountain.
Priority 5: The White Finish
White is the "Boss Key" of the colors. It is the most sensitive. White is required for the clouds (high altitude) and the snow cap (low altitude). The game's sensors are very strict about White placement. Only process White when the sky is 100% finished and the mountain is 95% finished. Premature White deployment is the number one cause of failure in the final stretch.
Emergency Order: The Key Dig
If the board is locked and the mixer isn't asking for the color you have, your priority shifts to "Digging." If you have full slots but the mixer wants a color you don't have, you must "burn" cups by discarding them into the mixer (even if they aren't a perfect match) or strategically placing them to clear a path to a Key. The keys always take precedence over perfect painting efficiency.
Detailed Walkthrough: Step-by-Step Instructions
Step 1: Initial Assessment and Tray Setup
When the level loads, pause for three seconds. Scan the board for the location of the Copper Key. It is almost always located in the top-left quadrant, buried under one Red cup and one Blue cup. Fill your tray with 2 Red cups from the accessible areas. Do not pick up the Blue cup yet, as it will waste a slot that you need for the incoming Orange flow. Your starting tray configuration should aim for: Red, Red, (Empty), (Empty), (Empty).
Step 2: Unlocking the Copper Gate
Begin dispensing the Red cups into the top sky sensors. As the Red paint flows, the game will likely trigger an Orange request. Check the Top Left area again. The stack covering the Copper Key should now be disturbed. If the key is exposed, tap it immediately. If it is still covered by a Blue cup, check your tray. If you have space, pick up the Blue cup, drop it into a non-critical area (or hold it if the mixer asks), and grab the Copper Key. This opens the Bottom Left gate.
Step 3: The Bottom Left Key Trap
With the Copper Gate open, the Bottom Left cluster is accessible. You will see a 3x3 grid of cups. You need the Red Key located here. However, the mixer is likely demanding Orange for the mid-sky. Look at the cups in this cluster. Pick up the Orange cups first to satisfy the mixer. This "burns" the stack away. Once the Red Key is revealed, clear your tray until you have space. Grab the Red Key. This unlocks the massive Right Column.
Step 4: The Golden Key Obstacle
Now look at the Middle Right. The Golden Key is visible, likely buried under a White and a Cyan cup. This is a critical choke point. The mixer might be asking for White (for clouds), but you shouldn't use it yet if the mountain isn't started. However, to get the Golden Key, you might need to move that White cup. Strategy: If the mixer asks for Cyan, pick it up. If it asks for White, hold off if possible, or use it only on the very top cloud pixels. Clear the cups until the Golden Key is free, then pick it up to unlock the Yellow Lock at the top right.
Step 5: The Mountain Rush (Blue and Cyan)
The board is now fully open. The Right Column pours out a supply of Dark Blue, Cyan, and Orange. The sky (Red/Orange) should be 80% done. Shift your focus entirely to the bottom center. Fill your tray with 3 Dark Blue and 2 Cyan cups. Alternate your tapping: Dark Blue -> Cyan -> Dark Blue. Watch the pattern closely. If you see a "blob" of Cyan, use two Cyan cups. If you see a line of Blue, use two Blue. Keep the rhythm steady. Do not let your tray fill up with 5 Blues; you will fail to weave the Cyan highlights.
Step 6: The Snow Cap and Final Cleanup
As the mountain body fills, the game will stop asking for Blue and Cyan. It will shift to White. Now, go back to the Right Column or any remaining White cups in the middle. Fill your tray with White. Apply it to the snowy peak and the final clouds. Once the art is complete, check the board for remaining cups. You will likely have leftover Cyan or Orange pieces. Clear your tray of the remaining White paint (usually by finishing the last pixel) and then systematically pick up the remaining trash cups to empty the board.
Pro Tips and Common Mistakes
Mistake #1: The Early White Pickup
The most common error in Level 85 is picking up the White cups for the Snow Cap too early. The White cups are often located near the keys in the middle of the board. Players instinctively grab them. However, the mixer will not trigger White paint until the Red and Blue sections are nearly fully rendered. If you hold White cups, they take up valuable slots needed for the Red/Blue/Cyan flow, causing a deadlock. Leave White alone until the endgame.
Mistake #2: Ignoring the Sky-Mountain Dependency
Do not try to paint the mountain while the sky is still mostly empty. The game's logic is programmed to prioritize background layers (Sky) before foreground layers (Mountain). If you have a tray full of Blue but the game is asking for Red, you are stuck. You must adhere to the background layering. Finish the Red/Orange gradient first to ensure the mixer shifts its "attention" to the mountain layer.
Mistake #3: The "Cyan Snake" Jam
In the Mountain section, the Cyan color creates a snake-like pattern. A frequent mistake is queuing up 3 or 4 Cyan cups in anticipation. The sensor, however, often demands single Cyan strokes separated by large Dark Blue patches. If you queue too much Cyan, you block your slots. You must pick up Cyan, paint one segment, and immediately go back to Dark Blue to keep the flow moving.
Mistake #4: Wasting the Key Slots
When a Key is exposed, the game does not automatically pause to let you pick it up. If your tray is full (5/5), you cannot grab the key. Many players die with the key visible because they were holding 5 Red cups. Always keep 1 slot open when you are close to unlocking a gate. If you are at 5/5 and a key is exposed, immediately burn a cup into the mixer, even if it's not a perfect color match, to free up the slot for the key.
Tip: Use the "Tap and Hold" Technique
When clearing the large sections of the Red Sky or the Dark Blue Mountain, use the "Tap and Hold" method (if your version supports it) or rapid tapping. Do not wait for the sand to finish flowing perfectly. As soon as the color hits the minimum threshold, you can switch gears. This speed is vital for clearing the board before the timer becomes a threat, although in this level, deadlock is a bigger threat than time.
Tip: The Right Column is Your Bank
Treat the Right Column as your "Bank." Once it is unlocked, it has the highest density of cups. Do not pick up cups from the Top Left or Bottom Left once the Right Column is open, unless absolutely necessary. Clear the outer sections first, then rely on the rich supply of the Right Column to finish the level. This minimizes the time spent scanning the board and keeps your tray stocked with the colors you actually need.
Advanced Tactics: Stuck Solutions & Speed Run
Solution: I'm Locked Out and the Mixer is Silent
If you find yourself with no valid moves and the mixer isn't asking for anything, you are in a "Key Deadlock." The game is waiting for you to unlock a sector. Look for the "Keyhole" icon on the screen overlay—it usually points to the cluster you need to clear. If you have no keys and see no locks, you might have missed a cup hidden under another. Zoom in (if possible) or tap blindly on the stacked areas to dislodge a hidden cup.
Solution: Tray Full of Useless Colors
You have 5 slots, but they are filled with Blue, and the game wants Red. You cannot reach the Red cups. The solution is the "Trash Burn." Look at your current cups. Is there *any* pixel on the canvas that matches them? Even a tiny dot? If yes, paint it. If no, you are forced to restart. However, you can usually find a tiny pixel of Blue in the sky mountains or a tiny pixel of Red in the foreground rocks to "dump" the cup and free a slot.
Solution: The "Invisible Cup" Glitch
Sometimes in Level 85, a cup appears to be invisible or blocked by the UI. If you know a key is supposed to be there but can't click it, try tapping the area just below the key icon. Sometimes the collision box is larger than the graphic. If that fails, rapidly tap the center of the locked area to force a refresh of the stack rendering.
Speed Run Tip: The 2-2-1 Tray Rhythm
For speed runners, the optimal tray management is the "2-2-1" method. Keep 2 slots for your primary color (e.g., Red), 2 slots for your secondary color (e.g., Orange), and 1 slot empty for Keys or emergency swaps. Never hold 3 of the same color unless you are 100% sure of the next 3 moves. This rhythm ensures you can adapt to the sensor changes instantly without pausing to dump cups.
Speed Run Tip: Pre-Loading the Right Column
As soon as the Red Key is collected, the Right Column unlocks. Don't wait for the current stack in the mixer to finish to look at the new column. Immediately scan the newly revealed cups. If you see Dark Blue, and your current task is finishing the last bit of Red, tap the Dark Blue cup *just before* the Red finishes. This queues it up, saving precious seconds in the transition between the Sky phase and the Mountain phase.
Speed Run Tip: Ignoring the 100% Cleanup
If you are strictly going for time and not score, ignore the final cleanup of straggler cups once the art is 100% complete. The game often registers the level as "done" visually before the board is physically empty. However, in most versions of Sand Loop, you must clear the board. If you must clear it, focus on the largest clusters first (the Right Column remains) and leave the singletons for the very last millisecond.