
Level 98
HARDHow to solve Sand Loop level 98? Get instant solution for Sand Loop 98 with our step by step solution & video walkthrough. Sand Loop 98 tips and guide.
Play Sand Loop Now
Experience the puzzle challenge firsthand
Game Screenshots
Sand Loop Level Guides
Level Overview: The Tropical Sunset Bottleneck
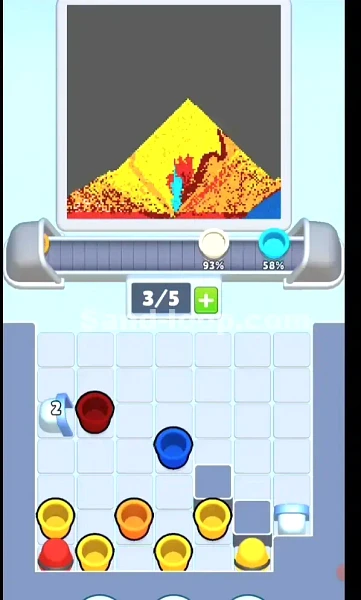
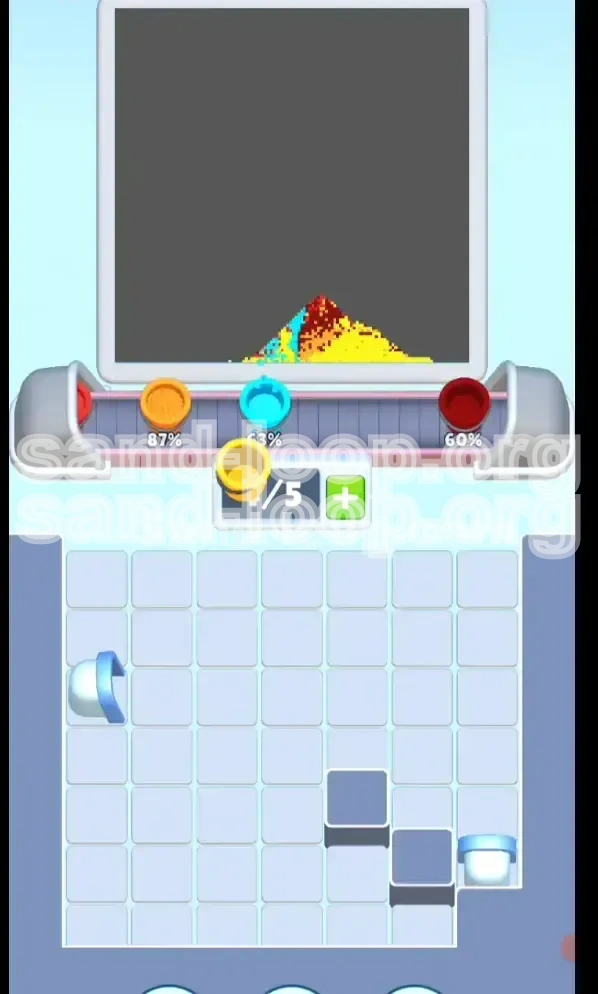
Level 98 of Sand Loop presents a deceptively beautiful challenge: a classic pixel art depiction of a Tropical Sunset. While the visual target—a vibrant yellow sun setting over a blue ocean framed by dark red palm trees—seems inviting, the level itself is a rigorous test of inventory logic and bottleneck management. Unlike previous levels where reflexive tapping might suffice, Stage 98 is a strict Logic Puzzle. The board is mechanically bisected by a Gold Key bar, creating a physical separation between your "cool" water colors (Cyan/Blue) and your "warm" sun colors (Yellow/Orange/Red).
This level introduces a high-stakes inventory crisis. The player begins with immediate access to the water colors but must execute a precise sequence of moves to unlock the basement reservoir containing the sunset colors. Failure to manage the limited slot economy during the transition phase will result in an immediate deadlock, forcing a restart. Understanding the physical mechanics of the Gold Key and the scarcity of the Red resource is essential for success.
Clear Objectives: Breaking the Lock
Objective 1: Establish a Rhythm with the Cool Tones
Your primary task in the first phase is not just painting the water, but clearing the vertical stack to access the board's internal mechanics. You must clear the top layers of Cyan and Blue cups efficiently. This serves two purposes: it completes the bottom half of the artwork (the ocean) and, more critically, removes the physical pressure keeping the Gold Key mechanism locked.
Objective 2: Shatter the Ice Blockers
The right side of the board features two Ice Counters. You cannot ignore these. Your secondary objective is to generate enough successful pours to lower these counters. Specifically, you must aim to reduce the Blue Ice (5) and the Red Ice (20) to zero. These blockers are strategically placed to prevent you from accessing the specific colors needed for the level's climax.
Objective 3: Retract the Gold Key Bar
This is the pivotal moment of the level. You must clear the specific cups occupying the key's trigger point. Until this horizontal bar retracts, the warm colors (Yellow, Orange) are physically trapped at the bottom of the screen and cannot enter the playing field. You must focus fire on the center-right section of the upper stack to free this mechanism.
Objective 4: Execute the Color Pivot
Once the key retracts, the board dynamic shifts instantly. Your objective changes from processing Blue/Cyan to managing a massive influx of Yellow and Orange. You must quickly clear the backlog of warm colors to paint the sun and sky without causing a belt overflow.
Objective 5: Secure the Scarce Red Resource
The final objective is the precise delivery of the Dark Red cups. Because there are very few of these, and they are locked behind the highest ice counter (20), you must ensure a clear path for them when they finally unlock. Missing the narrow window for the Red cups will result in a failed stage.
Step-by-Step Instructions: The Top-Down Protocol
Phase 1: The Water Foundation (Moves 1-15)
Begin the level by immediately tapping the Cyan and Blue cups located at the very top of the stack. Do not try to save these colors; the bottom of the canvas requires a significant amount of blue paint. By tapping these out, you allow the stack to settle. Keep a rhythm of approximately one tap per second. Ensure your belt capacity hovers around 2/5 to 3/5 full to prevent clogging, but do not let it run empty.
Phase 2: Targeting the Blue Ice (Move 16+)
As you clear the top layers, keep an eye on the right side of the screen. You will notice a Blue cup trapped behind a "5" Ice Counter. Every cup you successfully send to the belt reduces this number. Once the counter hits zero, the ice shatters. Immediately tap this newly freed Blue cup. It is often sitting directly on top of the mechanism needed for the next phase.
Phase 3: The Gold Key Maneuver
With the top layers cleared and the side ice shattered, look for the Gold Key bar in the middle of the stack. You will see specific cups blocking the keyhole. Do not tap randomly. Focus only on the cups in the center-right column that are physically resting on or near the key mechanism. Clearing these specific cups will trigger the animation that retracts the bar.
Phase 4: The Great Sunset Shift
The moment the Gold Key retracts, the "basement" opens. A large cache of Yellow and Orange cups will slide up to replace the depleted Blue stack. Immediately stop tapping any remaining Blue cups unless they are blocking a Yellow cup. Shift your focus entirely to the Yellow cups. The Sun is the largest object in the painting and requires the most paint. Alternate Yellow and Orange taps to match the sky gradient requirements.
Phase 5: The Red Cup Countdown
While painting the sun, you are simultaneously reducing the Red Ice Counter (20). By the time the sun is roughly 80% complete, this counter should be nearing zero. When the Red cup unlocks, assess your belt immediately. If the belt is crowded, pause briefly to let it clear. You must tap the Red cup when there is a clear lane to the dispenser.
Color Order Analysis: Strategic Processing
The "Cool" Priority: Cyan and Blue
Why Blue first? It is not just about the art; it is about stack physics. The game forces you to process Blue because these cups are physically on top. Attempting to access Yellow before the Gold Key is removed is impossible. Accept this order. The Blue cups are abundant and serve as the "fuel" to power the ice counters needed to unlock the rest of the board.
The "Warm" Priority: Yellow and Orange
Once the gate opens, Yellow becomes your highest priority. The Sun in the center of the canvas covers roughly 40% of the total pixel area. Orange is secondary, used for the sky gradient surrounding the sun. If you have a choice between a Yellow cup and an Orange cup, always choose the Yellow cup first to avoid running out of belt space for the larger color block.
The "Critical" Priority: Dark Red
Dark Red is the bottleneck color. It is used for the Palm Trees, which are thin, vertical, and detailed. Unlike the broad strokes needed for the sun or water, the trees require precision. The Red cup has the lowest drop rate and is locked behind the highest timer (20). Its position in the processing order is dead last for a reason: it must be poured exactly when the belt is ready to handle it, or it will slip by and clog the queue.
Key Tips and Notes
Manage Your Slot Economy
The belt has a finite capacity (usually 5 slots). A common error is treating the belt like a dump truck. Instead, treat it like a production line. If you fill all 5 slots with Blue right before the Gold Key opens, you won't have room for the sudden influx of Yellow, causing a jam. Try to keep 1 slot open as a buffer when you are close to unlocking the key.
The "Belt Watch" Strategy
Do not stare solely at the cup stack. Split your attention 50/50 between the stack and the conveyor belt at the bottom. If you see a Red cup approaching the dispenser but the current paint color is wrong, you may need to pause tapping to let the belt reset. Knowing where your active cup is on the belt is as important as knowing which cup to tap next.
Understanding Ice Counter Math
The Ice Counters are not random; they are balanced against the level's requirements. The Blue Ice (5) is low because you need to access the lower stack early to get started. The Red Ice (20) is high because you need time to paint the ocean and sun *before* the trees arrive. Don't panic about the high number; just focus on the flow and it will naturally decay as you play.
Visualizing the Bottleneck
Imagine the board as an hourglass. The top (Blue) must flow through the middle (Gold Key) to reach the bottom (Red). If you dump the top too fast, the middle clogs. If you tap the top too slow, you run out of time. Maintain a steady, medium tempo rather than bursts of speed.
Common Mistakes to Avoid
The "Premature Sunrise" Error
Many players see the Yellow cups peeking out from the bottom and try to tap them before the Gold Key is gone. This is impossible. Attempting to tap locked cups wastes time and breaks your rhythm. Wait for the mechanical "clunk" sound and the bar's disappearance before shifting your target to the warm colors.
The "Frozen Red" Panic
Seeing the Red cup locked behind a "20" counter can induce panic, causing players to tap wildly on Blue cups to lower the number. This usually leads to a belt overflow. Do not rush the ice counter. It is tied to your natural progression. Play your normal game, and the counter will reach zero exactly when you are ready for the Red cup.
Ignoring the Stack Physics
Sometimes, tapping a cup on the left side of the stack can cause a cup on the right side to slide into a position where it blocks the key mechanism. Always tap in a way that clears the center column first. If you clear the edges first, you might leave a "tower" in the middle that blocks the key's removal, forcing you to tap wasteful moves to fix it.
Over-filling the Belt During Transition
The most dangerous moment is when the Gold Key opens. The stack drops, and new cups become available. If you have 4 Blue cups on the belt and you immediately add 2 Yellow cups, the belt is full. If the dispenser needs to pour Blue for the remaining water but you are feeding it Yellow, you create a "color deadlock" where the belt is full of the wrong color.
Stuck Solutions and Recovery
Solution: "Belt Lock" Recovery
The Problem: The belt is full of cups, but none of them are matching the current sand dispenser color. The queue isn't moving.
The Fix: Stop tapping completely. Watch the belt. As the dispenser rejects the wrong colors, they will fall off the end of the belt. Once the wrong color is gone, the dispenser will cycle to the next color in your queue. Wait for the match before you tap another cup. Patience breaks the deadlock.
Solution: "Missing Red" Recovery
The Problem: You unlocked the Red Ice, but you missed the window to tap it, and it's buried under new Yellow cups.
The Fix: You must prioritize clearing the Yellow cups burying the Red one. Even if you don't need more Yellow paint, tap the Yellow cups to send them to the belt to free the Red cup underneath. You can "over-paint" the sun to save the Palm Trees. It is better to waste a bit of Yellow than to lose the game because the Red cup was inaccessible.
Solution: "Key Jammed" Recovery
The Problem: You've cleared the top layer, but the Gold Key won't retract.
The Fix: Look closely at the corners of the Gold Key bar. Sometimes a single small cup is wedged in the mechanism. You may need to tap a cup that seems slightly off-center to make the whole stack shift sideways. Look for the "tilt"—often one side of the stack is higher than the other; tap the high side to level it out and trigger the key.
Speed Run Tips: The Fast Track
The "Pre-Load" Technique
As the Red Ice counter is ticking down (e.g., at 18 or 17), start clearing your belt of all Blue and Yellow cups. Try to have an empty belt or just 1 cup right as the counter hits 20. This allows you to grab the Red cup the instant it unlocks and send it directly to the dispenser without waiting for other cups to clear the line.
Combo Tapping the Ice
The Ice Counters decrease with every successful tap, not just every color match. Therefore, speed is the key to breaking the ice. During the Blue phase, tap as fast as you can accurately manage. The faster you clear the Blue cups, the faster the Ice breaks, and the sooner you get to the high-volume Yellow phase which is easier to clear quickly.
Predictive Stacking
Learn the "drop pattern" of the cups. In this level, cups tend to slide toward the center. You can predict that tapping a left-corner cup will likely feed a center cup. Use this to set up "combos" where tapping one cup automatically aligns the next one you need, allowing you to maintain a continuous tapping rhythm without pausing to think.