
Level 99
HARDHow to solve Sand Loop level 99? Get instant solution for Sand Loop 99 with our step by step solution & video walkthrough. Sand Loop 99 tips and guide.
Play Sand Loop Now
Experience the puzzle challenge firsthand
Game Screenshots

Sand Loop Level Guides
Sand Loop Level 99 Master Guide: Synthwave Sunset Logic
Welcome to the retro-future landscape of Level 99. This stage is a significant difficulty spike, designed to test your ability to manage a strict supply chain under pressure. Unlike previous levels where you could simply match colors aggressively, "The Synthwave Sunset" requires the precision of a logic puzzle. You are not just painting; you are excavating resources from a frozen supply tray to create a piece of art. This guide will break down the exact color sequence, resource management strategies, and ice-breaking logic you need to achieve a three-star finish without getting stuck in a deadlock.
The Core Challenge: Constrained Logistics
The fundamental difficulty of Level 99 is the "Slot Choke." You are limited to 5 active slots on your conveyor belt. The supply tray is overloaded with Pink cups, which are the least valuable resource for the first half of the level. If you blindly pull cups, you will fill your slots with Pink, blocking access to the critical Purple cups underneath. This stage is about 70% resource management and 30% painting accuracy.
Visualizing the Target Canvas
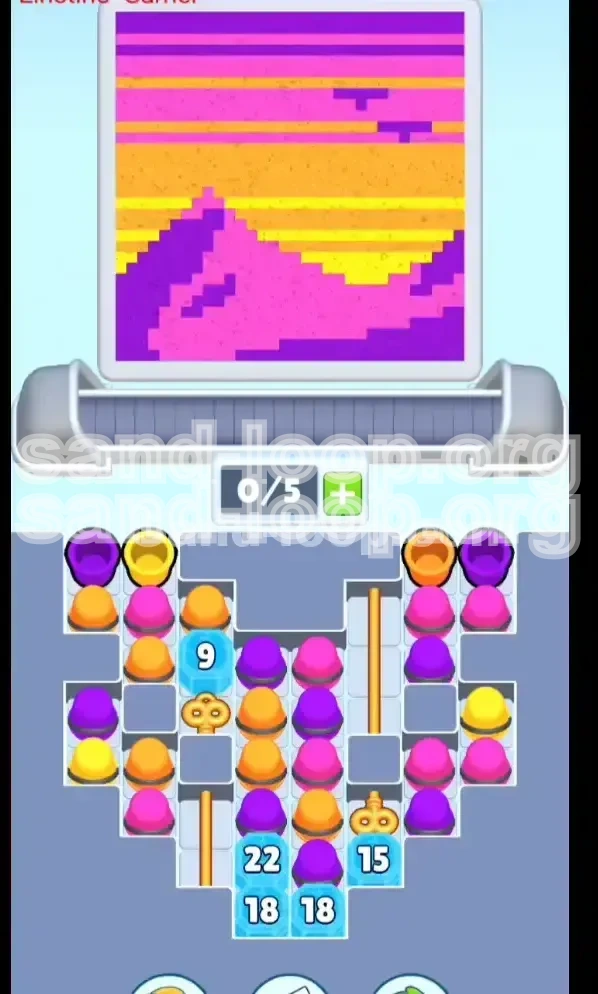
Your objective is to paint a vaporwave landscape featuring three distinct zones: a jagged mountain range at the bottom (Deep Purple), a retro-sun in the middle (Hot Pink/Orange), and a striped upper sky (Yellow/Orange). The physical properties of the sand simulation mean that sand poured later will settle on top of sand poured earlier. Therefore, you must paint from the bottom up (Mountains -> Sun -> Sky) to ensure the layers are correctly ordered. If you start with the Yellow sky, the Purple mountains will cover it up later.
The Supply Chain Layout
Your resources are buried under specific "Ice Blocks" with HP values. The top row is accessible but mostly clutter. The Left Key is trapped under Blue Ice (9 HP). The Right Key is trapped under Blue Ice (15 HP). The bottom reserves—your endgame fuel for Orange and Yellow—are sealed behind massive Ice Blocks (22 HP and 18 HP). Understanding this vertical stratification is key to planning your moves.
Winning Conditions
To complete the level, you must fill the "Fill Meter" to 100% while maintaining a clear conveyor belt. The level ends prematurely if the conveyor jams full for more than a few seconds. Success requires balancing the rate of consumption (pouring sand) with the rate of acquisition (pulling new cups).
Step-by-Step Phase Walkthrough
We will divide the level into four distinct phases. Do not move to the next phase until the current objective is met.
Phase 1: The "Trash" Clearing & Key Excavation
Your immediate goal is not to paint perfectly, but to clear the top layer of the supply tray to access the keys. The tray is choked with Pink cups, which you must use strategically.
- Action: Pull Pink cups first. Do not pull Purple yet.
- Targeting: Pour Pink into the small "jagged" areas of the upper mountain peaks and the lower sky strip.
- Ice Breaking: Focus your matches on the Left Blue Ice Block (9 HP). It requires fewer matches than the right block.
- Slot Management: Keep 2 slots open at all times. If the Left Key drops, you need space for it to spawn without causing a jam.
- Trigger: Collecting the Left Key usually unblocks the mid-tier supply tray, revealing the Deep Purple cups.
Phase 2: Establishing the Purple Foundation
This is the most critical phase. If you mess up the Purple base, the entire painting looks muddy. You must secure the "floor" of the image.
- Switch Colors: Once the Left Key is collected, immediately switch to Deep Purple.
- Pouring Logic: Load 3 Purple cups. Pour them steadily into the bottom center of the canvas.
- Visual Check: Watch the sand pile. It needs to rise up to form the silhouette of the mountains. Do not let it overflow into the "Sun" area yet.
- Purple Percentage: Roughly 40% of your total sand volume should be Purple. Do not stop pouring until the mountain range is solid and connected.
- Warning: Avoid mixing Orange into the Purple. If they mix on the canvas, you get a dirty brown color that fails the aesthetic check.
Phase 3: The Sky Striping & Sun Gradient
With the mountains locked in, you move to the middle layer. This requires alternating colors to create the "Synthwave" gradient.
- Sequence: Follow this strict order: Orange -> Pink -> Yellow.
- The Sun: Pour a thick band of Orange directly above the Purple mountains. This is your setting sun.
- The Highlights: Switch to Pink. Pour thin strips over the upper edges of the Orange sun to create the "glow" effect.
- The Upper Sky: Use Yellow for the very top stripes. This provides the high contrast needed for the vaporwave look.
- Gap Control: Leave a 1-second gap between switching colors. If you pour Pink while Yellow is still settling, they blend into a wash-out white.
Phase 4: The Endgame Ice Break
You will likely run out of standard colors at 80% completion. The final 20% requires forcing the bottom tray open.
- The Crisis: You will be low on slots. You must make a choice: jam the belt or break ice.
- Target: The Bottom Ice Wall (22/18/18).
- Technique: Look for "Cluster Matches." Do not waste moves on single cups. Only make matches that physically touch the bottom ice blocks.
- Priorities: Break the 22 HP block first. It usually holds the bulk of the remaining Yellow/Orange mix needed for the sky.
- Final Push: Once the ice breaks, flood the canvas with the remaining colors. At this stage, speed matters more than precision.
Understanding the Color Dependency Logic
Level 99 operates on a strict hierarchy of needs. Understanding which color "owns" which part of the canvas prevents you from wasting resources.
Deep Purple: The Anchor
Purple is the heaviest color in this palette. It forms the base layer. If you try to apply Purple last, it will bury your delicate Yellow sky lines. Rule of Thumb: Purple must be applied until the "Fill Meter" reads at least 35-40% before you touch Orange or Yellow. This ensures the mountain silhouette is tall enough to support the sky elements.
Hot Pink: The Bridge
Pink serves two functions: clearing the initial trash cups and creating the mid-tone gradient. Pink is the only color that can safely touch both Purple (for highlights) and Orange (for the sun glow) without causing a color clash. Use Pink to smooth the transition between the dark mountains and the bright sun.
Orange: The Volume Filler
Orange occupies the largest middle section of the canvas. Because it covers such a wide area, you will consume more Orange cups than any other color (except Purple). Ensure you have "unlocked" the Right Key (Ice Block 15) before you commit to a heavy Orange pour, or you will run dry halfway through.
Yellow: The Fragile Accent
Yellow is the "fragile" state. A little bit goes a long way. Because Yellow is so light, pouring it too early results in it being overpowered by the heavier Purple and Orange sands. Save Yellow for the very last 15% of the painting process to keep the colors crisp and bright.
Key Tips for Supply Management
Your biggest enemy in Level 99 is the "Frozen Supply." Here is how to keep the resources flowing.
The "Slot Buffer" Strategy
Never fill all 5 slots unless you are 100% sure of the next 3 moves. Always keep 1 slot empty as a "Buffer." This buffer catches the new cups that fall when you break an Ice Block. If you have 5/5 slots full and break an ice block, the new cup sits on top, creating a permanent jam that usually forces a restart. Keep it at 4/5 filled until you are ready for the endgame.
Calculated Cup Pulling
Do not pull cups from the tray just because they are matchable. Pull them because you need to clear space for the color underneath. For example, if you have 3 Pink cups on top of a Purple cup, pull the Pink even if you don't need Pink right now. Getting to that Purple cup is more valuable for the long-term strategy.
Identifying "Key" Ice Blocks
Not all ice is created equal. Prioritize Ice Blocks that are adjacent to the largest number of "clogged" cups. The Left Ice (9) is low HP, making it an easy win to get early momentum. The Bottom Ice (22) is high HP but critical because it unblocks the flow for the final 20% of the level.
Making Use of "Dead" Matches
Sometimes you will have a cup on the belt that doesn't match the current canvas area you are painting (e.g., a Yellow cup when you are painting the Purple mountains). Instead of letting it clog the belt, pour it into a "disposal zone" (a corner of the canvas that will be covered up later) or use it to trigger a combo to break ice faster. Efficiency is about converting "useless" cups into "ice damage."
Common Mistakes to Avoid
Players often fail Level 99 due to impatience. Here are the specific errors that lead to a "Game Over."
Mistake #1: The "Early Bird" Sky Paint
The Error: Painting the Yellow sky at the start because "it's at the top of the picture."
The Consequence: When you inevitably pour the heavy Purple mountains later, the purple sand will slide down and cover the yellow sky, turning it greenish-brown.
The Fix: Trust the physics. Paint from bottom (Purple) to top (Yellow).
Mistake #2: Ignoring the Key Triggers
The Error: Focusing only on the canvas and ignoring the supply tray.
The Consequence: You run out of Purple cups. The conveyor becomes full of unusable Pink cups. The game stalls because you have no way to break the ice blocking more resources.
The Fix: Check the supply tray every 10 seconds. If you see a key exposed, prioritize getting it, even if it means pausing your painting for a moment.
Mistake #3: Overloading the Conveyor
The Error: Pulling 5 cups of the same color (e.g., 5 Pinks) to try to "combo" them.
The Consequence: While you are pouring the first 3, the canvas fills up. You are now left with 2 cups you can't pour, blocking the slot for the color you actually need next.
The Fix: Pull in batches of 2 or 3. Re-evaluate after every batch.
Mistake #4: Wasting Ice Breaks
The Error: Making matches that break ice blocks you don't need yet (e.g., breaking the bottom ice early when you are still painting the top sky).
The Consequence: You flood your belt with heavy base colors (Purple) when you need light colors (Yellow), causing a color clash on the belt.
The Fix: Only break ice when you are ready to use the color it unlocks.
Stuck Solutions & Speed Run Tips
If you are stuck at 90% or looking to shave seconds off your time, these advanced tactics will help.
What to Do If You Get Stuck at 90%
Symptom: The canvas is mostly full, but you have no matching cups, and the remaining ice is too thick.
Solution: Create a "Controlled Spill." Pour your remaining mismatched cups into the center of the canvas to artificially raise the pile. This often reveals a new layer of cups on the tray or creates a new color match opportunity on the canvas edges. Don't try to be perfect; fill the volume to trigger the end-game animation.
Speed Running: The "Burst" Method
For the fastest time (under 3 minutes), ignore the "perfect" silhouette strategy.
1. Hammer the Left Ice (9) immediately in the first 30 seconds.
2. Flood Purple until the meter hits 40%.
3. Alternating Pour: Do not wait for sand to settle. Pour Orange, then immediately Pink, then immediately Yellow in a rhythmic 1-2-3 beat. The colors will blend slightly, but in Speed Run mode, volume fills the meter faster than aesthetics. The game is forgiving if you fill the meter quickly.
Using "Pause" to Plan
Sand Loop allows you to pause without penalty. Use this! Pause the game the moment the level loads. Look at the tray. Memorize where the keys are. Plan your first 10 moves. Unpausing to execute a pre-planned sequence is 50% faster than reacting in real-time.
The "Reset" Rule
If you make a mistake in the first 60 seconds (e.g., pour Yellow first), hit Restart immediately. Do not try to fix it. The color physics in Level 99 are unforgiving. A bad foundation cannot be covered up. A restart costs 30 seconds; trying to fix a bad paint job costs 5 minutes and usually fails anyway.